Tag: Workouts
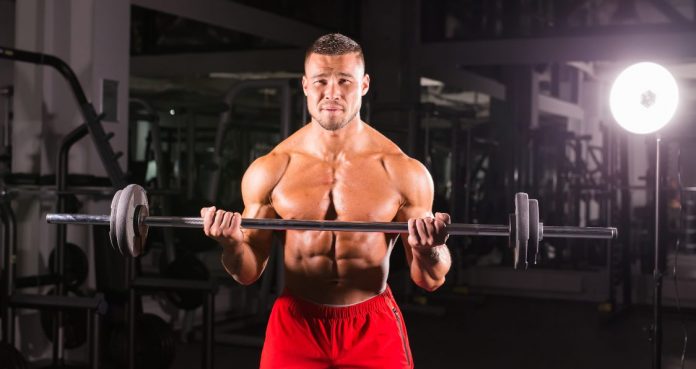
How To Perform the Perfect Barbell Curl
The Essential Exercise for Building Upper Arm Size
While exercises like barbell curls should be part of a strength training program, they are perhaps of secondary importance in comparison to a range of compound exercises such as squats, pulls, and presses.However, this is not to say that they are unimportant or unnecessary as the barbell curl can successfully bring about a significant change in the size of the biceps.Furthermore, working the biceps through exercises like the barbell curl can have a consequent impact on strength, power, general fitness, and aesthetics.This article will review the barbell curl, the specific benefits associated with the exercises, and a number of curl variations that you can add to your training.
Barbell Curl Technique & Muscles Work
Considering the fact that the barbell curl is an isolation exercise, the movements place a great amount of stress on only one muscle group – the biceps.However, the forearm muscles are also isometrically contracted as a result of gripping the bar. This simply means that the muscles are activated but are not changing in length.
The following 5 steps will allow you to complete the barbell curl in an effective manner and facilitate changes in bicep and forearm strength and size.
1) Stand Upright
Start by grabbing the bar using an underhand grip that is slightly wider than the hips. Be aware that grip widths may vary depending on your physical characteristics.Stand up with the bar in hand, lift the chest, pull the shoulders back and squeeze the shoulder blades together.It’s highly important that the shoulders remain pulled back throughout the barbell curl to ensure that a maximal load is placed on the biceps.
2) Squeeze the Bar
A common mistake is failing to squeeze the bar tightly during the curl. This often causes the elbows to flare out, the chest to drop and the shoulders to move forward.Gripping tightly will keep the hands supinated (palms out) and consequently prevent the elbows from flaring. Allowing flaring will turn the exercise into a shoulder-dominant movement which is not ideal. To maximize the load on the biceps, facilitate better form and develop fuller looking arms, focus on squeezing the pinkies on the barbell and imagine you are attempting to break the bar.
3) Curl Up and Out
When executing the curl, focus on keeping the bar away from the torso rather than tight to it. Ideally, the elbows should be slightly in front of the line of the shoulders.As you curl upwards, prevent the shoulders from shifting out of position – they may want to come forward as the bar rises.
4) Focus on the Squeeze
When reaching the top portion of the barbell curl, ensure that you do not curl the bar too far. Bringing the bar up to the chest will suffice.If you continue to curl up to the shoulders and allow the elbows to shift away from the sides, you will find that the tension on biceps will dissipate and the shoulders will become involved.The goal should be to maintain tension through the biceps, therefore, ensure you reach chest level and concentrate on the bicep contraction at the top of the movement.
5) Control the Descent
As mentioned in the last point, it is imperative that tension is maintained on the biceps throughout the duration of the exercise.Therefore, avoid rushing the eccentric lowering phase to maximize bicep tension. As you reach the bottom of the rep, avoid relaxing and fully straightening the arms to maintain tension.Focus on keeping your hands slightly in front of the body at the very bottom of the curl – this should prevent you from dropping the bar too far.
Benefits of the Barbell Curl
There are a number of reasons to incorporate the barbell curl into your training program. This section will consider 4 primary benefits associated with the exercise.
1) Stronger Grip
As highlighted, the barbell curl is not only an effective exercise for the biceps but the forearm muscles too. Increasing the strength of the forearm muscles will help to develop grip strength.The stress and strain placed on the forearms during the barbell will cause a significant adaptation and improve grip strength and wrist strength & stability.Enhancing these components will help with other resistance exercises that require a large degree of wrist and grip strength. Prime examples are the deadlift, loaded carries, hanging exercises, and weightlifting.
2) Injury Prevention
The biceps are responsible for bringing about flexion of the elbow joint as well as stabilizing and assisting in carries and pulling exercises.Having weak biceps can increase your risk of sustaining an injury to the biceps or the elbow as well as contributing to issues with grip thus negatively impacting your performance will certain exercises.Therefore, it is clear that incorporating bicep-orientated exercises like the barbell curl into your training is key for building strength and reducing the risk of sustaining an injury.
3) Increased Upper Body Size
Using the barbell curl as an accessory in conjunction with other accessory moves such as presses, dips, and rows can significantly impact overall upper body strength and size.Any lifter who is looking to gain weight in order to move up a weight class or improve for aesthetic reasons should consider incorporating barbell curls into their program.Likewise, those who are lacking in upper body strength and size and those who aspire to improve grip strength and joint health will benefit from the barbell curl.
4) Bigger Arms
The barbell curl is considered the ultimate bicep exercise for good reason and the most evident benefit associated with the barbell curl is an increase in upper arm girth.One of the biggest benefits of the barbell-based exercises is that the barbells allow you to lift the heaviest load possible (1) which causes the muscles to rapidly adapt in strength and size.Finally, as reflected on, developing the biceps not only has a positive impact on performance and joint health but having bigger arms may allow you to draw even more strength.
[embedded content]
Barbell Curl Variations and Alternatives
This section will provide detail on a number of barbell curl variations and alternatives that can be used to develop bicep size and strength.The variations and alternatives listed can be used if you find that progress has stalled with the barbell curl, need to add volume or are simply looking to freshen up your training.
Variations
1) Eccentric Barbell Curls
Emphasizing the eccentric phase of the barbell curl is one method of overloading the biceps and cause a large amount of damage to the muscle.Studies have found eccentric training to be a highly effective method for improving muscular size (2).For the eccentric barbell curl, complete the concentric phase as normal but lower the bar in a controlled manner back to the hips. This lowering phase should last 3-5 seconds.
2) Tempo Barbell Curls
The tempo curl is very similar to the eccentric method, however, the control can be applied to the concentric phase as well as the eccentric phase.The goal of this method is to maintain time under tension which has been found to be highly important in muscle mass development (3).A range of tempos can be used in tempo training however, considering that the goal is to increase time under tension, focus on 3-5 seconds per contraction.
3) Seated Barbell Curls
The seated variation of the barbell curl removes the bottom portion of the lift and entirely focuses on the upper portion.Because the range of motion is restricted, it is possible to lift a greater load with the seated barbell curl which can increase the demand placed on the biceps and cause a greater adaptation.
Alternatives
1) Hammer Curls
The hammer curl is a well known and renowned exercise for bicep and forearm development. The exercise targets the muscles of the arms from a different angle to help stimulate growth.The hammer curl is most commonly performed with dumbbells which are curled upward while being held in a neutral position (palms facing inwards). Although barbells have been found to highly activate the biceps most highly in the curl (4), dumbbells certainly have their benefits, specifically in terms of stability.
2) Preacher Curls
The preacher curl can be performed with a range of different pieces of equipment – barbells, EZ bars, and dumbbells.The exercise involves placing the upper arm onto an angled bench which entirely isolates the biceps by preventing the upper arms from moving.
3) Chin Ups
Although the chin-up is a compound exercise that works the lats as well as the biceps, it is a highly effective exercise for building strength and size in the arms.The exercise involves using an underhand grip on a pull-up bar and hanging. From the hanging position, pull hard so that the body rises up to the bar before dropping back down to the starting position.
Final Word
There is no doubt that the barbell curl is a highly effective developer of the biceps and should be especially be utilized by athletes and lifters who are looking to improve grip strength, arm strength & size and reduce the risk of upper extremity injury.
References:
1) Saeterbakken, Atle H.; van den Tillaar, Roland; Fimland, Marius S. (2011-03). “A comparison of muscle activity and 1-RM strength of three chest-press exercises with different stability requirements”. Journal of Sports Sciences. 29 (5): 533–538. doi:10.1080/02640414.2010.543916. ISSN 1466-447X. PMID 21225489.
2) Franchi, Martino V.; Reeves, Neil D.; Narici, Marco V. (July 4, 2017). “Skeletal Muscle Remodeling in Response to Eccentric vs. Concentric Loading: Morphological, Molecular, and Metabolic Adaptations”. Frontiers in Physiology. 8. doi:10.3389/fphys.2017.00447. ISSN 1664-042X. PMC 5495834. PMID 28725197.
3) Burd, Nicholas A; Andrews, Richard J; West, Daniel WD; Little, Jonathan P; Cochran, Andrew JR; Hector, Amy J; Cashaback, Joshua GA; Gibala, Martin J; Potvin, James R; Baker, Steven K; Phillips, Stuart M (January 15, 2012). “Muscle time under tension during resistance exercise stimulates differential muscle protein sub-fractional synthetic responses in men”. The Journal of Physiology. 590 (Pt 2): 351–362. doi:10.1113/jphysiol.2011.221200. ISSN 0022-3751. PMC 3285070. PMID 22106173.
4) Marcolin, Giuseppe; Panizzolo, Fausto Antonio; Petrone, Nicola; Moro, Tatiana; Grigoletto, Davide; Piccolo, Davide; Paoli, Antonio (July 13, 2018). “Differences in electromyographic activity of biceps brachii and brachioradialis while performing three variants of curl”. PeerJ. 6. doi:10.7717/peerj.5165. ISSN 2167-8359. PMC 6047503. PMID 30013836.

5 Reasons Why You’re Not Building Muscle
Top 5 reasons your (probably) not building muscle.
Bodybuilding isn’t an easy sport. Many people give up working out before they see any results. These people either blame their genetics for their inability to build muscle or throw out the “too busy to workout” excuse.
While bodybuilding can be hard, it is not rocket science. If you do all the things right, you will be on your way to building your dream physique. These could be the 5 reasons why you’re not building muscle mass.
1. You’re A Hardgainer
If you’ve not been able to build muscle mass, there could be chances you’re a hardgainer. It can be more difficult for a hardgainer to build muscle mass because of a variety of reasons which we will discover in this article.
You might start out skinny but you can pack on considerable muscle by breaking out of the hardgainer hell by following tips mentioned in this article. Don’t let being a hardgainer be an excuse for taking it easy in the gym.
2. Your Muscles Have Adopted To Your Workouts
Many people have the habit of the following the same workouts. Although doing this could be convenient but it will hurt your gains in the long run. In order to build muscle, you need to constantly shock your muscles.
Change your exercises every 2-3 weeks to see optimal gains. If you have a problem coming up with new exercises, you could follow one of the training programs available for free online or hire a trainer to design a personalized training program for you.
3. Your Diet is Not on Point
Depending on your body weight and your goals, your body needs macro and micronutrients to grow. If you’re not meeting your daily required nutrition goals, you will not see any progress.
If your goal is to build muscle, you should be consuming two grams of protein per pound of bodyweight to see results. For eg – if you weigh 70 lbs, you should be taking 140 grams of protein every day. If you don’t know how to make your diet plan, take the help of a professional.
4. Lack of Recovery
No matter how hard you workout, you won’t see results until your body recovers from your workouts. You don’t build muscle in the gym. Your muscles break down when you lift weights. Your muscles grow when you’re in deep sleep.
You need anywhere between 6-8 hours of sleep every night to recover from your workouts. Joint pains and prolonged muscle soreness are a sign of lack of recovery. Supplements can be an effective way to recuperate from your workouts.
5. Indiscipline
Bodybuilding is a sport which needs military-like discipline in all respects. You need to follow a regime with your training, diet, and rest. Following a program is the best and the fastest way to reach your goals.
You should follow a schedule for your workouts and diets. You should hit the gym at the same time every day because doing this will help your body respond better to your workouts. By being inconsistent with your training, diet, and rest, you are leaving gains on the table.
Are you a hardgainer? Let us know in the comments below. Also, be sure to follow Generation Iron on Facebook and Twitter.
6 Floor Presses Your Program Needs
Here are six floor presses to try during your workout program.
The floor press has gained notable popularity over the years. What started as a powerlifting staple has now become increasingly recognized among regular gym-goers. And for good reason, since the floor press comes with a myriad of benefits.
The reduced range of motion lessens the burden on the shoulders substantially, when compared to the bench press. Not only that, laying on the floor minimizes excessive arching in the lumbar area. So, if you ever experience low back pain when benching, floor presses may be the prescription you’re looking for.
But the benefits of floor presses don’t start and end with pain prevention. They’ll increase your lockout strength in the bench press while slapping meat on your triceps. You’ll get bigger, stronger, and feel less banged up from training. Pretty good deal, eh?
Oh, and no need to worry if the gym’s crowded and all the benches are taken. Just find some floor space and get to work.
Floor Press Variations
There’s an endless list of floor presses to meet your individual training goals.
1. Single Arm Floor Press
If you’re like most gym-goers, you go to the gym with the intention of doing core at the end of your workout, but to no avail. So, why not combine it with your lifting? At the end of the day, every lift is a core exercise if you’re doing it right and using appropriate (i.e. heavy enough) weights.
This single arm floor press really hammers your core given the offset nature of the movement. By pressing with one arm at a time, you’ll feel your core fire up almost immediately to help you counterbalance throughout your set.
Not only does this kill two birds (combining press and core into one), it’s way easier to set up as opposed to holding two dumbbells. Which can be pretty limited in nature as you start to lift heavier weights and don’t have anyone there to hand you the dumbbells.
To perform the single arm press optimally, you want to create as much tension as possible while reaching up to the ceiling with your free arm. Keeping your legs straight, as you’ll see with every type of floor press, minimizes lower body assistance. Thus, placing higher demand on your triceps and core to do the majority of the work. The closer your legs are, the more challenging it becomes.
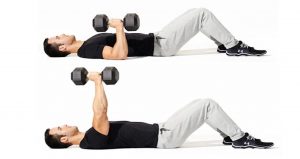
2. Floor Press with Hip Bridge
On the opposite side of the coin, you can add a hip bridge to your floor press to offer even greater leg drive than the bench press. By raising your hips off the floor as you press, you’re incorporating your lower body and, as a result, should be able to press more weight. Not only that, you’ll simultaneously be working on that pancake ass of yours.
Flex your feet with just your heels touching the floor for more glute activation. Keep your feet flat on the floor while you bridge to incorporate the quads. Both are great, so pick whichever one meets your individual goals.
3. Dead Bug Floor Press
Here’s another 2-for-1 special to tackle your core during the floor press. All credit goes to Tony Gentilcore for this gem.
Dead bugs are important, and chances are you’re not doing enough of them. And although I understand you’d rather watch paint dry while waiting in line at the post office, you should still find a way to add them into your training. Your lower back will thank you, your main lifts will skyrocket, and you’ll be able to take your shirt off without looking like a bag of milk.
The first variation you saw trains the anti-rotation and stability functions of the core. In this case, you’re training the anti-extension aspects of the core musculature by combining the dead bug with the floor press.
When extending your opposite leg out during the press, be sure to exhale heavy for a 3-5 sec count. Pretend you’re trying to blow out a candle that’s 10ft away from you. This will ensure you’re creating and maintaining abdominal tension and thus, providing a support system for the lower back.
You won’t be able to lift as heavy as you normally could with regular floor presses, and that’s the point. So don’t get too bent out of shape if you have to leave the ego at the door and go for the lighter dumbbells.
The key cues you want to focus on here during the dead bug floor press are exhaling heavy as you press the weight up, maintaining a flat lower back against the floor, and keeping tension in the core throughout your entire set.
4. Swiss Bar Floor Press
The neutral grip of the Swiss bar externally rotates the shoulders (as opposed to the internal rotation you’d be using with the straight bar). You also have the ability to load more weight than you potentially could with dumbbells here.
5. Trap Bar Floor Press
The benefits of the Swiss bar are echoed in this trap bar variation with one added perk: grip work. The long levers of the trap bar handles turn the floor press into a forearm-intensive press variation. What’s more, the neutral handles make for a natural pressing motion. All in all, this is just a great pressing variation to add to your arsenal.
6. Landmine Floor Press
The majority of floor presses alleviate the potential shoulder stress often associated with the bench press. This landmine variation takes it a step further and mitigates elbow pain given the thick handle of the barbell collar. That said, it’s not a magic pill that guarantees pain-free elbows. Listen to your body and see professional help if warranted.
You’ll have to play around a bit to get your positioning right with this one. But once you do, you’ll wonder why you haven’t done these sooner. The guided swivel of the landmine really lets you dial in to your pecs while offering greater potential for loading in comparison to dumbbells.
For more news and updates, follow Generation Iron on Facebook, Twitter, and Instagram.

10 Best Bodyweight Home Workouts For A Chiseled Physique
Why go to a gym when you can build a Greek God physique with these home workouts?
Most people have come to believe that they need to work out with dumbbells and barbells to build muscle mass. This is why they get a gym membership when they could have conveniently trained at home.
On the other hand, some people miss out on being a part of the fitness lifestyle because their busy schedule does not allow them the luxury of going to the iron paradise.
These individuals give up on their dream physique because, by watching their favorite Instagram fitness athletes train at fancy gyms, they have subconsciously internalized that a gym membership is indispensable for a body transformation.
The Holy Grail Of Physique Transformation
All fitness enthusiasts need to hear this – Your muscles do not know if you are training at a gym or home. They do not know if you are lifting iron or using resistance bands. Muscle tissues are damaged during a workout, and they grow back bigger and stronger with the correct diet and recovery time. As simple as that.
But how do you damage muscles during a bodyweight home workout?
Progressive overload.
As your workouts advance and you get stronger, you should increase your reps, time under tension, decrease rest time between each set and exercise, incorporate advanced training techniques in your training, and push yourself to failure in every set.
Oh, so you want to know if this could lead to overtraining?
Here is the harsh truth – most lifters who train at a modern gym with fancy equipment cannot train hard enough (even if they wanted to) to hit the overtraining stage, let alone people who are training at home. So, give home workouts all you have got and forget about overtraining.
The day people learn to use their body weight as resistance, gyms will have a hard time selling memberships.
Related Read: Training Programming: Progressive Overload is Your New Best Friend
Before you begin your home workouts, make sure you:
Warm-Up
Just because you are training at home does not mean you are free to skip warm-ups. Stretching and warming up will help fire up your muscles during your workouts.
Reasons why you should never miss a warm-up session:
Lower risk of injury – According to a study, an elaborate warm-up routine can reduce your risk of injury as it relaxes and loosens your muscles.
Mental focus – With time, a warm-up routine turns into a ritual that automatically puts you in the zone.
Improves flexibility & mobility – Being more flexible can improve your range of motion.
Increased blood flow – Blood carries oxygen and nutrients to different parts of your body. Warming up loosens your muscles which results in an increased blood flow throughout the body.
Reduction in muscle tension and pain – Muscles that are warm and relaxed move with less friction and are less likely to stiffen during and after a workout.
Better performance – Studies have shown that warmed-up muscles can help you work out more effectively.
10 Best Bodyweight Home Workouts For A Shredded Body
Workouts laid out in this article are perfect for lifters of any experience level. They will help you in building muscle and core strength and losing body fat. It also includes an all-out 20-minute HIIT (high-intensity interval training) workout.
#1 – Beginner Home Workout
Squat – 20 Reps
Walking Lunges – 10 Reps (each side)
Push-Up – 10 Reps
Single Arm Bent-Over Row (Resistance Bands) – 15 Reps (each side)
Plank – 30-seconds
Jumping Jacks – 30 Reps
Time: 20 minutes
Rest: 10 seconds between exercises
Circuits: 5
Firstly, this is as easy as it gets in the home workout program. Secondly, it is not that easy – as you will soon find out.
Perform each exercise for the desired repetitions and rest for 10 seconds before starting the next exercise. Make sure you are following a full range of motion while performing these workouts. Since this is a bodyweight workout program, you will be leaving gains on the table by performing partial reps.
In each workout, you will be doing at least one advanced exercise. In this workout, you will be performing single-arm bent-over rows with resistance bands.
Steps:
Stand with your right foot ahead of the left.
Lean forward so that your torso is at a 60-degree angle with the floor.
Place one end of the resistance band under your front foot.
Rest your right forearms on your right thigh.
Grab the other end of the resistance band with your left hand.
With your hand extended down, there should be no slack in the band.
While keeping your elbow close to your body, bring your arm up to your side.
Hold and contract at the top for a couple of seconds.
Return to the starting position and complete 10 reps before switching sides.
#2 – Core Workout
Circuit A
Skater – 30-seconds
Push-Up – 30-seconds
Shoulder Tap – 30-seconds
Forearm Plank Reach – 30-seconds
Circuit B
Skater – 30-seconds
Burpee – 30-seconds
Plank Jack – 30-seconds
Plank – 30-seconds
Time: 25 minutes
Rest: No rest between exercises in a circuit; 45-second rest between circuits.
Circuits: 5
After you complete all exercises in circuit A, take a 45-second rest before starting circuit B. Repeat until you complete five rounds of the circuits. One thing is for sure – your core will be sore for at least a couple of days after this workout. Core – sore. See what we did there?
#3 – 20-Minute HIIT Home Workout
Circuits X 8
Side Kick-Through – 20-seconds
Rest – 10-seconds
Circuits X 8
Skater Hop – 20-seconds
Rest – 10-seconds
Circuits X 8
Crab Toe Touch – 20-seconds
Rest – 10-seconds
Circuits X 8
Frogger – 20-seconds
Rest – 10-seconds
Circuits X 8
Curtsy Lunge – 20-seconds
Rest – 10 seconds
Time: 20 minutes
Rest: 10 seconds between exercises
Circuits: 8
The 20-minute HIIT workout is dialed-in to the T. You cannot afford to waste a single second during this training session. It might be a little harder for you if you are a beginner as you need good stamina, endurance, and cardiovascular health for this workout.
But do not use this as an excuse to skip this workout. Push your boundaries and go as hard as you can. Remember: There are no shortcuts to building your dream physique.
#4 – 7-Minute Home Workout For Ultimate Gains
Jumping Jack – 30-seconds
Wall Sit – 30-seconds
Push-Up – 30-seconds
Crunch – 30-seconds
Step-Up – 30-seconds
Squat – 30-seconds
Tricep Dips – 30-seconds
Plank – 30-seconds
High Knees Running in Place – 30-seconds
Lunge – 30-seconds
Push-Up with Rotation – 30-seconds
Side Plank – 30-seconds
Time: 7 minutes
Rest: 10 seconds between exercises
Circuits: 1
The 7-minute workout is for people with packed schedules. No matter how time-poor you are, you can always squeeze in a 7-minute workout in your day. In fact, you could even perform this training circuit on Air Force One.
According to a 2013 study conducted by the American College of Sport’s Medicine Health and Fitness Journal, this HIIT workout improves overall fitness levels and helps with weight loss.
#5 – Bodyweight Leg Home Workout From Hell
Squat (with a towel) – 10 Minutes 15 Reps
Bulgarian Split Squat – 5 Sets 30 Seconds (each side)
Squat Jump (with floor touch) – 3 Sets 15 Reps
Bridge Kick – 10 Minutes 10 Reps (each leg)
Superset
Burpee – 10 Sets 10, 9, 8, 7, 6, 5, 4, 3, 2, 1 Reps
Jump Lunge – 10 Sets 10, 9, 8, 7, 6, 5, 4, 3, 2, 1 Reps
Time: 45 minutes
Rest: 30 seconds between exercises
Circuits: 1
No, we are not trying to kill you. But even if we were, do not forget – what doesn’t kill you, makes you stronger.
In the first exercise, hold a towel with your arms extended straight overhead. The fact that this is a bodyweight workout should not stop you from mimicking Olympic lifts.
In the first (squat with a towel) and fourth (bridge kick) exercises, set a timer for ten minutes and perform 15 reps of the exercise at the start of each minute. After completing the desired reps, rest for the remainder of each minute. Repeat the cycle for 10 minutes.
#6 – No-Equipment Arm Workout
Decline Push-Up – 15 Reps
Up-and-Down Plank – 20 Reps
Crab Crawl – 10 Reps (each side)
Diamond Push-Up – 15 Reps
Inch Worm – 15 Reps
Tricep Dips – 15 Reps
Time: 20 minutes
Rest: 30 seconds between exercises
Circuits: 3
In the home workout program, you will be working on your aesthetics as well as functional strength. A chiseled physique without functional strength is as good as a Ferrari without an engine.
The number of repetitions in this workout is only for reference purposes. You are supposed to perform each exercise until you hit failure.
While performing push-ups, pause at the top of the movement for a few seconds, and contract your triceps as hard as you can.
#7 – Bodyweight Home Workout For Boulder Shoulders
Push-Back Push-Up – 12-15 Reps
Plank to Down Dog – 12-15 Reps
Pike Push-Up – 15 Reps
Wall Walk-Up – 6 Reps
Prone T (and Y) – 10 Reps
Pro: Handstand Push-Up / Bridge Push-Up – 10 Reps
Time: 30 minutes
Rest: 30 seconds between exercises
Circuits: 3
After you are done with the bodyweight shoulder workout, you will question the need for dumbbells and barbells and going to a gym for shoulder training.
The last exercise of this workout is only for pros. While most people know what a handstand push-up is, let’s go over bridge push-up.
How to perform bridge push-up:
Lie with your back on the floor, knees bent, and feet as close to butt as possible.
Place your right hand near your right ear and your left hand near your left ear. Your thumbs should be next to your ears, and your fingers pointing towards your heels.
Push up your hips, arch your back, and press hands into the floor to lift into bridge pose.
Once you gain stability in the bridge pose, start performing push-ups by bending at your elbows and lowering your head towards the floor.
#8 – Bodyweight Home Workout For A Stirated Chest
Resistance Band Push-Up – 15 Reps
Standing Chest Press – 15 Reps
Alternating Shuffle Push-Up – 15 Reps (7 on each side)
One-Arm Push-Up (on an elevated platform) – 15 Reps (each side)
Dynamic Push-Up – 12 Reps
Time: 30 minutes
Rest: 30 seconds between exercises
Circuits: 3
For this workout, you will need resistance bands that can be anchored to a door. We highly recommend the Serious steel resistance bands for this purpose.
How to perform resistance band push-up:
Wrap a resistance band around your back so that it is placed just under your armpits.
Loop the resistance band around your hands to tighten it.
Get into a push-up position, and perform 15 reps.
How to perform alternate shuffle push-ups:
Get into a push-up position.
Move your right hand to the left until both your hands are next to each other.
Slide your left hand further left until your hands are shoulder-width apart again.
Perform a push-up.
Repeat by moving to the right this time. Alternate between sides until you complete the desired reps.
You could also incorporate TRX in your bodyweight home workouts.
Related: How To Use The TRX To Build A Bigger Chest
Also, Check Out: Best Resistance Bands For Home Workouts & Gains (Updated 2021)
#9 – Bodyweight Home Workout For A Cobra Back
Pull-Up – Failure
Suspension Row – 15 Reps
Hindu Pushup – 15 Reps
Prone Back Extension – 15 Reps
Single-Arm Resistance Band Bent-Over Row – 15 Reps
Time: 30 minutes
Rest: 30 seconds between exercises
Circuits: 3
To annihilate your back with home workouts, you will need a sturdy pull-up bar that you can install in your doorway.
Best Pull-Up Bars For At-Home Gains & Convenience 2021
The best thing about a pull-up bar is that you can perform a range of exercises on it. By adding a TRX to a pull-up bar, you can use it to train your back, arms, chest, legs, and abs.
How to perform Hindu push-ups:
Get into a push-up position.
Push your hands into the floor to drive your weight back so your hips rise into the air.
Your back should be straight and your head behind your hands.
Lower your body in an arcing motion so that your chest scoops downward and nearly scrapes the floor.
Continue moving forward as you press your body up so your torso is vertical and your legs are straight and nearly on the floor.
#10 – Full-Body Finisher Bodyweight Home Workout
Side Plank Twist – 30-seconds AMRAP
Squat Pulse – 30-seconds AMRAP
Crunch – 30-seconds AMRAP
Lying Leg Raise – 30-seconds AMRAP
Push-Up – 30-seconds AMRAP
Mountain Climber – 30-seconds AMRAP
Bicycle Kicks – 30-seconds AMRAP
Time: 20 minutes
Rest: 10 seconds between exercises
Circuits: 3
This full-body bodyweight workout will make fat melt off your body.
For each exercise, you will perform as many reps as possible (AMRAP) in 30 seconds. You are allowed a 10-second rest between exercises and a 30-second rest between circuits.
Conclusion
Although these are home workouts, you could do these anywhere, even when you are traveling. You might have to purchase a few pieces of equipment (like resistance bands and a pull-up bar) for this workout but look at them as long-term investments. The dividends alone will be more than what you pay for the equipment.
How often do you workout at home?
Let us know in the comments below. Also, be sure to follow Generation Iron on Facebook, Twitter, and Instagram.
The Best 3-Move Workout For Huge Triceps
Essentials Components for Tricep Growth
Maximizing the time spent in the gym is important, especially for those who find that they are tight on time. Trying to manage time while simultaneously ensuring that you are getting enough training volume to bring about change, can be challenging.Common methods of time-saving include using restricted rest times, supersets, tri-sets, and giant sets which allow an individual to work through a greater amount of volume in a shorter time-frame. This article will cover the best exercises & equipment, time under tension and will finish with an excellent 15-minute workout for building tricep size.
Exercise Selection
When it comes to exercise choice, the types of exercises you select should be based on the training goals that you currently have. There are two categories of exercise that should be considered – compound and isolation exercises. While both are effective, they have unique uses and benefits in strength training.Compound exercises are simply exercises that activate a range of muscles across a number of joints. Some examples of compound exercises include the deadlift, squat, and bench.Meanwhile, isolation exercises focus on one muscle group across only one joint. Some examples of isolation exercises include the tricep pushdown, bicep curl and front raise.While both types of exercises have been found to be beneficial for both strength and muscle hypertrophy (1), both have specific uses in resistance training.Compound exercises will certainly be most beneficial in terms of pure strength development considering that it is possible to lift heavier loads with the majority of compound movements.Isolation exercises are highly beneficial for ironing out any weakness and imbalances that may exist. They can also be used to target specific areas that are proving problematic.Finally, because isolation exercises place all the stress on one muscle group, it is possible that these muscles will respond more quickly thus leading to an increase in strength and size.The best training programs focus primarily on compound exercises and use isolation exercises supplementally in order to facilitate and accelerate the rate of change.
Equipment Selection
In terms of equipment, it would be wrong to suggest that one piece of kit is better than another. Instead, a combination of equipment should be used for the majority of training programs.In the following workout, every exercise is to be completed using the resistance band cables as they allow for a greater degree of muscular control.The reason why barbells and dumbbells are not used for this workout is that, although typically more weight can be lifted, muscle tension is not consistent throughout the range of motion. This is not to discredit barbells or dumbbells as they absolutely have their place in resistance training – however, as will be discussed in the following point, cables more efficiently maintain tension on the muscle.
Time Under Tension (TUT)
Time under tension or TUT is a very common exercise principle that is often used by those looking to build significant muscle growth. The TUT technique involves manipulating tempo to increase muscular tension (2). The three mechanisms of muscular hypertrophy are mechanical tension, muscle damage, and metabolic stress (3).The principle behind the TUT technique is to increase the amount of mechanical tension which will consequently increase the amount of muscle damage and metabolic stress.Causing muscle damage and metabolic stress will prompt a response from the body to begin the recovery process. It is this recovery process that causes an increase in strength and size.Often, individuals rush through repetitions too quickly which is not ideal when we consider the mechanisms behind hypertrophy.Finally, as referred to earlier, the reason that cables are used in this workout comes down to their ability to maintain tension on the muscles throughout the duration of the exercise.Therefore, the cables are the perfect option for all time under tension work.
Nutrition Considerations
While all of the above points are very important, they will not make a significant difference on muscle growth if your nutrition is not right.For muscle growth, there are two key considerations to be made – calorie and protein consumption. Both are needed in high quantities in order to enhance recovery and onset muscle growth (4).
Three Moves for Bigger Triceps
There are 3 simple tricep isolation exercises that are to be performed and the workout follows a very simple structure – 3 exercises, 5 sets x 15 reps and 20-second rests.The short rest between sets means that you are likely to generate a significant muscle pump – perhaps more so than you would if you were to perform 6 conventional exercises.In terms of weight, start with a light load. It may feel far too light during the first set however, because of the restricted rest periods, it’ll feel super heavy by set 4 & 5.Each set should take approximately 25-30 seconds which consequently means that the entire workout should take no longer than 15 minutes.It is recommended to complete this workout after completing a chest day or to pair it with bicep work.
Exercise
Sets x Reps
Rest
Tricep Pushdown
5 x 15
20 sec
Reverse Grip Tricep Pushdown
5 x 15
20 sec
Cable Lying Tricep Extension
5 x 15
20 sec
Technique Tips
It’s important to remember that each of the exercises in this workout is an isolation exercise. Therefore, to effectively isolate the triceps, movement should only be generated around the elbow joint.It’s not uncommon to see individuals moving through the shoulder to assist in this exercise. Additionally, on occasion, the hips may also shift in order to help drive the movement.When this occurs, it can reduce the amount of tension placed on the triceps and move it onto other muscle groups. Therefore, all movement out with elbow flexion/extension should be eliminated.
Tricep Pushdown
For the pushdown, set up the pulley to a high position, attach the rope and grip it using a neutral grip (palms facing each other).In the start position, the hands should be approximately in line with the height of the shoulders. Tuck both elbows tightly into the ribcage and lift the chest prior to pushing down.Drive the load down to the hips by hinging at the elbows only. Ensure that you squeeze the triceps tightly at the bottom of the movement in order to maximize time under tension.In addition, control the eccentric (or negative) portion of the movement and avoid the temptation to rush through each and every rep.When you reach the top of the rep, feel free to let the elbows shift forward very slightly to maximize the stretch of the triceps.The first set of your pulldowns should feel very manageable and set 2 & 3 should feel like warm-up sets.It is with set 4 and 5 that the triceps will really start to fatigue and burn. As fatigue builds, focus even more so on technique as fatigue can begin to interfere with how you move.
Reverse Grip Tricep Pushdown
Having completed the conventional tricep pushdown, immediately move into the reverse grip pushdown to keep the blood flowing to the tricep muscles.Quickly swap the rope for the bar attachment and take up an underhand grip on the bar. This change of grip will cause greater activation of the long head of triceps.The movement pattern of the reverse grip pushdown is exactly the same as the conventional pushdown, the only difference being the grip used.This time, focus on the backside of the upper arm and keep each rep controlled to maximize the stretch on the muscle.As with the conventional pushdown, remember to squeeze the tricep at the bottom of the exercise.
Cable Lying Tricep Extension
The final exercise, the cable lying tricep extension, places a great stretch on the triceps as a result of the mechanics involved in the exercise.For the cable lying tricep extension, set a flat bench in front of the pulley and bring the pulley down to a low position.Look to keep the upper arm in a vertical position and focus on flexing and extending the elbows.To maximize the tricep stretch, it is imperative that each rep is kept controlled throughout. Take your time as you flex the elbows before extending and slowly squeezing the triceps.Often with this exercise (and the majority of tricep exercises), individuals jerk the weight rather than focusing on maintaining control.Remember that the entire purpose of this workout is to increase time under tension. By performing quick and uncontrolled repetitions, you will fail to effectively do this.Take your time with the movements and keep the tempo slow. If you do this effectively, you will really feel the triceps burn!
Final Word
Significant changes in muscle size will occur providing ample protein and calories are consumed and in conjunction with a well-planned resistance training program.
Considering the important role that time under tension plays in causing muscular hypertrophy, this 15 minute, 3-move tricep workout can increase the size of the triceps.
References:
1-Gentil, Paulo; Soares, Saulo; Bottaro, Martim (2015-6). “Single vs. Multi-Joint Resistance Exercises: Effects on Muscle Strength and Hypertrophy”. Asian Journal of Sports Medicine. 6 (2). doi:10.5812/asjsm.24057. ISSN 2008-000X. PMC 4592763. PMID 26446291.
2-Wilk, Michal; Golas, Artur; Stastny, Petr; Nawrocka, Monika; Krzysztofik, Michal; Zajac, Adam (June 13, 2018). “Does Tempo of Resistance Exercise Impact Training Volume?”. Journal of Human Kinetics. 62: 241–250. doi:10.2478/hukin-2018-0034. ISSN 1640-5544. PMC 6006544. PMID 29922395.
3-Schoenfeld, Brad J. (2010-10). “The mechanisms of muscle hypertrophy and their application to resistance training”. Journal of Strength and Conditioning Research. 24 (10): 2857–2872. doi:10.1519/JSC.0b013e3181e840f3. ISSN 1533-4287. PMID 20847704.
4-Stokes, Tanner; Hector, Amy J.; Morton, Robert W.; McGlory, Chris; Phillips, Stuart M. (February 7, 2018). “Recent Perspectives Regarding the Role of Dietary Protein for the Promotion of Muscle Hypertrophy with Resistance Exercise Training”. Nutrients. 10 (2). doi:10.3390/nu10020180. ISSN 2072-6643. PMC 5852756. PMID 29414855.
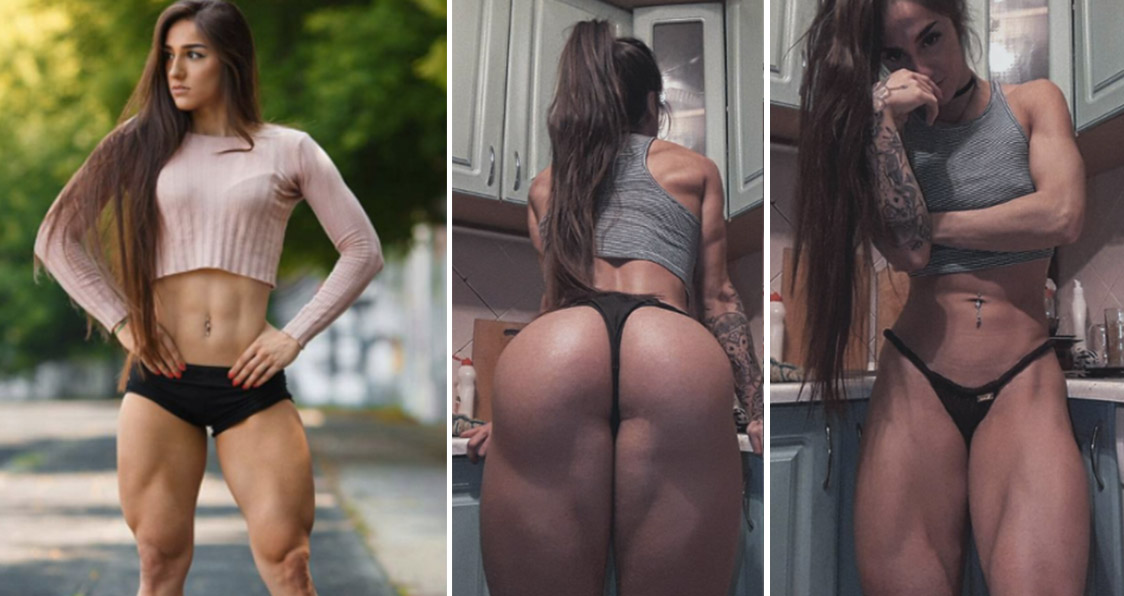
Bakhar Nabieva Workout For The Perfect Legs
Bakhar Nabieva is a 23-year old Ukranian. Nabieva arguably has the most shredded legs you will ever see on a girl. If you’re a guy and you’re reading this, you might feel a tiny bit ashamed of your wheels on seeing her.
Nabieva is the dream girl for guys who dig chicks with shredded legs and a perfectly shaped butt. Bakhar’s leg workout could easily be one of the hardest lower body routines you will go through.
Bakhar Nabieva Workout For Killer Legs
Squats – 3 Sets 12 Reps
It shouldn’t be a surprise to see squats on this list. Squats are a complete leg builder. If you have skinny legs and want to add size to them, squats are your best bet. Squats are a compound (multi-joint) exercise and will help in shaping your quads, hams, and glutes.
Squatting will add size to your legs and will make you stronger at other exercises as well. The range of motion is the key while squatting. ‘Ass to the grass’ is the way to go while squatting. Bakhar uses 80 kgs for warming up, we don’t expect the same from you.
2. Romanian Deadlifts – 3 Sets 12 Reps
Bakhar is big on training hamstrings. Hamstrings were her weakest muscle group when she started working out. Deadlifts are a compound movement and recruit multiple muscle groups.
While performing the Romanian deadlifts, maintain a slight bend in your knees and keep your back arched. While on the concentric movement, push back your glutes so all the tension is on your hamstrings.
3. Walking Lunges – 3 Sets 12 Reps
Walking lunges are an incredibly effective exercise at building the tear drop in your quads. Nabieva uses a barbell while performing the lunges. You don’t need to take long strides while performing this exercise, keep your strides normal.
While performing a lunge, the quad of your rear leg should be parallel to the calf of your front leg. Your front leg’s quad and calf should be forming a right angle. Your rear leg should be only an inch from the floor at the bottom of the movement.
4. Unilateral Hamstring Curls – 3 Sets 12 Reps
Bakhar Nabieva loves doing the unilateral hamstring curls. Hamstring curls on a machine is an isolation exercise. Using a machine helps in maintaining constant tension on the muscle throughout the exercise.
Unilateral hamstring curls involve training one leg at a time. Unilateral exercises are great at fixing muscle imbalances and building strength. You can even have a better mind-muscle connection with your hamstrings while doing the unilateral curl variation.
5. Hack Squat Good Mornings – 3 Sets 12 Reps
Hacks squat good mornings are one of Bakhar’s favorite exercises. Performing good mornings on a hack squat helps in isolating the hamstrings as compared to performing them with free weights.
You need to make sure you don’t put on too much weight on the machine while performing this exercise. Keep the reps slow and deliberate and squeeze the living hell out of your hams at the top of the movement.
What do you think of the Bakhar Nabieva workout for building an iron butt? Let us know in the comments below. Also, be sure to follow Generation Iron on Facebook and Twitter.
*Header image courtesy of Instagram
Build A Six-Pack With These 6 Moves
6 Exercises For A Shredded Core
A shredded midsection is what separates the men from the boys. You need to have your diet and exercise on point if you want to build solid abs. While it’s true abs are made in the kitchen, you need to train your core optimally to get the desired definition in your midriff.
Most people rely on a few exercises to build abs. Your core is divided into three parts; upper, middle and lower. You need to have exercises in your workouts which train all the three sections of your midriff.
1. Cable Crunches – 3 Sets 20 Reps
Using cables helps you maintain constant tension on your abs throughout the exercise. The problem with free weight exercises is, you have tension on your muscles on the concentric motion but have no tension on the eccentric motion.
Cable crunches focus on your upper abs. Make sure you keep your core tight throughout the movement. Exhale and squeeze your abs at the bottom of the movement to make the most of this exercise.
2. Crunches – 3 Sets 20 Reps
Crunches are the gold standard when it comes to ab training. The range of motion is the key while performing this exercise. You should be touching your knees at the top of the movement and lie flat on the floor at the bottom of the movement.
If body weight crunches are too easy for you, feel free to add resistance by using weights. Most people just go through the motions when doing crunches. You should keep your core tight and contract your abdominal muscles with every rep.
3. Hanging Leg Raises – 3 Sets 15 Reps
Hanging leg raises can be a brutal exercise if done correctly. This exercise work on your middle and lower abs. Fat on the lower belly can be the hardest to lose and this exercise can help you see results.
While performing this exercise make sure you’re not swinging your body. You need to keep your upper body stable and only have movement in the lower body. Hold your legs at the top of the movement and bring them back slowly.
4. Decline Crunches – 3 Sets 15 Reps
Decline crunches will set your lower abs on fire. While doing decline crunches, keep your hands on either side of your head. Don’t lock your fingers at the back of your head. Avoid using momentum to lift yourself up.
Maintain a mind-muscle connection with your abs. Exhale, contract and squeeze your abs at the top of the movement and pause at the top for a second. Slowly lower your body to the starting position and repeat.
5. Russian Twists – 3 Sets 15 Reps
Obliques are one of the most overlooked muscle groups while training abs. A midriff can never be deemed shredded if it doesn’t have ripped fish-gills like obliques. Russian twists are an incredibly effective exercise in developing your obliques.
Lie down on the floor with your knees bent and your feet four inches off the ground. Your quads and upper body should be forming an imaginary V-shape. Hold a weight plate in front of your chest while locking out your elbows. Rotate to your right side, exhale and squeeze your obliques, repeat for the left side.
6. Planks – 3 Sets 1 Minute Each
Planks have earned a name for themselves when it comes to building a strong core. Your abs will already be smoked by the time you reach this exercise. Planks can strengthen your core which will not only help in building abs but will also make you stronger at other exercises.
While performing the planks, make sure your body is in a straight line. Your hips shouldn’t be hanging low or be forming a bridge. Keep your core tight throughout this exercise and your head and neck in line with your body.
Which is your favorite ab exercise?
Let us know in the comments below. Also, be sure to follow Generation Iron on Facebook and Twitter.
Top 4 Things All Lifters Should Be Capable Of Doing
Are you a real lifter?
Many bodybuilders think it’s simply good enough to get themselves in tip top shape. You build massive muscle, cut away fat to reveal that exceptional musculature, and everything is golden, right? At least it is if you’re satisfied with simply looking the part of an athletic behemoth. But it shouldn’t be good enough to simply look the part, you should want to be just as strong and capable as your physique would suggest.
You’ve seen plenty of those kinds of bodybuilders. Men and women who look amazing, but when they’re put to the test they’re all closer to weak kittens than to what their physiques would suggest. If you’re hoping to not only build a physique that looks superhuman, but have the attributes of a truly athletic lifter, then you’re going to want to aim for these specific goals while traveling the road of a bodybuilder.
1. Bench Press Own Body Weight
First thing’s first, if you want to be considered a lifter with any merit then you should be able to bench press your own body weight. While many are incapable of doing so because of lack of strength, the vast majority who can’t usually have the trouble because they lack the technical fortitude to pull off the lift. If your grip is too wide you won’t have the leverage to complete the lift, if your grip is too narrow then your arms won’t be in the position to optimize your strength and push the weight up from your chest. The benefits are lifting your own body weight on the bench press means building functional power and strength that can be translated over to other pushing movements such as push ups and even punching power.
2. Deadlift Double Own Body Weight
For any of you that may not know this, deadlifting twice your body weight is a fairly standard goal that many fitness trainers set for their clients. So it should definitely be on your list of goals to accomplish as an athletic lifter. Obviously you won’t start out being able to lift twice your body weight, but it’s a goal to be set and a fairly common one at that. Being able to perform a deadlift of this nature translates over to overall athletic performance. You become more explosive and powerful and eventually once you’ve hit your goal of lifting double your body weight it will be only natural that you’ll look to achieve greater numbers. But even if you don’t, the benefits are extremely apparent and you’ll be as strong as an ox.
3. 30 Second Bodyweight Squat and Hold
Why should this be one of your goals as a lifter? Well, if you know anything about training then you’ll know that the squat is the king of all exercises. Being able to hold a deep and static squat for thirty seconds without using your hands of falling will certainly offer some insight into how athletic your lower body is. If you’re unable to perform this movement then it means there’s still work to be done in order to strengthen the lower half of your body.
4. Farmer’s Walk Own Bodyweight
Being able to farmer’s walk your own body weight is pretty telling of your overall athletic ability. A farmer’s walk can build functional strength throughout your arms, particularly your forearms, as well as the rest of your body. It strengthens the stabilizers and also helps to improve your overall conditioning. It’s definitely a goal that should be aimed for. There’s nothing more important than functional strength after all and like the other goals on this list, being able to not only lift but carry your own body weight for a distance is highly beneficial.
What are your fitness and bodybuilding goals?
Follow This Insane Pro Warm-Up Routine For Ultimate Gains
If you do not warm-up before a workout, you are leaving gains on the table.
Most people head straight to the resistance training section as soon as they enter the gym. They think performing a lightweight set of their first exercise is all the warm-up they need. If you are one of these people, this article will show you how this mindset is setting you up for failure.
There can be various reasons why an individual skips a warm-up. Some of the most common causes include:
tight schedule / running late
enough training experience that warm-up is not required
do not lift heavyweight
If you are one of the lifters who never has enough time to warm up, then you probably do not have enough time to work out as well. Go home and take a break. Return when you are serious about making progress.
And then there are individuals who live the #CardioLife. These people consider treadmills and elliptical machines to be warm-up exercises themselves.
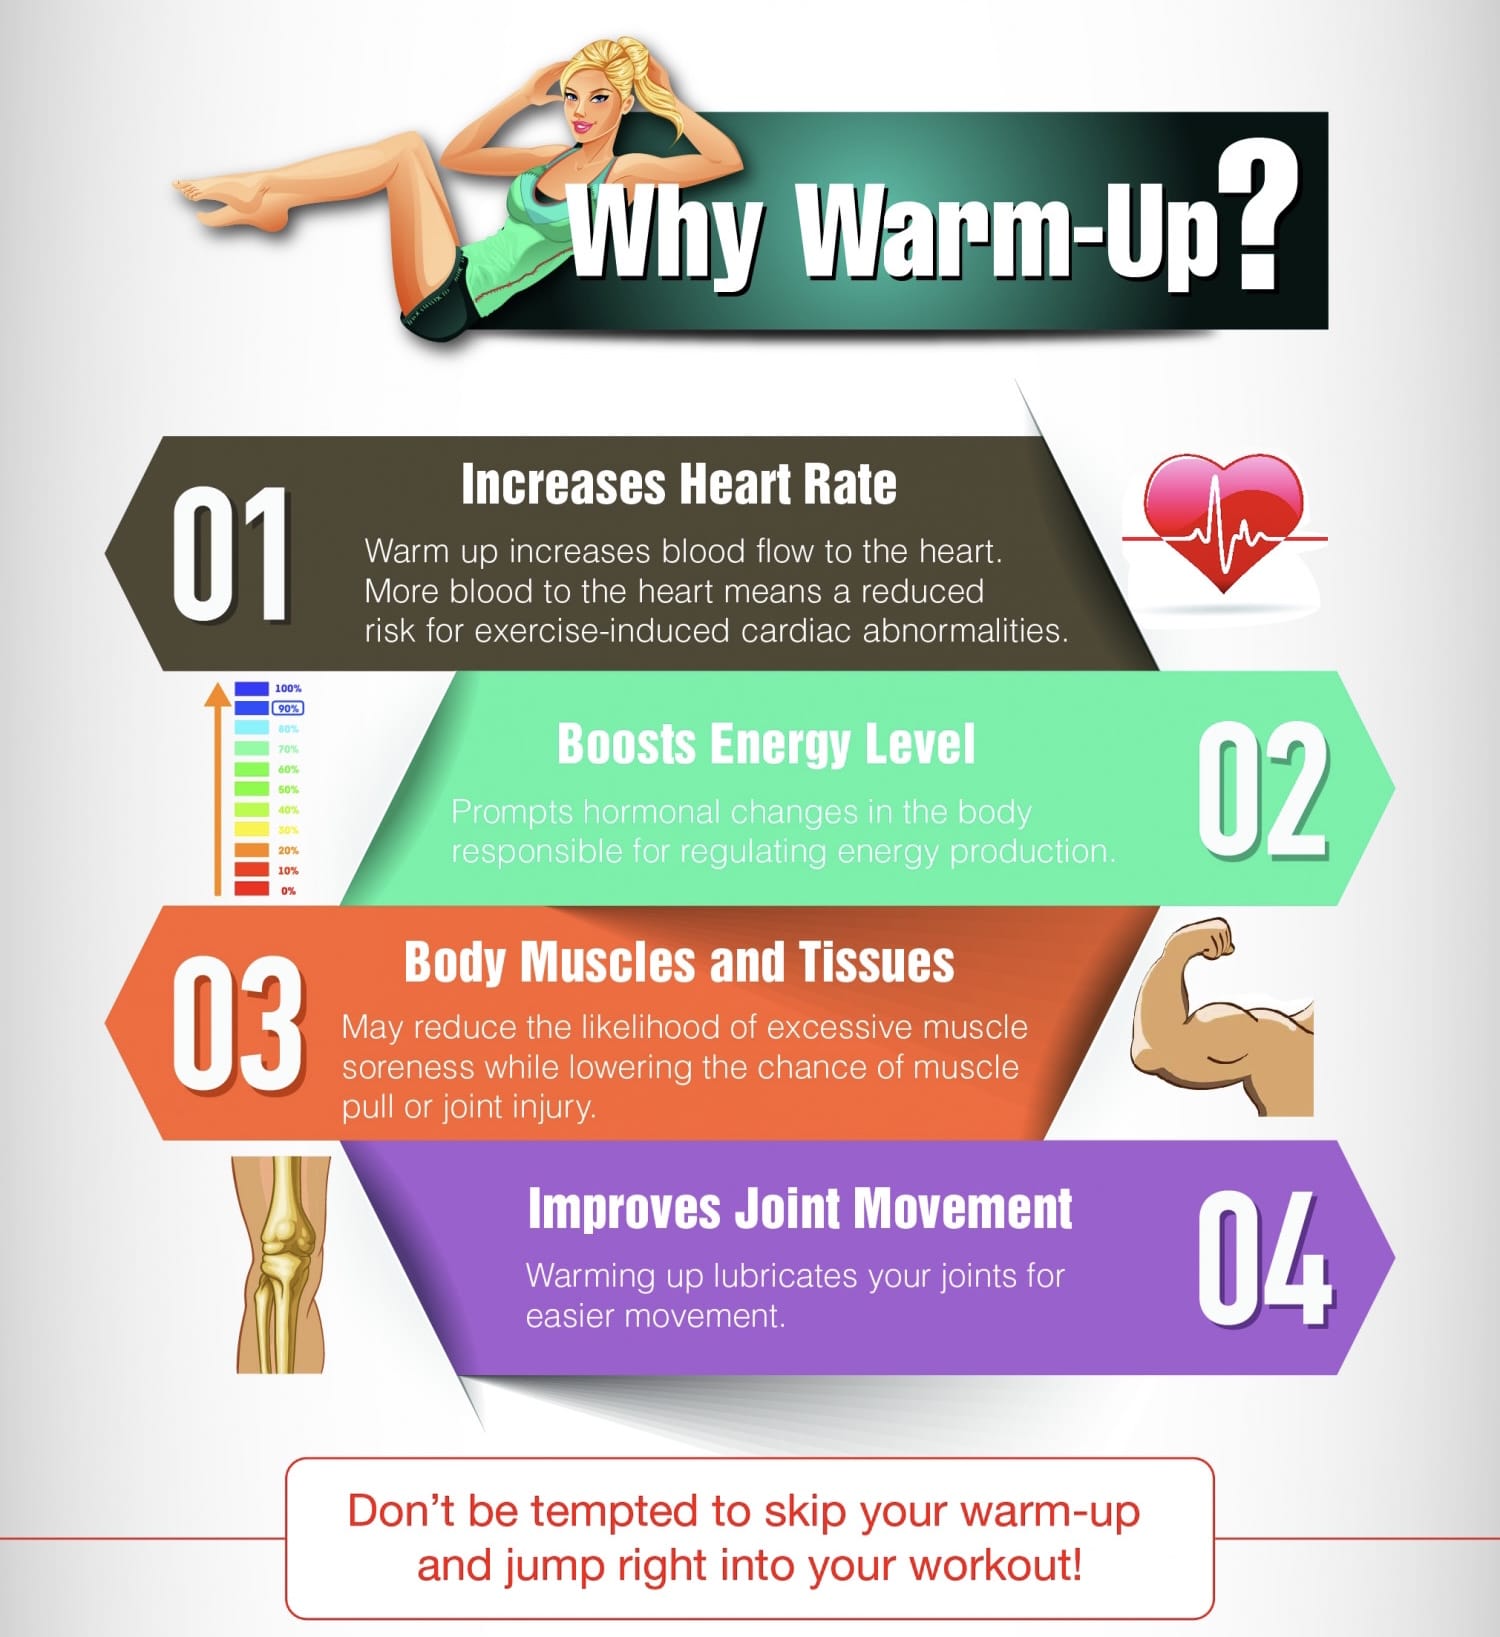
Why Warm-Up Before A Workout?
Your muscles are like rubber bands.
If you spend most of your day sitting, staring at your phone (like you are doing right now), those rubber bands have mostly gone unused. Then, if you head to a gym and immediately start lifting heavy or sprinting like it is the end of the day, unstretched rubber bands get pulled apart very quickly and might get snapped or pulled out of shape.
If you engage in high-intensity training (resistance or cardiovascular), you should follow a proper warm-up routine.
Skipping a warm-up routine can put you at a greater risk of injury, or you might end up putting unwarranted strain on your muscles. Taking a few minutes to ease your muscles into exercise mode will help you reap many fitness rewards in the long run.
Benefits of Warming-Up Before Your Workout
1. Improves Flexibility
Stretching out your muscles before a workout can improve your flexibility. Better flexibility can help improve your body posture and balance that can, in turn, help you exercise correctly.
Related Read: Flexibility Vs. Mobility: The Difference You Need To Know
2. Less Muscle Tension and Pain
Relaxed and warmed-up muscles move with less pain or stiffness.
Check Out: Best Foam Rollers For Muscle Recovery
3. Enhanced Performance
Numerous studies have proved that warmed-up muscles can help you work out more effectively. When you warm up before a workout, you are priming your muscles for the mayhem that is to follow.
4. Improved Range of Motion
Warming up before a workout can loosen up your muscles. A better range of motion in your joints can help achieve greater muscle fiber recruitment.
Related: Full Range Of Motion Vs Partials: Which Is The Way To Go?
5. Increased Blood Flow and Oxygen
Nutrients that you eat travel to all parts of your body via the blood. A better blood flow can help your muscles get the pre-workout nourishment they need before you begin intense training.
6. Lower Risk of Injury
This is one of the biggest reasons why you should never skip a warm-up session before a workout. According to a study, warming up can help relax your muscles which, in turn, can lead to a lower risk of an injury.
If you want to reach the pro level, you should spend at least 15-minutes warming up before a workout. And no, warm-ups do not have to be boring. If your warm-ups are limited to shoulder rotator cuff movements, you have been doing it all wrong. More on this later in the article.
Dwayne “The Rock” Johnson’s warm-up sessions range between 30-45 minutes. That’s more than the total time most people spend on their workouts.
https://www.instagram.com/p/BT5gTtWlbhQ/
Types of Warm-Ups
We know what you are thinking.
“Do warm-ups have to be so complicated?”
Yes and no.
In fitness, rules aren’t set in stone. What works for one might not work for the other. You will have to try a combination of different warm-ups (given below) before you can settle on what does the trick for you.
1. Static Stretching
Static stretching is the most common type of stretching. It consists of stretches held for a long period in the same position to help lengthen and loosen your muscles and connective tissue.
Few examples of static stretches:
toe touch
calf stretch
adductor stretch
Although static stretches might sound easy and convenient, they are not the best choice for you. Studies have shown that there aren’t many benefits of static stretching before workouts.
Research indicates that static stretching can decrease your potential for strength gains and performance. On top of this, static stretches do not reduce the chances of an injury.
These types of stretches can help increase your range of motion and flexibility. Static stretches are best done at the end of a workout.
2. Dynamic Stretching
A dynamic warm-up gets your body ready to work at a higher intensity. It focuses on performing movements similar to the exercises you will do in your workout.
Examples of dynamic stretches include:
hip circles
leg pendulum
arm circles
arm swings
spinal rotations
Dynamic warm-ups can help build strength, mobility, and coordination, which can all help improve your workout intensity. If this was not enough, research has shown that dynamic stretching can help reduce soreness after a workout.
An Advanced Dynamic Stretching Pro Warm-Up Circuit For Ultimate Gains
Jump rope – 2-3 minutes
Jumping jack – 50 reps
Bodyweight squat – 20 reps
Lunge – 5 reps (each leg)
Hip extension – 10 reps
Hip rotation – 10 reps (each leg)
Forward leg swings – 10 reps (each leg)
Side leg swing – 10 reps (each leg)
Push-ups – 20 reps
Spider-man steps – 5 reps (each leg)
The majority of lifters like to chat around while they are doing their warm-up. This needs to be stopped. You have to put in the maximum effort while performing these moves to ensure your muscles are ready for the main workout.
Perform one circuit of the dynamic stretching routine. Do anything more than this, and you might end up exhausted and running on fumes.
By the time you are done with the circuit, you will have broken some typical warm-up stereotypes. For a beginner, the advanced dynamic warm-up routine might be harder than the actual workout.
If you still have some gas left in the tank or want to try a different exercise, here are some of our favorite dynamic stretching exercises:
Walking jacks
Arm circles and shoulder shrugs
Marching in place
Mountain climbers
Swinging toe touches
Hip circles
We Are Halfway Through
Yes, we have only gone over half of your new warm-up routine. If you think it is too much, remind yourself about The Rock’s warm-up routine. Imagine the disappointed look on Black Adam’s face when he watches you quit during a warm-up routine.
Oh, so you are reading on. We are impressed.
Until now, we have discussed how to warm up for your workout. Now we will explore three different ways to use your warm-up routine to boost your strength so you can crush your PRs.
Three Pro Warm-Up Techniques For Superior Results
Depending on your lifting experience, the following three warm-up techniques can help improve your strength, performance, and effectiveness in the gym.
1. Overshoot Your Working Set
One of the best ways to build strength is to ramp up your low-rep sets beyond your working weight. The benefit of this technique is that when you come back down to your working weight, it will feel like you are lifting peanuts – Ronnie Coleman style.
Example: Assume that it is chest day, and your workout includes performing three sets of five reps on the bench press.
How to overshoot your working set:
Perform a few low-weight ramp-up sets.
Then perform one rep at 90-95 percent of your 1RM (one rep max). You do not want to attempt a PR on this set. Remember: this is just a warm-up.
Start your working set and drop down to your actual working weight. The weight will feel like you had been lifting feathers this whole time. It is the same feeling when you drop down the weight while performing a drop set.
This warm-up method is a way to trick your nervous system into thinking your working weight is super heavy – when it is not.
2. Incorporate Accommodating Resistance In Your Warm-Ups
Resistance bands and chains are some of the most common types of accomodating resistance tools. Their versatility allows them to be used in a variety of barbell and machines exercises.
Must Read: 4 Must-Know Facts On Lifting With Chains
Bands and chains are great tools to trick the nervous system during warm-ups. The best part about these tools is that they are easily accessible. They are common resistance accessories for serious lifters and can be found in most gyms.
Example: Using resistance bands on leg days can add a new dimension to your workouts. For improving your squat, add a resistance band to each end of the barbell, locked at the bottom of the squat rack with band pegs or looped into a knot.
How to squat using resistance bands:
Attach one end of the resistance band to the bottom of a squat rack, either through built-in pegs, looping the band into a knot, or tying it around a heavy kettlebell or dumbbell.
Add appropriate weight to the barbell you will be using. Use lighter weight as compared to what you would use on an orthodox barbell back squat as you will be facing additional resistance on the eccentric part of the lift.
Attach the top of each band to each end of the barbell.
Perform your warm-up sets. As you lower into the squat, the bands will recoil and remove additional resistance.
As you return to the starting position, the bands will engage and resist you by adding tension to your lower body.
Remove the bands after a few sets and squat with your regular working weight. You will now be able to lift heavier with better control. The instant strength gains will feel surreal.
Tip: Make sure you only use high-quality bands for resistance training. A cheap quality band can snap during the exercise leading to an injury.
Check Out: Best Resistance Bands For Home Workouts & Gains (Updated 2021)
3. Use A Thick Grip
Hand and forearm strength are often overlooked aspects of pressing movements like bench press and shoulder press. Using grip accessories like Fat Gripz can make it harder for you to hold onto a bar. Holding onto a bar with Fat Gripz results in more forearm and hand muscle fiber recruitment.
You will probably not be able to lift your usual weight for usual reps while using a grip accessory. Incorporating grip accessories in your warm-up routine can help you lift more in your working sets. You will see substantial gains in your pressing power once the grips are removed.
Related Read: Get Popeye Forearms With These Simple Forearm Exercises
How to use Fat Gripz in your warm-ups:
Attach Fat Gripz to the barbell for your warm-up sets.
Choose a weight you are comfortable with and perform your bench warm-ups as usual.
On the eccentric movement of the lift, squeeze the Fat Gripz as hard as you can. The muscles in your forearms and hands will be forced to activate at a greater intensity.
Remove the Fat Gripz.
Your hands and forearms are now ready for peak performance, and you will have a much easier time performing the lift.
You could use any of these three advanced warm-up techniques in your workout or a combination of the three lifts in a single session. You are only limited by your imagination here.
Example: Overshoot your bench press working set using accomodating resistance and a thick grip.
Conclusion
You can perform both these warm-up routines in a single workout. After you finish the dynamic stretching warm-up circuit, you could then start with the three advanced warm-up techniques.
But before you do any of this, you need to change how you view warm-ups. Warm-ups should not feel like wasted time. By following the techniques laid out in this article, you will not just warm up but fire up for greater gains.
How long is your warm-up routine?
Let us know in the comments below. Also, be sure to follow Generation Iron on Facebook, Twitter, and Instagram.
At Home Workouts With A Single Kettlebell
Ten Circuits That Build Full-Body Strength and Fitness
There has been a large spike in the number of people purchasing home gym equipment over the past few months as many gyms have been closed due to COVID-19.
As a result, people have had to think outside the box when it comes to home workouts. This is particularly true for those who only have access to a minimal amount of kit.
However, even without specific equipment, it is entirely possible to make large advancements in your fitness.
This article will begin by considering the kettlebell and the benefits of using one. It will then go on to provide ten highly effective single-kettlebell workouts that you can do at home.
Kettlebell Training At Home
The kettlebell is one of the most versatile pieces of fitness equipment that money can buy. In fact, It is so versatile that you only really need one kettlebell to enjoy a great workout.
It is an all-in-one conditioning tool that allows you to effectively work a variety of different fitness components including strength, balance, aerobic capacity, endurance, and flexibility (1).
In addition, it is also commonly used as an effective alternative to steady-state cardio. If you’ve attended any gym circuits class before you’ll likely be well acquainted with the kettlebell.
If your goal relates to muscular strength or size, the kettlebell is also an excellent tool. There are a vast number of kettlebell exercises to choose from which makes it easy to target specific muscles.
Furthermore, while there are a handful of more complicated exercises, the majority of kettlebell exercises are very straightforward and accessible for all skill levels.
Finally, unlike a number of other pieces of fitness equipment, kettlebells do not take up a vast amount of space and you will only require a small area to perform a workout.
The Ten Workouts
This section will provide ten different single kettlebell workouts that focus on developing specific fitness components or work towards particular health and fitness goals.
Pay particular attention to the recommended number of rounds and ensure to take a minute or two to rest between rounds.
1) Every Minute On The Minute
EMOM’s are a very straightforward yet highly effective workout structure that involves performing two exercises on designated minutes.For this workout, on the even minutes, you are to perform 20 alternating kettlebell swings. On the odd minutes, you are to perform alternating KB clean and presses.
If you complete the prescribed number of reps before the minute is finished, use the remaining time to rest and recover.
Exercise
Volume
Even Minutes: Alternating Kettlebell Swings
20 reps
Odd Minutes: Alternating KB Clean and Press
10 reps
2) Advanced Kettlebell Workout
For those who are highly conditioned or have lots of experience with kettlebells, the following advanced workout is recommended.
It involves a number of more complex moves such as the kettlebell high pull, lateral swing, and Turkish Get Up.
Simply work through the following session taking as little rest as possible between exercises. It is recommended to complete the circuit for three to five rounds.
Exercise
Volume
Kettlebell Clean and Press
10 reps (per side)
KB High Pulls
10 reps (per side)
KB Snatch
10 reps (per side)
KB Lateral Swings
10 reps (per side)
KB Turkish Get Up
2 reps (per side)
3) Balance and Strength Workout
By using just one kettlebell, you remove counterbalancing. When using two kettlebells simultaneously the weights counterbalance each other which enhances stability.
However, by removing one kettlebell from the equation, the exercise suddenly feels a lot less stable. Therefore, the core muscles must engage to a greater degree to promote stability.
The following workout utilizes all single-sided exercises to reduce stability to really challenge your balance and strength. For this workout, perform a minimum of three rounds.
Exercise
Volume
Front Rack Kettlebell Squat
10 reps (per side)
Heavy KB Suitcase Carry
20 meters (per side)
KB Single-Leg Deadlift
10 reps (per side)
KB Overhead Carry
20 meters (per side)
KB Windmill
10 reps (per side)
Plank with KB Pull Through
20 reps
4) Leg Burner Workout
For those looking to develop lower extremity strength and definition, the leg burner workout is the perfect choice.
The circuit incorporates an array of highly effective lower body resistance exercises in order to develop the glutes, quads, hamstrings, and calves.
With such a high number of reps, the legs will build significant fatigue, therefore, perform only two or three rounds of this workout.
Exercise
Volume
Kettlebell Goblet Squats
20 reps
Offset KB Walking Lunges
10 reps (per side)
KB Deadlift
20 reps
KB Goblet Lateral Lunges
10 reps (per side)
KB Good Morning
20 reps
KB Calf Raises
20 reps
5) Upper Body Strength
When it comes to maximizing strength, a lower rep range appears to be more beneficial than a high one (#). Therefore, the following workout utilizes a lower rep range than other workouts.
This workout has been designed for those who aspire to improve their upper body strength and general fitness and uses a combination of bilateral and unilateral exercise.Complete three to five rounds of this circuit. If needed, take additional rest periods between exercises to ensure good form is maintained.
Exercise
Volume
Single-Arm KB Floor Press
6 reps (per side)
KB Floor Pullover
12 reps
Single-Arm KB Bent Row
6 reps (per side)
KB Front Raise
12 reps
Single-Arm KB Overhead Press
6 reps (per side)
KB Upright Row
12 reps
6) Full Body Strength
In a similar fashion to the previous workout, the full body strength kettlebell workout also uses a lower rep range to optimize strength development.
Every exercise selected in this workout recruits a variety of muscle groups the length and breadth of the body.
Once again, good technique should be a top priority, therefore, take additional rest periods where required. This workout should be repeated three to five times.
Exercise
Volume
Kettlebell Goblet Squat
12 reps
Single-Arm KB Push Press
6 reps (per side)
Kettlebell Sumo Deadlift
12 reps
KB Single-Arm Renegade Row
6 reps (per side)
Single-Arm KB Overhead Lunges
6 reps (per side)
Heavy KB Suitcase Carry
20 meters
7) Deep Core Workout
Building core strength can have an array of benefits on strength, stability, movement, proprioception, and injury prevention (3).The exercises included in this workout incorporate a variety of different movements and challenge full body stability to most effectively work the deep core muscles.
It is recommended to complete this workout for a minimum of three rounds. Additional rounds can be added to increase intensity and challenge.
Exercise
Volume
KB Turkish Get Up
2 reps (per side)
Plank with KB Row
5 reps (per side)
KB Windmills
5 reps (per side)
KB Slingshot
10 reps
KB Russian Twists
10 reps
KB Sit and Press
10 reps
8) Fat Burning Workout
Fat loss is one of the most popular health and fitness goals. Although nutrition plays a massive part in fat loss, exercise can facilitate weight loss.
By performing high-intensity exercise and burning a great number of calories, the body will be forced to break down body fat stores.
This workout uses a descending pyramid training structure beginning with 40 reps and working down to 10 reps. Work through each exercise taking as little rest as possible.
Complete the following for three to five rounds.
Exercise
Volume
Kettlebell Swings
40 reps
KB Snatch
15 reps (per side)
Alternating KB Swings
10 reps (per side)
KB Clean and Press
5 (per side)
9) Swing Only Workout
The kettlebell swing is seen as the ultimate kettlebell exercise. It develops strength, speed, power, and burns a high number of calories.
One of the best things about the kettlebell swing is the fact that there are a number of swing variations. Each variation has its unique characteristics and works the body in a slightly different way.
The following workout incorporates four swing variations – the American swing, lateral swing, rotational swing, and Russian swing.
It is recommended to perform the circuit a minimum of three times. However, additional rounds can be added if desired.
Exercise
Volume
American Kettlebell Swings
30 reps
KB Lateral Swings
15 reps (per side)
One-Arm KB Swing with Rotation
15 reps (per side)
Russian KB Swings
30 reps
10) Explosive Power Workout
Leading on from the previous workout, the kettlebell swing is especially great for developing the amount of power the posterior chain can generate.
This final workout incorporates two basic plyometric exercises in conjunction with the kettlebell swing to develop explosiveness and general athleticism.
Perform this circuit three to five times. Be aware that a greater period of rest between rounds is needed for this particular workout in comparison to the others. Look to take a minimum of three minutes.
Exercise
Volume
Kettlebell Swings
20 reps
Tuck Jumps
10 reps
KB Swings
20 reps
Lateral Skater Jumps
10 reps
Final Word
Training without the use of a gym or with only minimal equipment can be challenging, however, it is by no means impossible.
As the aforementioned ten single kettlebell workouts demonstrate, it is very possible to make training enjoyable, varied, and effective, without having a lot of equipment.
References:
1 – Vancini, Rodrigo Luiz; Andrade, Marília Santos; Rufo-Tavares, Weverton; Zimerer, Carla; Nikolaidis, Pantelis Theodoros; de Lira, Claudio Andre Barbosa (2019-03-27). “Kettlebell Exercise as an Alternative to Improve Aerobic Power and Muscle Strength”. Journal of Human Kinetics. 66: 5–6. doi:10.2478/hukin-2018-0062. ISSN 1640-5544. PMC 6458586. PMID 30988835.
2 – Schoenfeld, Brad J.; Grgic, Jozo; Ogborn, Dan; Krieger, James W. (2017-12). “Strength and Hypertrophy Adaptations Between Low- vs. High-Load Resistance Training: A Systematic Review and Meta-analysis”. Journal of Strength and Conditioning Research. 31 (12): 3508–3523. doi:10.1519/JSC.0000000000002200. ISSN 1533-4287. PMID 28834797.
3 – Huxel Bliven, Kellie C.; Anderson, Barton E. (2013-11). “Core Stability Training for Injury Prevention”. Sports Health. 5 (6): 514–522. doi:10.1177/1941738113481200. ISSN 1941-7381. PMC 3806175. PMID 24427426.