Tag: Workouts

Rucking Basics for Fitness and Fat Loss
There are many different workouts you can use to get fit, lean, and healthy. And, contrary to what a lot of people will tell you, one is not better than the others. While some workouts may burn more calories per hour, the differences are marginal and easily offset by making small adjustments to your diet.
Rather, what separates a good workout from a great one is enjoyment and convenience. If you like what you are doing and can do it regularly, it’s more likely to provide results than the so-called best workout you hate and hardly ever do.
Because of that, it’s worth exploring all your workout options to find activities that fit best into your lifestyle and schedule.
In this article, we lift the lid on rucking, explaining why and how to do this popular workout.
What is Rucking?
Rucking is a military-inspired cardio workout that involves walking or hiking while carrying weight. In military circles, a ruck is a rucksack or backpack, so rucking means walking with a bag on your back.
As a cardio workout, rucking works your heart, lungs, and circulatory system. It’s an effective calorie burner and will help strengthen your core and legs. It’s a viable alternative to regular walking, jogging, running, cycling, etc., and provides a simple yet effective way to burn calories, get lean, improve your muscular endurance, and get fit.
Rucking is simple, low-tech, and effective, requiring no special athletic skills; if you can walk, you can ruck!
However, like most workouts, there is a right way and a wrong way to ruck. Mistakes can leave you exhausted and miles from home. That said, rucking is such a simple workout that such mistakes are easy to avoid, especially if you follow the guidelines in this article.
The Benefits and Advantages of Rucking
Not sure if rucking is the right workout for you? Consider these benefits and advantages and then decide!
Improved cardiovascular fitness
Cardiovascular fitness is your ability to take in, transport, and utilize oxygen, typically expressed as your VO2 max. Walking doesn’t usually have much of an effect on your cardiovascular fitness as the intensity is too low. However, that all changes when you strap on your ruck.
Rucking with weight will increase your heart rate as much as running, cycling, and other cardio workouts. As such, it can help you develop an impressively high level of cardiovascular fitness.
A higher VO2 max will make you more fatigue-resistant, help you recover faster between sets of strength training, improve your athletic performance, and may even help you live a longer, healthier life (1).
Stronger, more enduring legs
Walking briskly with a weight on your back feels very different from strolling without a backpack. It challenges your legs in a whole new way and will develop your muscular strength and endurance. Walking up and downhill is especially challenging, and as your heart rate soars, so too does the fatigue in your legs.
You can expect to feel rucking in your entire lower body, including your quadriceps, hamstrings, glutes, calves, and core.
It’s no coincidence that soldiers and long-distance hikers often have very well-develop legs. You can usually spot people who walk a lot by their well-developed (and often super-defined) calves.
An effective calorie burner
Several factors determine how many calories you’ll burn while rucking, including gender, age, speed, duration, and how much weight you are carrying. However, rucking could potentially burn as many calories as running. Walking with a weighted backpack will certainly burn more calories than walking without one.
As such, rucking can contribute to your weekly caloric expenditure and help you burn fat and lose weight. However, like all workouts, you’ll only lose weight if your diet is on-point.
Good for your posture and core
Walking is good for your posture. Firstly, it gets you up off your butt, onto your feet, and away from your keyboard or screen. Simply standing up straight can help fix your desk slouch and nerd neck.
Secondly, walking stretches and mobilizes your hips and lower back. This is also beneficial for your posture.
Finally, wearing a heavy backpack engages your deep core muscles. You must use your core to stop the pack from pulling you backward. A stronger core will also enhance your posture, as well as lowering your risk of back pain.
Accessible
You need very little equipment to start rucking. In fact, you probably have everything you need already (check out the next section for details). That means you can get started immediately and without having to buy any special equipment.
Rucking also requires no athletic skill, so it’s ideal for those with no sporting background.
As far as where to ruck, you can go anywhere you like. Put your backpack in your car and drive to the countryside or ruck around your neighborhood. You can ruck to and from work, ruck to the store to buy your groceries, or go rucking with your kids or dog – it’s a very convenient and accessible way to work out.
Remember, the best workout is the one that you can do frequently and that you enjoy. Rucking removes many of the barriers to regular exercise.
Low impact
While running is a popular cardio workout, it is not without risks. When you run, your feet hit the floor with a force equal to several times your body weight. All that impact can have an adverse effect on your feet, ankles, knees, hips, and lower back, plus all the associated muscles, tendons, and ligaments.
There is a reason that many athletic injuries are prefixed with the word running – such as runner’s knee and runner’s hip. Running-related injuries are very common.
In contrast, rucking is a low-impact activity, so despite the added weight, it puts far less stress on your joints. With a lower risk of injury, you are less likely to miss workouts because you are hurt.
Low-impact rucking is also an excellent workout for people who are overweight that would otherwise find running uncomfortable or risky.
Scalable
Rucking workouts can be modified to match your current fitness level. Start light and short, gradually increasing the weight and distance as you get fitter.
With this in mind, you can also ruck in a group of people with different abilities. For example, less fit individuals carry light packs, while the fitter members of the group carry heavier packs. With a little trial and error, everyone should be able to have a similar workout.
Sociable
Leading on from the point above, while there is nothing wrong with rucking alone, this workout is ideal for couples, families, and groups. You can ruck with your kids, your pets, your partner, or your friends.
If you enjoy group exercise classes but prefer to work out outdoors, rucking with friends could be perfect for you.
A functional workout
Functional workouts and exercises develop fitness that you can use outside of the gym. They prepare your body for the demands of daily life and sports.
For example, squats are very functional because the squat is one of the movements most people do many times each day. In contrast, machine leg curls are less functional because they aren’t an everyday movement.
Rucking is simply walking with weight, so it’s a very functional exercise. Humans have been doing it since they learned to stand on two legs.
Gear for Rucking
While rucking is a very low-tech, no-frills sort of workout, you still need a couple of things to do it.
A rucksack
The first thing you need to start rucking is a ruck, better known as a rucksack or backpack. Ideally, your ruck should be strong and sturdy, with a hip and chest strap to keep it secure on your back. The back panel and shoulder straps should be padded for comfort.
You don’t need a special rucking backpack, although such things are available. Rather, a standard hiking pack will suffice and is usually much cheaper.
Alternatively, you can wear a weighted vest. However, you’ll still need to find a way to carry water on your ruck, especially on longer workouts.
Weights
You can load your ruck with just about anything you have available. Small-denomination weight plates and dumbbells are a good option, as are tightly-sealed water bottles, bags of sand or gravel, rocks, books, and canned goods.
However, ensure that whatever you put on your ruck doesn’t poke you in the back. What started off as a mildly annoying pressure point can turn into a major pack rash when you start to get hot and sweaty. Wrap your weights in towels or old workout mats if you need extra padding.
You don’t need to buy specialist rucking shoes or military boots for your ruck workouts. However, your footwear needs to be supportive, cushioned, and comfortable. Trail running shoes are a good option, and walking shoes are another.
Regardless of what you choose, make sure your shoes don’t rub, as blisters can bring even the toughest soldier to their knees. This is not the time to wear new, untested shoes. Instead, stick with footwear you are familiar with and that you know are comfortable.
Appropriate clothing
The most important rule for rucking clothing is to dress for the elements. Wear layers when the weather is cold, and wear less on warm days to avoid overheating. Grab a wide-brimmed hat to protect your face from strong summer sunshine and warm gloves and a beanie in winter.
Remember, too, that the weather can change, and so too will your body temperature as your workout progresses. Make sure you can add or remove layers as conditions and your body temperature dictates.
And that’s all you really need to start rucking – a backpack, weights, shoes, and suitable clothes. That said, there are a couple of additional items that may enhance your workouts:
Water bottle – rucking is thirsty work. Wearing a rucksack means that heat cannot escape from your back, and your body temperate will probably increase more than usual. As a result, you’ll probably sweat more, which can lead to dehydration. Carry a water bottle and drink from it little and often to stay hydrated.
A smartwatch – handy for tracking steps, distance, and calories burned. Some can also be programmed with your rucking route.
Navigation app – downloading a navigation app to your phone means you can create and follow pre-planned routes. Navigation apps are an excellent alternative to a traditional map and compass. However, if you plan on rucking in wild country, you should also carry a map as phone batteries die, screens break, and apps crash.
Earbuds – rucking is a great way to unplug from technology and enjoy some time alone or with friends. However, if you prefer to work out to music or want to remain contactable during your ruck, earbuds will be invaluable. However, don’t turn the volume up too high, or you could fail to hear upcoming hazards, such as traffic.
First-aid kit – if you are rucking far from the maddening crowds, a first-aid kit is a must. While rucking is a very safe workout, you could still trip and fall, sprain an ankle, get snake-bit, get a blister, or otherwise get hurt. A first-aid kit means you can patch yourself up and get home safely.
Trekking poles – walking with trekking poles is very popular in Nordic counties. The poles are helpful for balance and extra traction on rough terrain and let you take some of the weight off your legs and put it on your arms. Using trekking poles turns a lower-body activity into a full-body workout.
How to Get Started with Rucking
While rucking is simple and accessible, it’s still possible to get it wrong and turn what should be an enjoyable workout into a painful nightmare. Follow these steps to ensure your first few rucking excursions go as smoothly as possible.
Pick your distance carefully
Walking with weight is much more challenging than walking while unencumbered. Short distances feel much further when you’re wearing a heavy pack. With that in mind, be conservative and keep your first few rucks relatively short. Choose distances you can cover comfortably in an hour or less, i.e., 2-4 miles.
While you’ll soon work up to rucking faster and further, not going too far too soon will make your first few outings much more enjoyable.
Be conservative with your ruck weight
While it might be tempting to load all the weight you can into your backpack, carrying too much weight too soon could put you off rucking for good. Heavy loads get heavier as you start to feel tired, and your shoulders and back probably aren’t used to being loaded down with a heavy pack.
So, start with no more than about 10% of your body weight. This will be enough to be challenging but not so heavy that you feel crushed under the weight of your backpack. If in doubt, use less weight rather than more. You can always increase the load on subsequent ruck outings if your pack isn’t heavy enough.
Start slow
While soldiers ruck at four miles an hour or faster, you don’t have to. In fact, you should start slow, feeling like you could go more quickly if needed. You can increase your speed as you get used to walking with a weight on your back. However, remember it’s the weight that makes rucking such an effective workout, and you don’t need to walk at top speed or break into a run for it to be effective.
Choose easy to moderate terrain
Rucking in wild countryside is an awesome workout, but uneven terrain and steep inclines can be too challenging for beginners. So, for your first few rucks, stick primarily to flat, easy paths and trials, saving the rough stuff for when you are more experienced.
Enjoy it!
Don’t turn your rucking workout into a race. Take your time, look around, open your ears, and enjoy your surroundings. Breathe deeply and easily, relax your shoulders and arms, and even try some moving meditations. Stay off your phone, and use your ruck as an opportunity to decompress.
Rucking Basics for Fitness and Fat Loss – FAQs
Do you have a question about rucking? No problem, because we’ve got the answers!
1. How fast should I walk when rucking?
There is no set speed for rucking. However, most people average between 3-4 miles per hour or 15-20 minutes per mile. Your rucking speed depends on the terrain, your fitness, how much weight you are carrying, and how far you plan on walking.
Adjust your speed so you are slightly out of breath but comfortable enough that you can maintain your pace for the duration of your ruck. However, if you cannot maintain three miles an hour, you may be carrying too much weight.
2. How far should I ruck?
Like rucking speed, distance is also dependent on numerous factors, including your fitness and the time you have available. If you are unsure how far to ruck, start with a couple of miles and increase gradually as you get used to the demands of the workout.
It’s usually best to under-commit and over-deliver, so you finish your workout feeling like you could have done more. This is a much better approach than a “death march” that you can only just complete and never want to repeat.
3. How often can I ruck?
While rucking is low impact, it will still take a toll on your muscles and joints, especially if you walk fast and with heavy loads. As such, you should probably do 3-5 rucking workouts per week.
While you could do more than this, e.g., every day, the accumulated stress could lead to aches, pains, and injuries.
So, you could do one “big” ruck per week, perhaps at the weekend, plus a couple of shorter rucks spread throughout your week. Experiment with different training frequencies to see what works best for you.
4. Do I need a specialist backpack or shoes for rucking?
While there are companies making and selling rucking-specific shoes and backpacks, you don’t need them for this style of training. In fact, all you really need is a hiking daypack and comfortable, supportive footwear, like your usual athletic shoes.
That said, if you plan on rucking over rugged terrain, a pair of hiking shoes may be beneficial.
So, while you can buy a specialist rucking pack and shoes, you don’t need them. If you are new to rucking, use the equipment you already have, and then upgrade if you make rucking part of your regular workouts.
5. Is rucking good for weight loss?
Like all types of exercise, rucking can help you lose weight when combined with a sensible, sustainable diet. It burns a similar number of calories as running. Still, the impact is less, so you may be able to do it longer and more often, making it potentially more effective for weight loss.
However, what makes rucking so great is how it requires no specialist equipment, and you can do it almost anywhere and anytime. The best workouts for weight loss are the most accessible and convenient, as you need to do them frequently and consistently for them to be effective.
Long story short? Yes, rucking is good for weight loss!
Closing Thoughts
Getting fit and losing weight often seem like complicated pursuits, but really, they don’t have to be. In fact, all you need to do is toss some weights in a backpack and go for a brisk walk. Eat a few more salads and a bit less junk food, and your body will start burning fat for fuel.
You see – not complicated at all!
That said, simple doesn’t mean easy, and working out and eating healthily are often incompatible with our modern, hectic lifestyles.
That’s why convenience and accessibility matter; the easier something is to do, the more likely you are to do it. Rucking is exceptionally simple yet extremely effective, providing a workout you can do almost anywhere and anytime.
So, if you are looking for an excuse-free workout, try rucking. It’s no better than any other type of training, but nor is it any worse. Instead, it’s just another tool you can use to lose weight and get fit.
References:
1 – Strasser B, Burtscher M. Survival of the fittest: VO2max, a key predictor of longevity? Front Biosci (Landmark Ed). 2018 Mar 1;23(8):1505-1516. doi: 10.2741/4657. PMID: 29293447. https://pubmed.ncbi.nlm.nih.gov/29293447/
Build a Better Butt: Three Glute Workouts for Women
For years, six-pack abs were the fitness-fashion must-have. Actors, pop stars, athletes, B-listers – everyone had shredded abs and was happy to show them off. Entire workout programs revolved around getting a washboard stomach, and abs training exercise machines were on everyone’s Christmas list.
While ripped abs are still popular, they’ve been somewhat overshadowed by another muscle group – the glutes. Since the Kardashians hit the big time, glutes have become the fitness accessory that no woman can be seen without.
Unfortunately, prolonged sitting means that a lot of women’s glutes are flat, soft, and weak instead of rounded, strong, and firm. Glute amnesia is the term often used to describe how some people have literally forgotten how to contract their butts.
The good news is that the glutes are highly trainable and will quickly respond to regular workouts. You don’t even need a fancy gym to train your glutes – bodyweight and freeweight exercises can be very effective. When it comes to glute training, consistency is the key.
In this article, we share three tried-and-tested glute workouts for women. And yes, men can do them too!
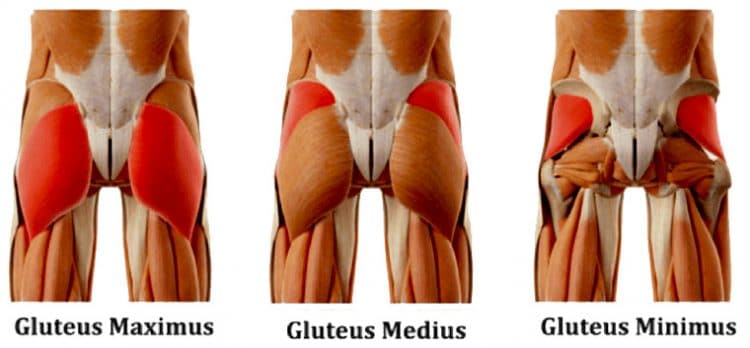
Glute Anatomy Basics
When most people mention their glutes, they’re talking about their gluteus maximus. However, there are three glute muscles, each of which deserves your attention if you want to develop a muscular, aesthetically pleasing butt.
Gluteus maximus
The gluteus maximus is the most prominent muscle in the human body. It’s also potentially the strongest. Located on the rear and lateral aspect of your hips, the functions of the gluteus maximus are:
Hip extension
Hip abduction (superior/upper fibers)
Hip adduction (inferior/lower fibers)
Hip lateral rotation
Gluteus medius
The gluteus medius is found near the iliac crest of the pelvis, above and under the gluteus maximus. It works alongside the gluteus maximus and also has some additional functions of its own, too:
Hip abduction
Hip rotation
Pelvis stabilization
Gluteus minimus
The gluteus minimus is a small, triangular muscle located toward the back of the hip. Gluteus minimus also works with the gluteus maximus, but has some additional functions:
Hip abduction
Hip medial rotation
Pelvis stabilization
Bonus glute muscle: Tensor fascia latae
The tensor fascia latae, or TFL, is part of the glute complex, even though gluteus isn’t part of its name. The TFL a biaxial muscle, meaning it crosses two joints – the hip and the knee. As part of the glute group, TFL plays an essential role in the following:
Hip internal rotation
Hip abduction
Pelvis stabilization
To develop your best ever butt, you must pay attention to all the glute muscles. So, while the gluteus maximus is the biggest muscle in the glute complex, the other muscles also deserve your attention. After all, they’re vital for hip stability and performance. That’s why we’ve included a variety of exercises in the following glute workouts for women.
The Benefits of Glute Training for Women
Weak glutes are a modern-day epidemic. Prolonged sitting for work and leisure means that many people have feeble, flat, soft, underdeveloped glutes. Most women train their glutes because they want a better-looking butt. While this is no bad thing, there are several additional benefits to working your glutes hard and often.
These benefits include:
Less lower back pain
Back pain is a common problem affecting a significant percentage of adult women, and a lot of back pain is caused by weak glutes. If your glutes are weak, much of the work they should do falls on your lower back, e.g., bending and lifting objects off the floor. Stronger glutes mean less stress on your lower back and a lower risk of back pain.
Glute-related lower back pain is especially common during pregnancy, as the shift in your center of gravity pulls you forward, and you’ll need strong glutes to counter this effect. Stronger glutes will also help stabilize your sacroiliac (SI) joint, which is another common cause of lower back pain for women.
In many cases, stronger glutes are the most effective way to prevent and treat lower back pain – with your doctor’s approval, of course.
Better posture
Posture is the alignment of your joints, which can be good or bad. Good posture puts minimal stress on your joints, ligaments, and muscles and is very efficient. In contrast, poor posture puts far more pressure on your joints and connective tissue and is very inefficient. Poor posture can lead to muscle tension, fatigue, and chronic pain.
Weak glutes can affect the alignment and position of your lumbar spine or lower back. It can also reduce pelvic stability. Stronger glutes can help prevent common postural problems such as hyperlordosis or an over-arched lower back.
A better-looking butt
While training your glutes has a lot of functional benefits, there is no denying the aesthetic appeal of a strong, firm, muscular butt. Great-looking butts don’t happen by accident; if you want a rear you can be proud of, you must train it hard, often, and consistently.
Increased hip and knee stability
The hip is a very mobile ball and socket joint capable of a wide range of movements, including flexion, extension, medial and lateral rotation, abduction and adduction. However, that mobility comes at a price – reduced stability.
While increased mobility is generally a good thing, uncontrolled movement of the hip can cause hip pain and injuries and even affect your knees. For example, if your hips cave in while you are walking or running, you may experience pain in the medial part of your knees.
Strengthening the muscles around your hips will enhance joint stability and function, leading to more efficient movements and a lower risk of hip and knee pain.
Three Glute Workouts for Women
Here are your three glute workouts for women. But, before doing any of them, you must prepare your joints and muscles for what you’re about to do by warming up. Start with 5-10 minutes of easy cardio, e.g., air bike, rower, jogging, or jumping rope, followed by a few dynamic mobility and flexibility exercises for knees, hips, and lower back.
A ten-minute warm-up can save you months of lost training caused by an otherwise avoidable injury, so don’t skip it.
Ready? Then let’s get to work!
Bodyweight-Only Glute Workout
No time to go to the gym? Prefer home workouts? No problem! You can train your glutes almost using just your body weight. Do this workout at home, in your hotel room, in your garden, at the park – anywhere you want!
#
Exercise
Sets
Reps
Recovery
1
Glute bridge marches
2-4
12-20
60-90 seconds
2
Prisoner good-mornings
2-4
12-20
60-90 seconds
3
Frog pumps
2-4
12-20
60-90 seconds
4
Reverse lunges
2-4
12-20 per leg
60-90 seconds
5
Side leg raises
2-4
12-20 per leg
60-90 seconds
1. Glute bridge marches
Target muscles: Gluteus maximus, hamstrings, core.
Steps:
Lie on your back with your legs bent and feet flat. Brace your abs. Drive your feet into the floor and push your hips up so your knees, hips, and shoulders form a straight line.
Without lowering your hips, lift one leg up and push your knee up toward the ceiling.
Lower your foot to the floor, swap legs, and repeat.
Continue alternating legs for the prescribed number of reps.
2. Prisoner good-mornings
Target muscles: Gluteus maximus, hamstrings, core.
Steps:
Stand with your feet about hip-width apart. Bend your knees slightly.
Place your hands behind your head and push your elbows back to open your chest. Brace your core.
Hinging from your hips, lean as far forward as possible without rounding your lower back. Push your butt backward as you lean.
Drive your hips forward and stand up.
That’s one rep – keep going!
3. Frog pumps
Target muscles: Gluteus maximus, gluteus minimus, gluteus medius, hip abductors, hamstrings, core.
Lie on your back with your legs bent and the soles of your feet pressed together.
Push your knees apart.
Drive the outside of your feet into the floor and lift your hips up to form a straight line with your knees and shoulders.
Lower your butt back down to the floor and repeat.
Read more: Frog Pumps Exercise Guide: How To, Benefits, Muscles Worked, and Variations
4. Reverse lunges
Target muscles: Gluteus maximus, hamstrings, quadriceps, core.
Steps:
Stand with your feet together and your arms by your sides. Pull your shoulders down and back, and brace your core.
Take a large step backward, bend your legs, and lower your rearmost knee down to within an inch of the floor. Lean forward slightly to increase glute engagement.
Push off your back leg, bring your feet back together, and repeat on the opposite side.
Alternate legs for the required number of reps.
5. Side leg raises
Target muscles: Gluteus maximus, gluteus minimus, gluteus medius.
Steps:
Lie on your side so your body is straight and your head is resting on your outstretched arm.
Raise your uppermost leg to about 45 degrees, turning your hip slightly inward to maximize glute engagement.
Lower your leg and repeat.
Roll over and do the same number of reps on the other side.
You can make this exercise more challenging by putting a booty band around your knees or wearing an ankle weight.
Freeweight Glute Workout
Freeweights provide a low-tech way to overload your glutes and build more strength. Barbells and dumbbells are available at almost every gym. They are also ideal for home workouts as they’re cheap, compact, and easy to store between workouts.
#
Exercise
Sets
Reps
Recovery
1
Barbell Romanian deadlift
2-4
12-20
60-90 seconds
2
Barbell hip thrust
2-4
12-20
60-90 seconds
3
Dumbbell side leg raise
2-4
12-20 per leg
60-90 seconds
4
Dumbbell high step-up
2-4
12-20 per leg
60-90 seconds
5
Dumbbell sumo squat
2-4
12-20
60-90 seconds
1. Barbell Romanian deadlift
Target muscles: Gluteus maximus, hamstrings, core.
Hold a barbell in front of your hips with a double overhand grip. Stand with your feet hip-width apart, knees slightly bent.
Pull your shoulders back and down and brace your core.
Push your hips back and hinge forward, lowering the bar down your legs.
Descend as far as you can without rounding your lower back.
Push your hips forward, stand back up, and repeat.
2. Barbell hip thrust
Target muscles: Gluteus maximus, hamstrings, core.
Sit on the floor with your back against a sturdy bench. Rest and hold a barbell across your hips. Use a folded mat or squat par pad for comfort if required.
Push down with your feet and lift your hips up to form a straight line between your knees and shoulders.
Lower your butt back down to lightly touch the floor and repeat.
3. Dumbbell side leg raise
Target muscles: Gluteus maximus, gluteus minimus, gluteus medius.
Lie on your side with your legs straight and your head resting on your lowermost arm.
Hold a dumbbell in your other hand and rest it on your uppermost thigh.
Raise your top leg to about 45 degrees, lower it, and repeat.
The further down your thigh you hold the weight, the more challenging this exercise becomes.
On completion, roll over and do the same number of reps on the opposite leg.
4. Dumbbell high step-up
Target muscles: Gluteus maximus, hamstrings, quadriceps, core.
Hold a dumbbell in each hand, arms by your sides. Stand in front of a bench or step that’s about knee height.
Place one foot on the top of the platform, drive your foot down, and step up. Try not to push off with your trailing leg.
Step back down, switch legs, and repeat.
Continue alternating legs for the duration of your set.
5. Dumbbell sumo squat
Target muscles: Gluteus maximus, hamstrings, quadriceps, core.
Stand with your feet about 1.5 shoulder widths apart, toes turned slightly outward.
Hold a single dumbbell in front of your hips.
Pushing your knee outward, squat down as deeply as possible without rounding your lower back. Keep your weight on your heels to maximize glute engagement.
Drive your feet into the floor and stand back up.
Continue for the prescribed number of reps.
Gym Glute Workout for Women
Having access to a gym means there are lots of ways to train your glutes. In fact, there are so many choices that it can be hard to know where to start! Keep your training on track with this tried-and-tested gym-based glute workout.
#
Exercise
Sets
Reps
Recovery
1
Barbell booty band back squat
2-4
12-20
60-90 seconds
2
Cable machine pull-throughs
2-4
12-20
60-90 seconds
3
Dumbbell single-leg Romanian deadlift
2-4
12-20 per leg
60-90 seconds
4
Cable hip abduction
2-4
12-20 per leg
60-90 seconds
5
Barbell glute march
2-4
12-20
60-90 seconds
6
Reverse hypers
2-4
12-20
60-90 seconds
1. Barbell booty band back squat
Target muscles: Gluteus maximus, gluteus minimus, gluteus medius, hamstrings, quadriceps, core.
Put a booty band around your knees. Rest and hold a barbell across your upper back. Step out so your feet are about shoulder-width apart. Push your knees out against the resistance offered by the band.
Bend your knees and squat down until your thighs are roughly parallel to the floor. Keep pushing your knees outward. Do not round your lower back.
Stand back up and repeat.
2. Cable machine pull-throughs
Target muscles: Gluteus maximus, hamstrings, core.
Attach a rope handle to a low pulley machine.
Stand astride the cable with your back to the machine. Hold the handle in both hands in front of your hips. Take 1-2 steps forward to tension the cable.
Push your hips back and lean forward, reaching back and through your legs.
Drive your hips forward and stand up straight.
Continue for the prescribed number of reps.
You can also do this exercise with a resistance band.
3. Dumbbell single-leg Romanian deadlift
Target muscles: Gluteus maximus, hamstrings, core.
Hold a dumbbell in one hand and stand with your feet together.
Shift your weight over onto one leg. Bend your supporting knee slightly.
Hinging from your hips, lean forward and lower the weight down toward the floor. Extend your non-weight-bearing leg out behind you for balance.
Stand back up and repeat.
Use your non-working arm for support if required.
Switch legs and do the same number of reps on the other side.
4. Cable hip abduction
Target muscles: Gluteus maximus, gluteus minimus, gluteus medius.
Wrap a strap around your ankle and attach it to a low pulley machine.
Stand sideways onto the weight stack with your working leg furthest from the weight stack. Hold the machine for balance. Brace your core.
Keeping your leg straight, lift your foot out to the side, taking care not to twist your hips.
Lower your leg and repeat.
Do the same number of reps on both sides.
5. Barbell glute march
Target muscles: Gluteus maximus, hamstrings, core.
Lie on the floor with your legs bent and feet flat. Rest and hold a barbell across your hips. Use a folded mat or squat bar pad for comfort if required.
Drive your feet into the floor and raise your hips so they form a straight line with your knees and shoulders.
Keeping your hips up, extend your right leg.
Lower your foot back to the floor, swap legs, and repeat.
Continue alternating legs for the prescribed number of reps.
6. Reverse hypers
Target muscles: Gluteus maximus, hamstrings, core.
Lie on the machine so your hips are in line with the lever arm pivot point. Place your lower legs behind the restraint. Hold onto the support handles.
Extend your hips and legs out behind you, taking care not to hyperextend your spine.
Lower your legs and repeat.
No reverse hyper machine at your gym? Don’t worry; you can also do this exercise with a regular workout bench, like this:
Glute Workouts for Women – FAQs
Do you have a question about these workouts or glute training for women in general? No problem, because we’ve got the answers!
1. How often can I train my glutes?
While it might be tempting to train your glutes more often, 2-3 workouts per week should be sufficient for most women. Muscles take on average 48-72 hours to recover between workouts, so training them more often could impede rather than accelerate your progress.
So, train your glutes every 2-3 days for best results, e.g., Monday, Wednesday, and Friday, or Monday and Thursday.
2. Will these exercises and workouts fix my violin hips?
Violin hips, aka hip dips, are where your lower glutes/upper thighs curve slightly inward. Contrary to what a lot of influencers believe, this is NOT something that can be fixed with exercise or diet and is caused by your bone structure. Hip dips are perfectly natural and not something you need to try and alter.
While training your glutes will enhance your general butt shape, your hip dips are here to stay. So, don’t worry about them, and focus on the things you can control instead.
3. Do I have to stick to the 12-20 rep range?
To build maximal strength, you must train using heavy weights and low reps, typically 1-5 per set with 85% or more of your one-repetition maximum. However, if you aren’t training for strength, it really doesn’t matter how many reps you do per set.
In fact, studies suggest that you can perform anywhere from 5 to 35 reps per set and still make progress (1). Almost any rep count will work if you take your set close to failure.
12-20 is just a general guideline, and you can do eight, ten, twenty, or thirty reps per set if you wish.
4. What is the best diet to build a better butt?
Building a bigger, stronger butt is a type of hypertrophy training, better known as bodybuilding. As such, you’ll need to provide your body with the energy it needs for your workouts as well as muscle growth and repair.
Invariably, this means eating a slight calorie surplus, consuming enough protein, and eating mostly natural, clean foods.
It’s beyond the scope of this article to provide you with a diet to follow, but you can find all the information you need to write your own healthy eating plan in this step-by-step guide.
5. Can I just do core workouts to get in shape?
Your glutes are just a small selection of the 600+ muscles that make up the human body. Trying to get in shape by just training your glutes is like trying to keep your car running by only ever checking the tire pressure!
While these glute workouts will certainly help, you need to train the rest of your body if you want to be in good shape. That means including upper body, cardio, and core training in your weekly workout schedule.
Glute training IS undoubtedly important, but it’s just one of the things you need to do to be fit and healthy.
Glute Workouts – Closing Thoughts
Whether you are training for better health, improved athletic performance, or want to look your best, glute training can help. Unfortunately, many women have weak, soft glutes, often because they spend too much time sitting.
Use these workouts to sculpt your perfect butt. However, remember that while the glutes ARE important, the rest of your body deserves the same amount of care and attention. Nature abhors imbalances, and going all glutes all the time will probably cause more problems that it cures.
More Glute Workouts:
The No Weight Equipment Arm Workout for Bigger Guns
Showing up at the gym at five o’clock is futile; crowded dumbbell areas, every squat and power rack occupied, and a sense of claustrophobia take place. You look around and scratch your head wondering where to start and how in the world you will get an effective workout in this zoo you call a gym.
The answer may seem simple, but one that many have scoffed at time and again: adopt a minimal equipment workout that enables you to train arms from anywhere. As foregoing traditional equipment such as dumbbells and barbells, not to mention weight machines and utilizing your body weight, isn’t anything new; the concern lies in the effectiveness of said workouts.
Many see bodyweight training as easy or only used for maintenance. However, you can build appreciable muscle mass if you do bodyweight training correctly. A recent study by the leading researcher in muscular hypertrophy, Brad Schoenfeld, reported that sets performed in the lower rep range and heavier loads (3 sets of 7 reps) and lighter weight with higher reps (25 to 35 reps) yielded similar hypertrophy results. [1]
Advantages of No Equipment Training
Let’s look at some advantages of no-equipment training and see if it’s a good fit for your next arm workout:
The Solution to a Crowded Gym
Nothing is more frustrating than entering the gym ready to put your perfect plan for bigger arms into action when you look around and find no place to go. So when every rack, dumbbell, barbell, and machine is occupied, creativity is paramount. Fortunately, there are plenty of options to fall back on. Chin-up bars, suspension trainers, and even the floor become highly effective tools for building larger, sleeve-busting arms.
Builds muscle mass
By now, you know all too well the infamous definition of insanity: doing the same things over and over and expecting different results. A no-equipment arm workout will surely spur more than enough diverse stimulation and shock your arms into growing. It’s not just a minor modification of a dumbbell arm curl or a slight shift in elbow angle during a triceps pushdown. It’s an entirely new challenge.
Using Little to No Equipment Will Put Excitement Back Into Your Training
The sheer novelty of doing something new will boost motivation and skyrocket your progress to new heights. Science Daily looked at a study concluding that people learn from new experiences without even trying [2]. This trigger can be advantageous when trying new exercises, especially ones you’ve never tried before.
Now let’s look at some specific, highly effective arm exercises when the gym is crowded, and you’re unable to use the traditional means to build your arms, or you just want something new.
Bodyweight Biceps Exercises
Add the following bodyweight biceps exercises to your exercise arsenal:
Suspension trainer biceps curl
Generally speaking, muscle activation is greater during suspension training versus comparable traditional movements. A study from the Sports Biomechanics Journal looked at many criteria regarding muscle activation, including electromyographic signals, and found that suspension training was superior to the more traditional moves. [3]
For the suspension biceps curl, affix a suspension trainer rig high on a sturdy bar or station. Grasp the handles and place your feet close to the anchor point. Lean back and extend your arms so they are perpendicular to your torso. With your palms facing the ceiling, bend only at your elbows to bring your forehead toward your hands. Your body should remain in a plank position and move toward the anchor point. Once your biceps are contracted and beside your head, reverse the motion and straighten your arms.
Variations: A simple modification to either progress or regress the difficulty is to adjust your stance. The closer your feet are to the anchor point, the more challenging the exercise. The more your feet are placed below your hips, the easier it is. Whichever variation you choose, keep your elbows high and stationary while performing the move slowly and under control.
Biceps chin-up
Another non-traditional biceps builder is the reverse grip chin-up. Normally performed to develop the back, a few tweaks can make this into one effective biceps builder. To place the most stress on your biceps, grasp the overhead bar with an underhand grip about shoulder-width apart. Contract your midsection and round your back slightly. This will take the stress off of your back. Curl your body up with your biceps, bringing your shoulders toward your hands. Flex hard at the top and then return under control.
Variations: If you’re not the best at the chin-up and need to make the exercise a bit easier, you can loop a band around the bar overhead and step into the other end to lessen the body weight lifted. Or you can place your toes on a bench or box to assist you. Either way, work your way to lifting your body weight over time. Another regression is performing the same exercise on a lower rack with your feet on the floor and legs extended out in front of you as if you were going to perform a reverse rack row.
To progress the exercise, pause at the top of the movement for a count of two before slowly lowering to the start position.
Inverted rack curl
Think of this as a combination of the suspension curl and chin-up. Assume a sitting position under a stable bar in a rack or Smith machine. Take an underhand grip above your head and straighten your body from shoulders to feet. Curl your body up and your forehead toward the bar, then return to the bottom extended position.
Variations: Raising the bar will make the exercise a bit easier since more body weight will be supported by your feet. Lowering the bar raises the difficulty since your arms will be under more total body load.
Suspension trainer lateral curl
Stand with your right shoulder closest to the suspension trainer. Grasp the handle with your palm facing the ceiling and extend straight to your side. Your entire arm should be nearly level with your head. Begin by curling your arm and raising your body toward your hand. Extend back down by straightening your arm. This biceps exercise is considered a bit advanced, so be careful not to loosen up your form at risk for injury.
Variations: As with other suspension trainer exercises, the closer you move your feet toward the anchor point of the trainer, the more challenging it becomes. The less angle to the anchor point, the easier it becomes.
Best Triceps Exercises
Here are some of the most effective bodyweight triceps exercises:
Suspension trainer triceps extension
The triceps extension is a demanding but adjustable exercise that can be done pretty much anywhere with a suspension trainer. Affix a suspension trainer overhead on a pull-up bar or some other stable foundation. Grasp the handles facing away from where the suspension trainer is anchored. Back your feet up and extend your entire body with your hands overhead. Maintaining a planked body position, bend only at the elbows as your body lowers toward the ground. Your hands should move past your ears. Reverse direction and straighten your arms out once again.
Variations: As with suspension trainer biceps curls, adjusting your stance can make the exercise more or less challenging, depending on your strength and ability. Moving your feet back toward the anchor point will impose more body weight into the movement, and moving them out will make it easier. Adjust as necessary.
Triceps push-up
As an old favorite but often forgotten exercise for triceps is the push-up with hands placed close together. Also called diamond push-ups, a study from the University of Wisconsin-La Crosse looked at the triceps activity with electromyography comparing traditional triceps exercises such as pushdowns, close-grip bench presses, and skull crushers with triceps push-ups. The study found that triceps push-ups had the most significant muscle activation. [4]
Start by assuming a plank position with your hands about six inches apart. Lower your body toward the floor while keeping your elbows by your sides. Stop just a few inches from the floor before returning to the top position.
Variations: There are many ways to make triceps push-ups more challenging. First, you can simply place your feet on an elevated surface or a bench to transfer more stress to your upper body. Additionally, you can add instability, such as your feet looped into a suspension trainer or placing your hands on a small medicine ball. You can also slow the exercise’s cadence and pause at the bottom for a count or two.
Rack triceps press
Stand in front of a stable bar in a rack or Smith machine bar that is about hip height. Grasp the bar with an overhand grip a little wider than shoulder width. Step back with your feet until your body is straight and your arms arm extended out in front of your torso. Bending your elbows, slowly lower your body toward the bar as your head moves closer to the bar. Allow your head to dip below the bar as your elbows are fully bent. Reverse the direction until your arms are extended once again.
Variations: Raising the bar higher will allow you to perform more reps and is apt for beginners. As you move the bar lower to the floor, more stress is placed on your triceps for a more advanced version.
Suspension trainer triceps press-down
Getting that powerful triceps contraction can easily be achieved without a cable machine. Utilizing a suspension trainer stand facing the anchor point of the trainer. Hold the handles by your sides with your palms facing behind you. Slowly raise the handles by bending at the elbows as your body leans back slightly. Once your hands are parallel with your elbows, press and straighten them back down and back as you contract your triceps.
Variations: Standing closer to the anchor point will increase the amount of stress on your triceps, calling for more intensity and strength. Advance to more difficult variations only after you’ve mastered the basics first.
Whichever variation you choose, be sure to master the basic movement before progressing to more challenging versions.
Sample No Weight Equipment Arm Workout Program
Here’s a quick sample program you can plug into any workout any day of the week. Use as a shock to replace your normal arm program or adopt it for several weeks, progressing with each exercise. Shoot for performing the following routine at least twice per week.
Biceps
Suspension trainer biceps curl: 3 x 10-15 reps
Biceps chin-up: 3 x as many as possible
Inverted rack curl: 3 x 10-15
Suspension trainer lateral curl: 3 x 10-15
Triceps
Suspension trainer triceps extension: 3 x 10-15 reps
Triceps push-up: 3 x as many as possible
Rack triceps press: 3 x 10-15
Suspension trainer triceps press down: 3 x 10-15
Wrapping Up
If you’re still skeptical about building appreciable amounts of muscle without dumbbells, barbells, and other more traditional means, then maybe it’s time you try the above program. Perfect the exercises, progress like you would any other program, and be sure to challenge yourself with more difficult versions. You have nothing to lose and only more muscle to gain to fill out those sleeves just in time for summer.
References
Schoenfeld B., Wilson, J, & Lowery, R. (2016). Muscular adaptations in low- versus high-load resistance training: a meta-analysis. Eur J Sport Sci., 16, 1–10.
VIB (the Flanders Institute for Biotechnology). (2020, February 5). Novelty speeds up learning thanks to dopamine activation. ScienceDaily. Retrieved April 12, 2023, from www.sciencedaily.com/releases/2020/02/200205132255.htm
Aguilera-Castells, Joan & Buscà, Bernat & Fort-Vanmeerhaeghe, Azahara & Montalvo, Alicia & Peña, Javier. (2020). Muscle activation in suspension training: a systematic review. Sports Biomechanics. 19. 55-75. 10.1080/14763141.2018.1472293.
Boehler, B. (2011). Electromyographic analysis of the triceps brachii muscle during a variety of triceps exercises. University of Wisconsin-La Crosse.
3 Arm Workouts For Women To Build Strong and Sculpted Guns (Featuring 22 Killer Exercisers)
Whether you want to get ready for the summer or build strength to boost your functionality and perform better at daily activities, you must train your arms. Furthermore, strong arms can help you do more in other workouts that require pulling and pushing strength.
Due to hormonal differences, women are more likely to develop bat wings than men. Arm workouts will not only make you look amazing in that sleeveless top, but you’ll also be able to carry those heavy grocery bags with ease.
Arm workouts are an essential part of any fitness routine, especially for women. Besides making you look stunning in sleeveless dresses, arm workouts, provide numerous benefits, including improved strength, posture, and metabolism.
In this article, we cover the 22 best arm exercises to help you carve the perfect arms. We have also programmed these 22 movements into three workouts for women at different experience levels to help maximize the results. This article has something for everyone. So, let’s roll up our sleeves and dive into the world of arm workouts for women — trust us, your arms will thank you!
22 Best Arm Exercises For Women
The arm workouts for women article compiles the most effective biceps and triceps exercises that women can incorporate into their workout routine to achieve beautifully sculpted arms reminiscent of Greek goddesses. Here are the lifts that should be a part of your exercise arsenal:
Barbell Biceps Curl
The barbell biceps curl is an isolation exercise that is incredibly effective for building size and strength. Follow a strict form on this movement for optimal muscle fiber recruitment.
Steps:
Stand upright with a hip-width stance while holding a barbell with a shoulder-wide underhand grip.
Keep your elbows pinned to your sides, and curl the bar to your shoulder level.
Pause and contract your pythons at the top.
Slowly return to the starting position.
Repeat for recommended reps.
Pro Tip: Grab the bar as tightly as possible to engage your forearms. Alternatively, use a false (thumbless) grip to limit forearm recruitment.
Check out our complete barbell biceps curl guide here!
Dumbbell Biceps Curl
The dumbbell biceps curl is a unilateral exercise that can help fix muscle and strength imbalances.
Steps:
Stand erect with a shoulder-wide stance while holding a dumbbell in each hand using a neutral (palms facing your thighs) grip.
While keeping your left arm in place, bend your right elbow to curl the bar to your shoulder level. Twist your arm to the outside during the concentric (upward) motion. Your palm should face your shoulder at the top.
Slowly return to the start position.
Alternate between sides for recommended reps.
Pro Tip: Beginners can hold the dumbbell in front of their thighs with a supinated (palms facing forward) grip. It will help improve your mind-muscle connection.
Check out our complete dumbbell biceps curl guide here!
Dumbbell Hammer Curl
The dumbbell hammer curl helps improve your biceps thickness by working the brachialis muscle.
Steps:
Stand erect while holding a dumbbell in each hand with a neutral grip.
Keeping your elbows pinned to your side, curl the dumbbells to your shoulder level.
Return to the start position.
Repeat for recommended reps.
Pro Tip: Ensure you are not using momentum to lift the weight by swinging your torso back and forth.
Check out our complete dumbbell hammer curl guide here!
Barbell Reverse Curl
The barbell reverse curl engages the forearm muscles, which helps improve your arm symmetry and balance.
Steps:
Stand upright with a hip-width stance.
Grab the bar with a shoulder-wide overhand grip.
Keeping your elbows pinned, curl the bar to your shoulder level.
Rinse and repeat.
Pro Tip: Use a thumbless grip for greater forearm muscle recruitment.
Check out our complete barbell reverse curl guide here!
Underhand Pull-Up
Contrary to what most lifters believe, you don’t always need weights to train your biceps. The bodyweight underhand pull-up will set your pythons on fire.
Steps:
Grab a pull-up bar with a supinated shoulder-wide grip.
Bend at your elbows to bring your chest to the pull-up bar level.
Pause and contract your pythons at the top.
Return and repeat.
Pro Tip: Ladies that cannot perform a bodyweight pull-up can use an assisted pull-up machine. You could also ask your training partner to spot you or use a resistance band.
Check out our complete underhand pull-up guide here!
Cable Biceps Curl
Unlike the free weights, the cable keeps constant tension on your muscles throughout the range of motion, helping induce hypertrophy.
Steps:
Set the cable pulley at the lowest setting and attach a straight bar attachment.
Grab the bar with a shoulder-wide grip.
Keeping your elbows pinned, curl the bar to your shoulder level.
Rinse and repeat.
Pro Tip: Ensure the weight is engaged throughout the range of motion. The weight should not rerack at the bottom of the movement.
Check out our complete cable biceps curl guide here!
21s
This exercise is a must-do for women that have never experienced a biceps pump.
Steps:
Grab a barbell with a shoulder-wide underhand grip.
Keeping your elbows pinned, curl the bar until your forearms are parallel to the floor.
Repeat for seven reps.
After completing the seven reps, curl the bar to your shoulder level.
Slowly lower the bar until your forearms are parallel to the floor.
Repeat for seven reps, then lower the bar to the start position.
Perform seven full reps.
Pro Tip: Use an EZ bar to make this exercise easier on your wrists.
Check out our complete 21s guide here!
Incline Dumbbell Curl
This exercise eliminates momentum since you’ll be lying on an incline bench.
Steps:
Adjust the back of an incline bench at a 45-degree angle with the floor.
Lie with your back on the bench while holding a dumbbell in each hand with a neutral grip.
Curl the dumbbells to your shoulder level. Turn out your wrists during the eccentric motion.
Lower the weights.
Repeat.
Pro Tip: Lowering the back of the incline bench will make the exercise more challenging, whereas lifting it will make it easier.
Check out our complete incline dumbbell curl guide here!
Preacher Curl
Since the preacher curl involves keeping your arms on an incline bench, it allows optimal biceps brachii engagement. It is an excellent exercise to improve your biceps peaks.
Steps:
Place the back of your upper arms on the preacher curl bench.
Hold an EZ bar with a shoulder-wide grip.
Bend your elbows to curl the bar.
Slowly lower the bar to the start position.
Repeat for reps.
Pro Tip: Using a cable preacher curl machine helps keep constant tension on your biceps throughout the ROM.
Check out our complete preacher curl guide here!
Squatting Biceps Cable Curl
This exercise locks your elbows in place and removes the possibility of using momentum by swinging your torso.
Steps:
Set a cable pulley machine at the lowest position and attach a straight bar.
Grab the bar with a shoulder-wide underhand grip and take a step back.
Sit in a deep squat and place your elbows on the inside of your knees.
Curl the bar toward your head.
Slowly return to the start position.
Pro Tip: Keep your chest up throughout the exercise. Rounding your shoulders will limit your range of motion.
Overhead Cable Curl
Ladies, if you want to look dazzling while hitting the front double biceps pose, you must add the overhead cable curl to your exercise arsenal.
Steps:
Set the cable pulleys at the highest position and attach D-handle bars on both ends.
Grab the handles with an underhand grip, position yourself in the center of the machine, and assume a shoulder-wide stance.
Your arms should be extended at your sides at the starting position.
Keeping your elbows pinned, perform a biceps curl.
Rinse and repeat.
Pro Tip: Maintain the natural curvature of your spine throughout the range of motion. Rounding your back will throw you off balance during the set.
Check out our complete overhead cable curl guide here!
Diamond Push-Up
The diamond push-up is a bodyweight triceps exercise that works your triceps through its full range of motion.
Steps:
Get on all fours.
Place your hands together on the floor so your index fingers and thumbs touch. Your hands should form a triangle.
Extend your legs behind you.
Get into a push-up position.
Slowly lower your chest to the floor by bending your elbows until your chest touches your hands.
Pro Tip: Your body, from head to heels, should be in a straight line throughout the exercise. Lifting your hips or letting them drop will remove tension from your triceps.
Check out our complete diamond push-up guide here!
Cable Triceps Pushdown
The cable triceps pushdown is a staple in most triceps workouts, and for a good reason.
Steps:
Set the cable pulley at the highest position and attach a straight bar.
Grab the bar with a shoulder-wide overhand grip.
Extend your arms while keeping your elbows pinned to your sides.
Pause and contract your triceps at the bottom for optimal muscle fiber stimulation.
Repeat for reps.
Pro Tip: Use different grips, such as a straight bar, V-handle bar, and ropes, to train your triceps from different angles.
Check out our complete cable triceps pushdown guide here!
Overhead Triceps Extension
This exercise engages your lateral and long triceps head, helping develop a chiseled horseshoe muscle.
Steps:
Stand upright with a shoulder-wide stance.
Hold one end of the dumbbell with both hands and lift it overhead.
Keeping your elbows pinned, slowly lower the dumbbell until the other end touches the back of your neck.
Return to the start position.
Repeat for reps.
Pro Tip: Perform this exercise on a cable machine to keep constant tension on your triceps.
Check out our complete overhead triceps extension guide here!
EZ Bar Skull Crusher
The EZ bar skull crusher is an incredibly effective exercise to tone your arms and build strength.
Steps:
Lie supine (facing the ceiling) on a flat bench.
Hold an EZ bar with a narrow grip over your shoulders. Your arms should be perpendicular to the floor at the start position.
Keeping your lower arms pinned, bend your elbows so the bar is a few inches away from your forehead at the bottom.
Rinse and repeat.
Pro Tip: Beginners and those lifting heavy should perform this exercise with a spotter.
Check out our complete EZ bar skull crusher guide here!
Dumbbell Kickback
You must perform this exercise with a picture-perfect form for optimal triceps engagement.
Steps:
Grab a dumbbell in each hand with a neutral grip.
Slightly bend your knees and lower your torso toward the floor by bending your hips and pushing them back.
Lift your elbows above your sides. Pull back your shoulder blades and lift your shoulders to your ears.
The dumbbells should be next to your chest at the start position.
Extend your arms.
Pause and contract your triceps.
Slowly return to the start position.
Pro Tip: Do this exercise on one side if you are struggling to establish a mind-muscle connection in the bilateral variation.
Check out our complete dumbbell kickback guide here!
Reverse-Grip Cable Pressdown
Some exercisers find the reverse-grip cable press-down more effective at targeting the triceps than the conventional pushdown.
Steps:
Set a cable pulley at the highest position and attach a straight handle.
Grab the bar with an underhand grip.
Keep your elbows pinned slightly in front of your body and extend your arms.
Rinse and repeat.
Pro Tip: You could also use lifting straps if you have difficulty holding onto the bar with a reverse grip.
Check out our complete reverse-grip cable press-down guide here!
Close-Grip Bench Press
This compound (multi-joint) exercise primarily works the triceps. Use a weight that allows you to follow a full ROM and complete between 8-12 reps.
Steps:
Lie with your back on a bench.
Grab the bar just outside your chest width.
Unrack the bar and hold it over your chest.
Lower the bar to your chest by bending your elbows.
Explode to the start position.
Repeat for reps.
Pro Tip: Avoid flaring your elbows while performing this exercise, as it can put unnecessary strain on your shoulder rotator cuffs.
Check out our complete close-grip bench press guide here!
Dips
The parallel bar dips are an excellent exercise to target your triceps. Beginners could perform this exercise on a flat bench.
Steps:
Grab the parallel bars with a neutral grip.
Your arms should be extended at the starting position.
Slowly lower toward the floor while keeping your elbows close to your sides and maintaining an upright torso.
Your chest should be at your hand level at the bottom.
Repeat for reps.
Pro Tip: Avoid bending forward while performing this exercise, as it will result in pectoral muscle engagement.
Check out our complete dips guide here!
Tate Press
The Tate press is an underutilized exercise. However, its unique range of motion will help you tone your arms.
Steps:
Lie supine on a flat bench while holding a dumbbell in each hand using a neutral grip.
Your arms should be above your chest and perpendicular to the floor at the start position.
Turn your arms so your palms are facing forward.
The inside plates of the dumbbell should be touching each other. Your elbows should be pointing outward. This will be your starting position.
Initiate the movement by bending at your elbows and bringing the dumbbell inner plates toward your chest.
Touch the dumbbell to your chest at the bottom.
Return to the starting position.
Pro Tip: Ensure that the dumbbells are in contact throughout the range of motion.
Check out our complete Tate press guide here!
Cable Triceps Kickback
This is an excellent dumbbell kickback variation if you have trouble establishing a mind-muscle connection during the conventional exercise.
Steps:
Set the cable pulley at hip height and attach a D-handle bar.
Grab the handle with a neutral grip.
Step back and bend over so your torso is almost parallel to the floor.
Lift your elbow so your upper arm is parallel to the floor.
Extend your arm.
Pause and contract your triceps.
Repeat for recommended reps before switching sides.
Pro Tip: Holding onto the cable directly will help ensure better stability.
Check out our complete cable triceps kickback guide here!
Resistance Band Overhead Triceps Extension
You’re in for a surprise if you’ve never tried the resistance band overhead triceps extension before. Use a loop resistance band for this movement.
Steps:
Place one end of the loop resistance band around your right foot.
Wrap the other end around your right hand.
Bring your hand to your shoulder level and point your elbow toward the ceiling.
Keeping your elbow pinned, extend your arm.
Pause and contract your triceps.
Slowly lower to the start position.
Repeat for recommended reps before switching sides.
Pro Tip: Start with the lightest resistance band in your gym and focus on contracting your triceps at the top of the movement.
3 Effective Arm Workouts For Women
Given below are three arm workouts for women at different experience levels. These workouts will train your arms from different angles using various equipment to ensure overall growth.
Beginner Arm Workout For Women
The arm workouts for women in this article include four exercises each for the biceps and triceps. Although we have listed the biceps exercises first, you must start the workouts with your weaker muscle group. For example, ladies with lagging triceps should begin these workouts by training the back of their upper arms.
Exercise
Sets
Reps
Biceps Cable Curl
3
8-12
Preacher Curl
3
8-12
Dumbbell Hammer Curl
3
8-12
Overhead Cable Curl
3
8-12
Cable Triceps Pushdown
3
8-12
Dumbbell Kickback
3
8-12
Resistance Band Overhead Extension
3
8-12
Dips
3
8-12
Dumbbell-Only Arm Workout For Women
You can perform the following workout with just a pair of dumbbells. Keep your training intensity high by limiting your rest duration between exercises to 60-120 seconds. You must complete these workouts within 60 minutes.
Exercise
Sets
Reps
Dumbbell Biceps Curl
3
8-12
Incline Dumbbell Curl
3
8-12
Dumbbell Hammer Curl
3
8-12
Dumbbell Reverse Curl
3
8-12
Overhead Triceps Extension
3
8-12
Dumbbell Kickback
3
8-12
Dumbbell Skull Crusher
3
8-12
Tate Press
3
8-12
Advanced Arm Workout For Women
In this workout, you’ll use two advanced training techniques, supersets and dropsets.
#
Exercise
Sets
Reps
1
Barbell Biceps Curl
3
8-12
2
21s
3
21
3a
Machine Preacher Curl
3
8-12
3b
Underhand Pull-Up
3
8-12
4a
Reverse-Grip Triceps Extension
3
8-12
5
Tate Press
3
8-12
6a
Close-Grip Bench Press
3
8-12
6b
Diamond Push-Up
3
8-12
The machine preacher curl (3a) and underhand pull-up (3b) are super set exercises for the biceps. After performing 8-12 reps on the machine preacher curl, start doing the underhand pull-ups without stopping for rest. You are allowed a 60-120 second rest after completing the recommended reps for the underhand pull-up. Similarly, the close-grip bench press and diamond push-up are super sets for the triceps.
The reverse-grip triceps extension (4a) is a drop-set exercise. Perform 8-12 reps on this exercise, then immediately lower the weight on the stack and perform another set to failure without stopping for rest.
Wrapping Up
Whether you are a fitness enthusiast or a beginner, these three arm workouts for women can help you feel stronger, more confident, and ready to take on any challenge that comes your way.
Stick to these workouts for at least 12 weeks to allow them the time to work their magic. Feel free to tweak the workouts to fit your needs. However, you must progressively overload your muscles to ensure strength and muscle gains. Best of luck!
Master the Art of Cluster Sets: Boost Your Workouts and Unlock Your True Potential!
The set is the basis of everything you do in the gym. It comprises a certain number of reps, after which you rest briefly before moving on to your next set. But, just as there’s more than one way to skin a cat, there are several ways to structure your sets. If your goal is to lift as heavy as possible and turn up the intensity, then you need to know about cluster sets.
Cluster sets are an advanced training technique, but there is some confusion surrounding them. Some people confuse them with rest-pause training, while others mix them up with drop sets. In this article, we’ll clear up the confusion as we explain exactly what cluster sets are, why they’re a good technique for increasing strength and muscle, and how you can program them into your routine.
What are Cluster Sets?
Cluster sets are like a series of mini-sets within a larger set. You do a certain number of reps, then rest for a few seconds before doing the next cluster of reps. Typically, a cluster set will consist of three or four of these mini-sets. Cluster sets are considered an inter-set form of training.
Cluster set training is popular among powerlifters and other strength athletes. There is a large body of research investigating its benefits to enhance strength and power. That research tells us that different forms of cluster training are more beneficial for different outcomes.
There are three primary reasons that you would include cluster set training in your routine:
Strength
Power
Hypertrophy
When it comes to power training, the goal is to develop explosiveness. You should use a reduced weight that is 40 to 65% of your one-rep max. The focus will be on completing three to five clean, explosive reps. You then rest for around 20 seconds before completing the same number of reps again. You will usually complete three of these many sets while focusing on maintaining excellent form and producing as much explosive power as possible.
Power training cluster sets aim to train for power rather than exhausting your muscle fibers. This type of training has also been shown to improve the neurological pathways between your muscles and brain.
Cluster sets for strength training should see you working with between 80 and 90% of your one-rep max. So you might take a weight that you can perform four reps on and do two reps. You then rest for around 30 seconds and then do two more. If you did this for a total of four mini-sets of two reps each, you would end up doing eight reps within that cluster set. That represents double the volume and a substantially increased amount of intensity compared to if you were to just do a traditional set of four reps.
When it comes to hypertrophy, cluster sets are an excellent intensity-enhancing tool. That is because it allows you to train with heavier weights than you could usually do to complete the set. It also increases your time under tension. But unlike traditional sets, where it’s usually only the last two or three reps that could be described as high threshold time under tension, with cluster sets, every rep is a high threshold time under tension rep.
Finally, cluster sets allow you to achieve muscle overload. For example, you might choose a weight with which you could normally do eight reps and perform a cluster set of six, four, and three-rep mini sets. That’s a total of 13 reps — five more than you previously would have done.
Cluster Set Research
The vast majority of the research into cluster sets focuses on strength and power training. This research highlights five key benefits of cluster set training.
Rep Quality
According to some research, cluster set training improves the technical precision of each rep within the cluster set. That makes sense because, unlike with straight-set training, there is no fatigue accumulation to impair performance on the last few reps. Doing a technically demanding exercise like the clean and jerk or snatch using the standard high rep approach can lead to form breakdown. However, when you’re only doing a couple of reps and then having a short rest, you are far more likely to maintain correct form. [1]
Greater Power Output
Research suggests cluster sets can result in greater power output on each rep than straight-set training. Again that’s because there is less accumulated fatigue going into each new rep. Greater power output means more explosiveness in sports like basketball, football, and powerlifting. [2]
Reduced Inter-Set Fatigue
Cluster set training, when done in power training and strength training style, will reduce the cumulative fatigue effect from set to set and exercise to exercise. This is beneficial when you want to move to a new exercise fresh and relatively unaffected from the previous exercise. That is what you want when you are training for power and strength. With hypertrophy training, of course, your goal is the opposite — you want to increasingly fatigue the muscle as the workout progresses. [3]
Power Endurance
A 2008 study showed that cluster set training could help develop power endurance very effectively. This type of muscular endurance is needed by cyclists, soccer players, and people who play racquet sports. [4]
Increased Strength and Power
Cluster sets have been shown to produce superior results than traditional straight sets in terms of power and strength gains. In a 2013 study, 22 men were assigned to either a cluster set or a traditional set training protocol. Each group followed a 12-week training program. At the end of the study, the cluster set group showed significantly greater improvement in the bench press, vertical jump, and squat. However, the two groups had no significant difference in lean mass gains. [5]
What a Hypertrophy Cluster Set Looks Like
When using cluster set training as part of your muscle-building routine, you should select a weight that allows you to perform eight reps if you were lifting in traditional set form. On the first set, perform six reps, even though you know you could do a couple more.
Now rest for exactly 20 seconds. During that rest period, put the weight down and let go of the bar.
On the next mini-set, leave one rep in the tank. So, if you know that you can get five reps, stop after the fourth rep. Rest for another 20 seconds, then go to failure, which will probably be around three or four reps.
You can also experiment with higher starting reps. So you might begin with the weight you can do for 12 reps. In this case, you perform ten reps, rest for 20 seconds, then do your next mini-set, stopping with one rep in reserve. In the final mini-set, you go to failure.
What Exercises Should You Use for Cluster Set Training?
The exercises you choose for cluster set training will depend on your objective. If you’re using it for power or strength training, compound exercises like squats, deadlifts, and bench presses are ideal. With this type of training, you’re using 50 to 65% of your one-rep max. That means your risk of injury due to muscular failure and form breakdown is relatively low.
However, when using cluster sets for hypertrophy training, your muscular fatigue goes through the roof. That increases the likelihood that you will fail on the last rep or two of the cluster set. You want to avoid that from happening when using maximum weights on compound movements like the squat or bench press. For that reason, you should select exercises that are relatively safe if you fail on a rep.
So, rather than doing a cluster set on squats when training quads, do it on the leg press. If you fail on the last rep of a leg press, you won’t injure yourself the way you could on a squat. Similarly, when training the chest, you are better off using dumbbells or a chest press machine than a barbell. All those options will allow you to bail out of a rep without ending up with 90% of your one-rep max crushing down on your rib cage.
What an Explosive Power Cluster Set Looks Like
When using cluster sets for explosive power development, you should reduce the weight to about 50-65% of your one-rep max. Compared to hypertrophy or strength training, your reps will be relatively high.
For example, if you were doing squats, you might choose a weight with which you can do 10 quality reps. Perform five clean reps, concentrating on an explosive drive out of the hole on each rep. Now re-rack the weight and rest for exactly 30 seconds. Now do another five reps. Complete for a total of three mini sets within the cluster set.
Perform three or four cluster sets as part of your power training program one or two times per week.
What an Explosive Power Cluster Set for Strength Looks Like
Cluster sets for strength training typically involve the use of heavier weights than for hypertrophy or power. Choose a weight that is between 80-90% of your one-rep max and keep each mini-set to 1-2 reps. Here’s what that might look like for deadlifts:
Load the bar with 85% of your one-rep max.
Perform two reps.
Rest for 30 seconds.
Do your second mini-set of two reps.
After another 30-second rest, complete your third and final mini-set of two reps.
Complete a total of three cluster sets to complete your deadlift workout. Your rest between cluster sets should be 3-5 minutes.
How To Program Cluster Sets into Your Routine
When training for muscle gain, you don’t want to do cluster sets at the beginning of your workout. That’s because they are so fatiguing that your performance on the rest of the workout will probably be compromised. You should add a cluster set on the third exercise for a body part. For example, if you are training your chest, you might begin with three or four sets of dumbbell bench presses, then go to the incline barbell bench press for four sets before moving to the Hammer Strength machine chest press. This is the exercise you should do a cluster set on. Make it the final set for that exercise.
So, if you are doing the Hammer Strength machine chest press, you might do two sets of 10 reps. The third and final set is going to be a cluster set. If you were doing a traditional set with the same weight you did on the previous set, you might be able to get eight reps. It is because you’re fatigued and can’t get to the 10 reps of the previous set. For the cluster set, though, you will pump out six reps. You then rest for exactly 20 seconds and do another four reps. After another 20-second recovery, you keep going to failure. That might be three or four reps, taking your total for the cluster set to 13 or 14 reps.
At this point of your workout, your chest muscle fibers will be on fire. However, you may choose to do a final exercise. This will likely be an isolation move like dumbbell flyes or the pec dec. If you can handle it, do a final cluster set on the last set of that exercise to max out the intensity of your chest workout.
So, as you can see from the example, just one or two cluster sets per workout are all you need. This is an extremely intense form of training that places exceptionally heavy demands on your muscle fibers. If you overuse the technique, you will overtax the muscle and inhibit your ability to recover fully between workouts.
Who Should Use Cluster Sets?
Cluster set training is not designed for beginners. If you are still within your first two years of consistently working out, you should stick with traditional sets. They will give you all the muscle stimulation you need for growth. Then, once you’ve been training for a couple of years, have built your strength base, and are able to develop the mind-muscle connection that you need to know how many reps you’ve got left in the tank, then you can start experimenting with cluster sets.
The more advanced you become, the more beneficial cluster sets will be for you. The longer you’ve been training, the harder it will be to keep making strength and muscle gains. So an advanced technique like this will help you to push the envelope.
FAQs
Are cluster sets the same thing as rest-pause training?
Though cluster sets and rest-pause training are very similar, the key difference is that cluster sets are pre-programmed. At the outset, you know how many reps to do in all but the last mini-set (which is to failure). You also know how long your rest between each mini-set will be. When it comes to rest-pause training, though, you do reps to failure, then rest for just long enough to allow you to pump out another 2 or 3 reps.
How do cluster sets differ from drop sets?
Drop sets and cluster sets are both an extended set form of training. With drop sets, though, you start with a weight that will allow you to perform 6-8 reps. You then immediately decrease the weight slightly and pump out another few reps. You continue doing this for further drops until you reach muscle failure.
In contrast, cluster sets involve using the same weight for each of the mini sets that make up the cluster set.
Are cluster sets effective for building muscle?
Yes, cluster sets are an effective muscle-building strategy. It allows you to increase your training volume and time under tension while pushing a muscle to maximum fiber stimulation. This advanced technique can help you break through a muscle-building plateau and continue making progress.
How are cluster sets written on an exercise program?
Cluster sets can appear a bit like an algebra equation when you first see them. Here’s what they look like:
1(4 x 4) -20s w/ a 6RM
This means you will do one cluster set consisting of four mini-sets of four reps. Your rest between each mini-set will be 20 seconds. You will choose a weight that you can do six reps with.
Wrap Up
Cluster sets are a safe, effective way to maximally stimulate your muscle fibers for muscle gain. They are also great for increasing strength and power with load and rep modifications. This is a tool to be used in a careful, targeted manner. If you aim to build muscle, you don’t have to do more than one or two cluster sets in your workout to achieve results. Program them towards the end of the workout, during the third or fourth exercise, for maximum benefit.
References
Haff, Guy & Hobbs, Ryan & Haff, Erin & Sands, William & Pierce, Kyle & Stone, Michael. (2008). Cluster Training: A Novel Method for Introducing Training Program Variation. Strength & Conditioning Journal. 30. 67-76. 10.1519/SSC.0b013e31816383e1.
Lawton TW, Cronin JB, Lindsell RP. Effect of interrepetition rest intervals on weight training repetition power output. J Strength Cond Res. 2006 Feb;20(1):172-6. doi: 10.1519/R-13893.1. PMID: 16503678.
Lawton, Trent & Cronin, John & Lindsell, Rod. (2006). Effect of Interrepetition Rest Intervals on Weight Training Repetition Power Output. Journal of strength and conditioning research / National Strength & Conditioning Association. 20. 172-6. 10.1519/R-13893.1.
Haff, Guy & Burgess, SJ & Stone, Michael. (2008). Cluster training: theoretical and practical applications for the strength and conditioning professional. Prof. Strength and Cond.. 12. 12-17.
Oliver JM, Jagim AR, Sanchez AC, Mardock MA, Kelly KA, Meredith HJ, Smith GL, Greenwood M, Parker JL, Riechman SE, Fluckey JD, Crouse SF, Kreider RB. Greater gains in strength and power with intra set rest intervals in hypertrophic training. J Strength Cond Res. 2013 Nov;27(11):3116-31. doi: 10.1519/JSC.0b013e3182891672. PMID: 23736782.
Cite this page: Theunissen, S. (2023) ‘Master the Art of Cluster Sets: Boost Your Workouts and Unlock Your True Potential!’, Fitness Volt. Available at: https://fitnessvolt.com/cluster-sets/ (Accessed: 5 May 2023).
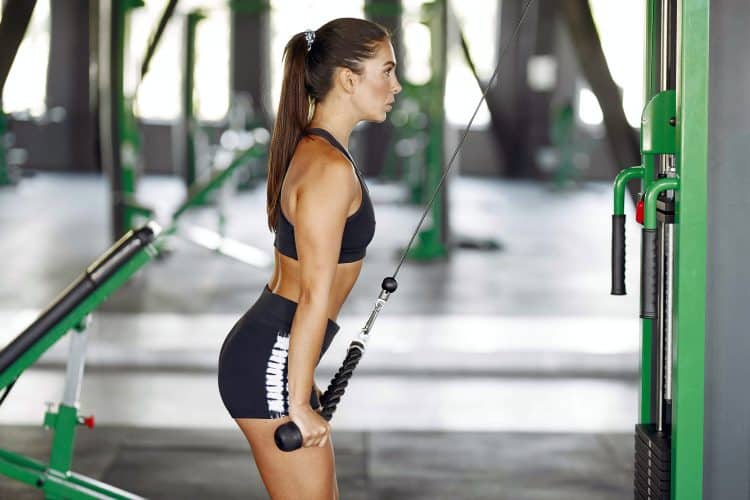
Upper Body Cable Workout for Functional Strength and Mass
Cable machines are great! They’re safe, effective, and versatile, which is why most gyms have several cable stations.
And yet, despite their obvious advantages and benefits, a lot of lifters only use cable exercises as finishers or as an afterthought. Instead, they build their workouts around compound free-weight exercises like barbell squats, bench presses, deadlifts, and overhead presses.
While there is nothing wrong with heavy compound free-weight exercises, you can have too much of a good thing. Do the same movements and the same workout over and over and eventually it will stop producing results.
So, if you are stuck in a training rut or just want to try something new, take our upper body cable workout for a spin. Not only will it increase your muscle mass, but it will also improve functionality, so you’ll look AND perform better.
Cable Training Advantages and Benefits
Before we reveal our upper body cable workout, let’s take a look at what makes cable training so darn effective!
The advantages and benefits of cable training include the following:
Target your muscles more precisely
Most freeweight exercises spread their effect across several muscle groups. While this is a great way to overload multiple groups of muscles, it’s less effective for targeting specific body parts.
Cables allow you to work your muscles more precisely, so you can develop localized hypertrophy and sculpt a more aesthetically pleasing physique.
A safer workout
Exercises like freeweight bench presses and squats can be risky, especially when training to failure. A missed rep can result in serious injury, and getting pinned under a heavy bar can even be fatal.
There is no such risk with cable exercises, and a failed rep should result in nothing more dangerous than a loud but harmless crash. This means that cable exercises are ideal for training to failure.
Perfect for drop sets
Most cable machines have selectorized weight stacks, making them ideal for muscle-building, pump-inducing drop sets. Do your chosen exercise to failure, reduce (or drop) the weight by 10-20%, and then rep out again. Repeat for 2-4 drops.
This popular bodybuilding strategy is an excellent way to take your muscles beyond failure, providing an increased stimulus for muscle growth.
A more joint-friendly workout
Compared to many freeweight exercises, cable machines are much easier on your joints. When you lift heavy barbells and dumbbells, the ends of your bones are often pressed together, resulting in a lot of compressive force.
This does not tend to happen so much with the same exercises performed using cables. As such, cable workouts are often more joint-friendly than some freeweight workouts.
More consistent muscle tension
Because you aren’t working directly against gravity, cable exercises tend to involve more consistent muscle tension than their freeweight counterparts. For example, when you do dumbbell flies, muscle tension peaks when your arms are extended but then decreases as you bring the weights over your chest.
In contrast, doing cable flies keep your muscles loaded through the entire range of motion, which may make them more effective for hypertrophy.
Change angles quickly and easily
When it comes to building muscle mass, bodybuilders know that angles matter. They adjust their limbs to hit specific parts of the muscles they want to develop, e.g., incline presses for the upper chest or wide-grip pulldowns to work their upper lats.
Unlike many freeweight exercises, changing the angle of your limbs during cable workouts is very easy. You can often do this mid-set simply by pushing or pulling in a slightly different direction.
All of this saves you from having to use angled benches, which is the norm when training with freeweights.
A more functional workout
Most cable exercises are performed while standing, which makes them more functional than many of the freeweight equivalents. For example, when was the last time you had to lay on your back and press a heavy weight upward? The barbell bench press is undeniably a good exercise. Still, it won’t necessarily improve your ability to push an opponent in football or increase the power of your throws or punches.
Cable exercises improve functional strength, which will enhance your ability to perform movements and activities outside of the gym. Cable exercises are especially useful for athletes, regardless of your chosen sport.
Upper Body Cable Workout for Functional Strength and Mass
This cable workout is designed to build upper body muscle while enhancing functionality. As such, it’s ideal for exercisers training for improved aesthetics who also care about their athletic performance.
Do this program 1-2 times per week in conjunction with a couple of lower-body workouts. After all, friends don’t let friends skip leg day!
But, before you begin, prepare your muscles and joints by warming up thoroughly. Begin with 5-10 minutes of progressive cardio followed by a few minutes of dynamic mobility and flexibility training for the body parts you’re about to train.
All set? Then let’s go!
Exercise
Sets
Reps
Recovery
1
Cable crossover
3-4
12-20
60-90 seconds
2
Supine cable incline chest press
3-4
12-20
60-90 seconds
3
Straight arm pulldown
3-4
12-20
60-90 seconds
4
Cable Y pulldown
3-4
12-20
60-90 seconds
5
Cable lateral raise
3-4
12-20
60-90 seconds
6
Cable Cuban press
3-4
12-20
60-90 seconds
7a
Cable Bayesian curl
2-3
12-20
60-90 seconds
7a
Cable overhead triceps extension
8a
Cable rope curl
2-3
12-20
60-90 seconds
8b
Cable rope pushdown
Exercises 7a and 7b and 8a and 8b are to be performed as supersets. Do the first exercise (a) and immediately do the second (b). Rest for the prescribed time and then repeat the pairing. Use the same pattern for the second superset.
Exercise Instructions
There are two ways to do most exercises – the right way and the wrong way. The right way keeps the tension on your workout muscles and away from your joints. In contrast, the wrong way makes your workout less effective and more likely to cause injury.
Use these step-by-step guidelines to ensure that you perform each exercise as correctly as possible. If any of the exercises are unfamiliar to you, do a few light sets to get a feel for the movement, and only increase the load when you’ve got your technique dialed in.
1. Cable crossover
Your first cable upper body exercise is a classic! Cable crossovers work all three pectoral heads, emphasizing the costal or lower head. It’s also an excellent exercise for isolating and firing up your chest before moving on to another chest exercise.
Steps:
Attach D-shaped handles to the high pulleys on a cable crossover machine.
Hold a handle in each hand and stand in the middle of the two weight stacks.
Adopt a staggered stance and stand with your arms stretched out to the side, hands about shoulder level.
With your elbows slightly bent but rigid, sweep your arms forward and down so your hands meet in front of your hips.
Slowly raise your arms, get a mild stretch in your chest, and repeat.
Muscles targeted:
Primary: Pectoralis major.
Secondary: Anterior deltoids.
Benefits:
A very shoulder-friendly chest exercise.
An effective way to target the lower/inner pecs.
A great way to prep your pecs for subsequent chest exercises.
Tips:
Keep your core braced and your torso upright to avoid turning this move into a pressing exercise.
Pause with your pecs contracted for 1-2 seconds at the midpoint of each rep to maximize muscle engagement.
For variety, you can also do this exercise with horizontal arms or moving from low to high.
2. Supine cable incline chest press
Supine cable incline chest presses are a uniquely effective upper and inner chest exercise. They feel very different from doing incline dumbbell presses, which is the nearest freeweight equivalent. However, make no mistake, this is a bonafide pec-builder that’s hard to beat!
Steps:
Place an incline bench in the center of a cable crossover machine. Adjust the backrest to around 30 degrees.
Attach D-shaped handles to the low pulleys.
Sit on the bench and hold a handle in each hand. Lie back and pull the handles into your shoulders. Rotate your wrists so your palms face down your body.
Press your hands up and together so they meet above your chest. Pause for 1-2 seconds.
Return your hands to your shoulders, stretch your pecs, and continue for the prescribed reps.
Muscles targeted:
Primary: Pectoralis major, anterior deltoids.
Secondary: Triceps.
Benefits:
A very effective upper/inner chest exercise.
Keeps your muscles under near-constant tension.
Very safe, as no bar or weights can drop on your chest.
Tips:
Adjust the angle of your bench to see what feels and works best for you.
You can also do this exercise with a neutral or hands facing inward grip.
Push your hands inward as much as upward up to maximally engage your chest.
3. Straight arm pulldown
Straight arm pulldowns are one of a small handful of exercises that isolate your lats. That means they don’t involve your biceps, and movement only occurs at one joint. Like cable crossovers, this exercise provides a great way to wake up the target muscles before moving on to your next back movement.
Steps:
Attach a straight bar to a high cable machine.
Grab the handle with an overhand, shoulder-width grip.
Brace your abs and set your shoulders down and back.
With your elbows slightly bent but rigid, push the bar down to your upper thighs. Flex your lats at the bottom of each rep.
Raise your arms, feel the stretch in your lats, and repeat.
Muscles targeted:
Primary: Latissimus dorsi, triceps.
Secondary: Rectus abdominis.
Benefits:
An excellent preparatory exercise for the lats.
An effective way to target the long head of the triceps.
A great move for building a stronger mind-muscle connection with your lats.
Tips:
Drive your elbows back and down to maximize lat engagement.
You can also do this exercise with a rope handle.
Do this exercise while kneeling to make the movement stricter and more demanding.
4. Cable Y pulldown
Most lat pulldown variations involve pulling your arms more-or-less straight down. This unique variation is more of a pull-in than a pulldown, hitting your lats from a very unusual angle. This exercise is guaranteed to give you are wider upper back.
Steps:
Attach D-shaped handles to the high pulleys of a cable crossover machine.
Grip a handle in each hand and kneel in the middle of the pulleys, arms raised to make a Y-shape.
Bend your arms and pull your elbows down and into your sides, squeezing your shoulders down and back.
Reach up and out and repeat.
Muscles targeted:
Primary: latissimus dorsi, biceps.
Secondary: Trapezius, rhomboids.
Benefits:
An effective alternative to traditional lat pulldowns.
A unique lat exercise that will develop your lat width.
A great way to train your lats unilaterally.
Tips:
Kneel on a foam pad or folded mat for comfort.
Lead with your elbows and keep your wrists straight to fully engage your lats.
Think about tucking your elbows into your ribs to make this exercise as effective as possible.
5. Cable lateral raise
Cable lateral raises are a much better exercise than the same move done with dumbbells. With regular dumbbell lateral raises, all the tension comes on at the end of the movement, and the start is almost too easy to have much of an effect. Using cables means your muscles are under tension from start to finish, making this a far superior exercise.
Steps:
Attach D-shaped handles to the low pulleys of a cable crossover machine.
Hold the left handle in your right hand and the right handle in your left hand so the cables cross in front of your hips.
Stand in the center of the pulleys. Bend your arms slightly, but then keep them rigid. Brace your core and set your shoulders down and back.
Raise your arms up and out so they’re parallel to the floor.
Lower your arms back to your sides and repeat.
Muscles targeted:
Primary: Medial deltoids, upper trapezius.
Secondary: N/A.
Benefits:
A very effective exercise for the medial or side deltoids.
Keeps your shoulders under near-constant tension.
A perfect exercise for intensity-boosting drop sets.
Tips:
Lead with your elbows (and not your hands) to maximize deltoid engagement.
Keep your shoulders down and back to avoid overusing your upper traps.
You can also do this exercise with a single cable, like this:
6. Cable Cuban press
The Cuban press is beloved by weightlifters, bodybuilders, and functional exercisers. It’s one of a few exercises that manages to work all three deltoid heads at once. It’s also a revered pre/rehab exercise. So, better looking, more muscular, healthier shoulders? We’re in!
Steps:
Attach your D-shaped handles to a low cable machine. Hold a handle in each hand and step back to tension the cables.
Brace your core and set your shoulders down and back.
Bend your elbows and row the handles up to your lower chest.
Next, rotate your forearms forward and up to vertical.
Press the handles up and overhead.
Reverse the movement and then repeat.
Muscles targeted:
Primary: Deltoids, trapezius, rhomboids, rotator cuff.
Secondary: Biceps, triceps.
Benefits:
A total deltoid exercise.
Good for developing shoulder mobility and stability.
An all-in-one solution for bigger, stronger, healthier shoulders.
Tips:
You can also do this exercise with a single handle/bar.
Go light and focus on using a controlled, smooth movement. This is not an exercise for heavy weights!
Skip the overhead press is you want to emphasize your rotator cuff.
7a. Cable Bayesian curl
Bayesian curls work your biceps like incline dumbbell curls. They start with your shoulder in an extended position, so your biceps are stretched. This provides an excellent workout for the long head of your biceps, which gives your biceps their peak.
Steps:
Attach a D-handle to a low pulley machine.
Grab the handle and adopt a split stance with your back to the weight stack. Extend your arm behind you and brace your core.
Bend your elbow and curl the handle forward and up to your shoulder.
Extend your arm, getting a good mid-rep biceps stretch.
Continue for the prescribed number of reps.
Do the same number of reps on each side.
Muscles targeted:
Primary: Biceps.
Secondary: Brachialis, brachioradialis.
Benefits:
One of the best biceps peaking exercises around.
Keeps your muscles under more constant tension than incline dumbbell curls.
Ideal for sleeve-splitting pump-inducing drop sets.
Tips:
Push your arm forward at the top of each rep to fully engage your biceps.
Keep your wrists straight and hips and shoulders squared and level throughout.
You can also do this exercise with a hammer or neutral grip.
7b. Cable overhead triceps extension
If you want bigger arms, this exercise needs to be part of your workouts. By raising your arms overhead, you put the long head of your triceps into a stretched position, forcing them to work harder. This ensures all three triceps heads get a great workout, maximizing muscle growth and size.
Steps:
Attach a rope handle to a low pulley machine.
Grab the handles and straighten your arms above your head so the cable is behind you.
Pull your upper arms into the side of your head, brace your core, and set your shoulders down and back.
Bend your elbows and lower your hands behind your head. Get a good stretch in your triceps.
Extend your arms and repeat.
Muscles targeted:
Primary: Triceps.
Secondary: N/A.
Benefits:
A proven triceps builder.
One of the best exercises for targeting the long head of the triceps.
An effective shoulder and thoracic spine mobilizer.
Tips:
Do this exercise while kneeling or sitting if preferred.
You can also do this exercise with a straight or EZ bar.
Keep your chest up and shoulders back and down to make this exercise as safe and effective as possible. Try not to lean back, as doing so could cause injury.
8a. Cable rope curl
Dumbbell hammer curls are excellent for building thicker biceps and more domineering forearms. However, like so many dumbbell exercises, the tension doesn’t really kick in until the midpoint of each rep. Cable rope curls work the exact same muscles, but there is tension from the very start of each rep.
Steps:
Attach a rope handle to a low pulley machine. Hold one end of the rope in each hand and stand with your arms straight, core braced, and shoulders back and down.
Keeping your upper arms close to your sides, bend your elbows and curl your hands up to your shoulders. Keep your hands neutral, i.e., palms facing inward.
Extend your arms, pause, and repeat.
Muscles targeted:
Primary: Biceps.
Secondary: Brachialis, brachioradialis.
Benefits:
A better exercise than dumbbell hammer curls.
A total biceps and forearm exercise.
More elbow-friendly than straight bar curls.
Tips:
Bend your knees slightly for balance and stability.
Keep your wrists straight throughout.
Do not use your legs or back to help you swing the weight up, as doing so takes tension away from the target muscles.
8b. Cable rope pushdown
Triceps pushdowns are one of the most popular triceps exercises around. However, while the straight bar version is relatively effective, using a rope handle makes it even more do. That’s because the neutral grip afforded by the rope handle increases triceps long-head engagement, which can add a lot to your upper arm size.
Steps:
Attach a rope handle to a high pulley. Grab one end in each hand and pull your upper arms down to your sides. Brace your core and set your shoulders down and back.
Extend your arms and press your hands down to the outside of your thighs. Spread your hands apart to maximize triceps engagement.
Bend your arms and repeat.
Muscles targeted:
Primary: Triceps.
Secondary: N/A.
Benefits:
Targets the all-important long head of the triceps.
Very elbow and wrist-friendly.
An excellent exercise to superset with cable rope curls.
Tips:
Bend your elbows as far as possible without moving your arms away from your sides. There is no need to stop at 90 degrees.
Keep your legs and torso stationary to avoid turning this into a decline chest press exercise.
Use a towel instead of a rope handle to increase forearm engagement, like this:
Upper Body Cable Workout FAQ
Do you have a question about this workout or cable training in general? No sweat because we’ve got the answers you seek!
1. Is this workout for beginner, intermediate, or advanced exercisers?
The great thing about strength training is that people with vastly different fitness levels can often do the same workout. Beginners can use lighter loads and do fewer sets, while more experienced exercisers can load up the weights and do more sets. However, the exercises can remain unchanged.
So, with that in mind, this workout is suitable for all levels, but it’s probably best for beginners and intermediates. More advanced exercisers may find that doing two exercises per body part is not enough volume to build muscle and get stronger.
2. Is this a cutting or bulking workout?
Cutting and bulking have more to do with your diet than your workout. Cutting involves reducing your food intake to create a calorie deficit. This forces your body to burn more fat for fuel so that you get leaner and more defined.
In contrast, bulking involves eating more and creating a calorie surplus. This gives you more energy for training and promotes muscle growth and weight gain.
Providing you train hard enough, it doesn’t matter that much what workout you follow for cutting and bulking. So long as your diet is dialed in, you should be successful.
There ARE bulking and cutting workouts you can follow, but in reality, it’s more a question of diet.
3. Why do higher reps for cable exercises?
Most cable exercises do not lend themselves to heavy weights and low reps. Because many of the exercises are performed standing, using big loads makes it much harder to maintain good posture and even remain on your feet.
Use a massive weight with, e.g., cable crossovers, and you’ll probably end up moving backward instead of pushing the weight forward.
Using moderate weights and medium to high reps provides the best opportunity to stimulate your muscles while using the best possible form. While this training approach won’t build your maximal strength, it can be effective for hypertrophy, provided you take each set within a couple of reps of failure (1).
4. Can I change any of the exercises?
Feel free to change the exercises providing you choose movements that work the same muscles. For example, doing cable skull crushers instead of cable rope pushdowns is OK, while doing cable reverse curls instead of cable crossovers is not.
Changing exercise is an excellent way to start learning how to write your own workouts, and that’s something every exerciser should be able to do.
5. How long should I follow this program?
Even the best workouts start to lose their potency after 6-8 weeks. Because of something called the repeated bout effect, your muscles get used to the exercises in your program and become less responsive to them.
Avoid training plateaus by changing your workout whenever you feel your progress starting to stall. But, don’t change your workout so often that it doesn’t get a chance to work, e.g., every other week.
However, you can prolong the life of a program by a) increasing the weights week by week, b) using different set and rep schemes, and c) making minor changes to things like the exercise selection and order.
That said, it would be a mistake to keep on doing the same workout once it’s stopped working, as all you’ll do is maintain your current fitness rather than increase it.
More Cable Exercises:
Closing Thoughts
Cable exercises are effective, functional, joint-friendly, and safe. And while there is nothing wrong with lifting heavy barbells and dumbbells, that doesn’t mean they’re the only way to build muscle and develop a high level of performance and conditioning.
If you are banged up or just bored of heavy bench presses and bent-over rows, give our upper-body cable workout a try. Do it 1-2 times a week for the next 6-8 weeks, and the results will speak for themselves.
References:
Lasevicius T, Ugrinowitsch C, Schoenfeld BJ, Roschel H, Tavares LD, De Souza EO, Laurentino G, Tricoli V. Effects of different intensities of resistance training with equated volume load on muscle strength and hypertrophy. Eur J Sport Sci. 2018 Jul;18(6):772-780. doi: 10.1080/17461391.2018.1450898. Epub 2018 Mar 22. PMID: 29564973. https://pubmed.ncbi.nlm.nih.gov/29564973/
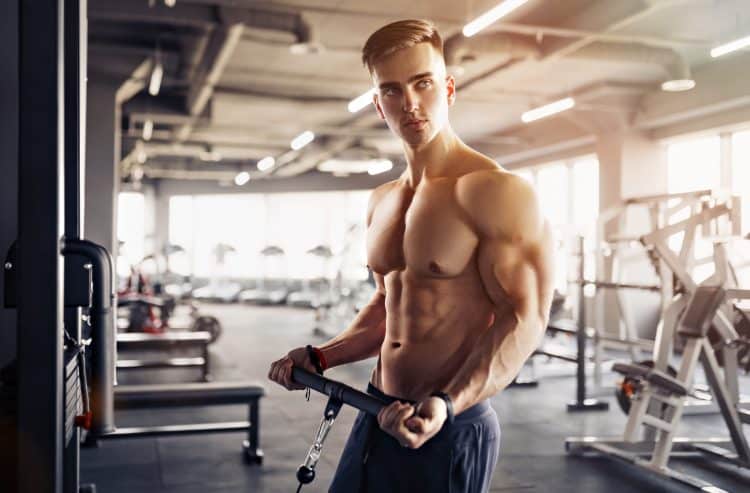
The Best Cable Hypertrophy Workout Program
Most hypertrophy training programs are built around compound freeweight exercises. There is a firmly held belief that movements like squats, bench presses, and deadlifts are superior for building muscle.
However, the truth is that your muscles cannot differentiate between freeweight, machine, and bodyweight exercises. Rather, they just know tension and work.
Providing you train hard enough, long enough, and often enough, your muscles will grow and get stronger. It doesn’t matter if you lift barbells, kettlebells, or your own body weight. As far as your muscles are concerned, work is work (1).
That’s not to say that the classic freeweight exercises are ineffective. After all, they provide a convenient if low-tech way to overload your muscles. However, they are not the only training tool available for building the body of your dreams.
In this article, we reveal how cable machines can help you reach your hypertrophy goals and provide you with a cable hypertrophy workout to try.
What’s So Great About Cable Machines?
Cable exercises can offer several advantages and benefits over other types of resistance training. These include:
More constant tension on your muscles
When you do freeweight training, the tension on your muscles tends to vary depending on leverage and the angle of your limbs.
For example, squats are hardest when your knees are deeply bent but get easier as your legs straighten. With biceps curls, the tension on your arms is greatest as your elbows approach 90 degrees. This means some parts of your reps are more effective than others.
With most cable machines, the workload is distributed more evenly, and your muscles are kept under more constant tension. This means every rep performed is potentially more effective.
Less joint stress
During many freeweight exercises, you have to support the load on extended joints, which pushes the ends of the bones together. This can cause discomfort and even severe injury. Cable exercises tend not to do this, so they’re often more joint-friendly. You can also modify your chosen exercise based on your unique biomechanics, adding to your workout comfort.
So, if years of heavy freeweight training have given you painful elbows, hips, knees, or shoulders, doing more cable exercises could be a good option.
Hit your muscles from a variety of angles more easily
When it comes to building an aesthetic physique, training angles matter. For example, you must develop your upper, mid, lower, inner, and outer pecs to sculpt the perfect chest. Using cables makes it easy to alter the angle of your limbs and target the muscle fibers you want to develop.
In contrast, doing the same thing with freeweights invariable means using different-angled benches and different grips. Cables make training muscles from a variety of angles much more straightforward.
A safer workout
Building muscle invariably involves training close to failure. For this reason, most freeweight exercises are best performed with a spotter or in a power rack. Even then, you could still find yourself pinned under a heavy weight, possibly getting injured in the process.
Cable exercises are much safer as you are never beneath a weight – heavy or otherwise. Instead, you can just drop the weight if you cannot perform more reps. The worse thing that can happen is you make a big clanging noise.
Perfect for muscle-building drop sets
Drop sets are a bodybuilding technique that allows you to train your muscles beyond failure. You rep out with your chosen weight, and then, on reaching failure, you lower the load by 10-20% and crank out a few more reps. Bodybuilders use drop sets to wring the last bit of energy from their muscles and make their workouts more intense.
Cable machines with selectorized weight stacks are perfect for drop sets. In contrast, drop sets are usually less convenient with barbells as reducing the weight takes too long.
Quicker transitions between exercises
If you like doing supersets, you’ll love training with cables. Supersets involve moving quickly from one exercise to another. Delaying your transition between movements makes supersets less effective. Switching pulleys or changing handles on a cable machine takes no more than a few seconds, so your superset workouts will go more smoothly.
Suitable for all levels of exerciser
Beginner, intermediate, and advanced exercisers can all benefit from training with cables. In contrast, some beginners find freeweight exercises tricky. There are also exercises that are best learned under the tutelage of a trainer or coach because they’re so technical, e.g., power cleans, front squats, and barbell bent-over rows. However, most cable exercises are quite straightforward, so even raw beginners can quickly get to grips with them.
A more functional workout
A functional exercise is a movement that replicates everyday or sporting activities. The best functional exercises are performed standing because that’s how your body usually works in nature.
Most cable exercises can be considered functional as they closely mirror the demands of everyday and athletic activities. However, the same cannot be said about some freeweight exercises.
For example, when was the last time you had to lie on your back and press a heavy weight off your chest? In contrast, standing cable chest presses are much more common, e.g., pushing open a heavy door or shoving an opponent in football.
Cable Hypertrophy Workout Overview
While you could just add a few cable exercises to your current workout, you can also immerse yourself completely in cable training. That way, you can fully experience and appreciate the power of cable exercises.
Here is cable machine hypertrophy training plan to try.
Upper body cable workout
#
Exercise
Sets
Reps
Recovery
1
Cable crossover
3-4
12-20
60-90 seconds
2
Single-arm cable chest press
3-4
12-20
60-90 seconds
3
Straight arm cable pulldown
3-4
12-20
60-90 seconds
4
Single-arm cable row
3-4
12-20
60-90 seconds
5
Cable lateral raise
3-4
12-20
60-90 seconds
6
Single-arm biceps cable curl
3-4
12-20
60-90 seconds
7
Cable triceps pushdown
3-4
12-20
60-90 seconds
Lower body + core cable workout
#
Exercise
Sets
Reps
Recovery
1
Cable goblet squat
3-4
12-20
60-90 seconds
2
Cable stiff-legged deadlift
3-4
12-20
60-90 seconds
3
Cable single-leg extension
3-4
12-20
60-90 seconds
4
Cable single-leg curl
3-4
12-20
60-90 seconds
5
Cable lunge
3-4
12-20
60-90 seconds
6
Kneeling cable crunch
3-4
12-20
60-90 seconds
7
Cable Paloff press
3-4
12-20
60-90 seconds
This program utilizes an upper body/lower body (and core) split so you can train your major muscle groups one, two, or three-times a week according to your preferences and the time you have available.
Your training frequency options are:
Monday
Tuesday
Wednesday
Thursday
Friday
Saturday
Sunday
Option 1
Upper body
Rest
Rest
Lower body
Rest
Rest
Rest
Option 2
Upper body
Lower body
Rest
Upper body
Lower body
Rest
Rest
Option 3
Upper body
Lower body
Upper
body
Lower body
Upper body
Lower body
Rest
Choose the training frequency that best matches your experience and energy levels.
Of course, before you start either of these workouts, you should take a few moments to prepare your muscles and joints for what you are about to ask them to do. Begin with 5-10 minutes of easy cardio followed by dynamic mobility and flexibility exercises for the body parts you’re going to train.
Read more about warming up for strength training here.
Cable Hypertrophy Workout Exercise Instructions
There are two ways to perform an exercise – the right way and the wrong way. The right way is safe, productive, and time efficient. The wrong way increases your risk of injury and is less effective.
Use these instructions to ensure you perform all the exercises in your workouts correctly.
Upper Body Workout
1. Cable crossover
Cable crossovers are an isolation exercise for your chest. Doing this exercise before the following chest pushing exercise will pre-exhaust your pecs and make that second exercise more challenging.
Muscles worked:
Pectoralis major, anterior deltoids.
Steps:
Set your cables to shoulder height and attach a D-shaped handle to each pulley.
Grab the handles and stand between the cables with your arms extended to the sides. Use a split stance for balance. Brace your core.
Keeping your elbows slightly bent but rigid, sweep your arms forward and down so they meet in front of your hips.
Open your arms, get a stretch in your chest, and repeat.
Tips:
Move smoothly to keep the tension on the target muscles.
Pause at the midpoint of each rep to maximize muscle engagement.
You can also do this exercise horizontally or go from low to high to hit different parts of your chest.
2. Single-arm cable chest press
Most chest exercises work both sides of your pecs at the same time. Unfortunately, this can disguise left-to-right strength imbalances and lead to uneven chest development. Using one arm at a time means you can fix these imbalances and prevent them from happening in the first place.
Muscles worked:
Pectoralis major, triceps, anterior deltoids.
Steps:
Attach a single D-shaped handle to a cable machine set to chest height.
Hold the handle in one hand, turn your back on the weight stack, and then adopt a split stance for balance. Brace your core.
Drive your arm forward at shoulder height.
Return to the starting position and repeat.
Do the same number of reps with both arms.
Tips:
Use a neutral or palms-down grip as preferred.
Push your arm upward to hit your upper chest more, or push downward to work your lower chest if you wish.
You can train both sides of your chest simultaneously if you have a narrow dual cable machine.
3. Straight arm cable pulldown
Like doing cable crossovers before single-arm chest presses, doing straight-arm pulldowns before single-arm rows will pre-fatigue your lats to make the subsequent exercise more effective. In addition, this sequence of events will help strengthen your mind-muscle connection for a more effective workout.
Muscles worked:
Latissimus dorsi, triceps, posterior deltoid.
Steps:
Attach a straight bar to a head-high cable machine.
Hold the handle with an overhand, shoulder-width grip. Brace your abs.
Keeping your arms straight, use your lats to push the bar down to your thighs.
Raise your arms and repeat.
Tips:
You can do this exercise on a cable crossover or a lat pulldown machine.
Pause with the bar lightly touching your legs to maximize muscle engagement.
Think about leading with your elbows and pulling them down and back to contract your lats as fully as possible.
4. Single-arm cable row
As with single-arm chest presses, single-arm cable rows allow you to train one side of your body at a time. Not only is this an excellent way to ensure both lats are developed equally, but it also provides your core and lower back with a welcome additional workout.
Muscles worked:
Latissimus dorsi, biceps, posterior deltoids.
Steps:
Attach a single D-shaped handle to a cable machine set to chest height.
Hold the handle and take 1-2 steps back to tension the cable. Brace your core and pull your shoulders down and back.
Bend your arm and pull the handle into your lower ribs.
Extend your arm and repeat.
Do the same number of reps on both sides.
Tips:
Lead with your elbow and drive it back to fully engage your lats and upper back muscles.
Experiment with an underhand and neutral grip to see which you prefer.
Use a staggered stance for extra balance if required.
5. Cable lateral raise
Cable lateral raises target your medial or side deltoid. This is the deltoid head that gives your shoulders their width, contributing to your V-taper. Using cables instead of dumbbells makes this exercise much more effective because it keeps your muscles under tension for longer.
Muscles worked:
Medial deltoids.
Steps:
Attach a D-shaped handle to a low pulley machine. Stand sideways onto the weight stack and hold the handle in your furthest hand so the cable runs in front of your hips. Brace your core.
Keeping your elbows slightly bent but rigid, raise your arm to the side until your hand is level with your shoulder.
Lower your arm and repeat.
Do the same number of reps on both sides.
Tips:
Try doing this exercise with the cable behind you to change the feel of the movement.
Lead with your elbows and not your hands to get more from this exercise.
You can also do this exercise with both arms at the same time if you wish:
6. Single-arm biceps cable curl
When it comes to building bigger biceps, your range of motion matters. Single-arm biceps cable curls start with your upper arm extended behind you, putting your biceps into a stretched position. This move is the cable equivalent of incline dumbbell curls, which is another renowned arm builder. This exercise is also known as a Bayesian curl.
Muscles worked:
Biceps, forearms.
Steps:
Attach a D-shaped handle to a low cable pulley. Grab the handle with one hand and turn your back to the weight stack. Take 1-2 steps forward and adopt a split stance for balance. Your arm should be extended slightly behind you.
Keeping your hips and shoulders square, bend your arm and curl your hand up to your shoulder.
Extend your arm, getting a stretch in your working biceps, and repeat.
Tips:
You can also do this exercise with a resistance band.
Use a neutral hammer grip to emphasize your brachioradialis and brachialis muscles.
Adjust the height of the pulley to hit your biceps from different angles.
7. Cable triceps pushdown
Cable triceps pushdowns are a classic cable arm exercise. While they’re simple and ideal for beginners, more experienced lifters will benefit from this exercise which is why it features in so many triceps workouts. As the saying goes, if it ain’t broke, don’t fix it!
Muscles worked:
Triceps.
Steps:
Attach a straight bar to a high cable pulley. Grip the bar with a shoulder-width overhand grip.
Pull your upper arms into your sides, brace your core, and set your shoulders down and back.
Extend your arms and press the bar down to your thighs. Pause for 1-2 seconds.
Bend your arms as far as you can without letting your upper arms move away from your sides.
Continue for the specified number of reps.
Tips:
You can also perform this exercise with a V-shaped bar or a rope handle if preferred.
Try using an underhand grip for variety.
Keep your torso uptight to avoid turning this into a pressing exercise. Instead, isolate your triceps, and don’t use your abs and shoulders to push the weight down.
Lower Body Workout
1. Cable goblet squat
Most people do goblet squats with a dumbbell or kettlebell. However, they work just as effectively with a cable machine. As an added advantage, using cables means you can adjust the weight more quickly, making them good for drop sets.
Muscles worked:
Quadriceps, hamstrings, gluteus maximus, core.
Steps:
Attach a handle to a low pulley. Hold the handle in front of your chest, just below your chin. Set your shoulders and brace your core.
Take a small step backward and stand with your feet about shoulder-width apart, toes turned slightly outward.
Bend your legs and squat down until your thighs are roughly parallel to the floor. Do not round your lower back.
Stand back up and repeat.
Tips:
Work your glutes harder by putting a booty band around your knees.
Hit your quads harder by placing your heels on weight plates.
Experiment with different bars and handles to see which feels the most comfortable.
2. Cable stiff-legged deadlift
The hamstrings are a biaxial muscle, meaning they cross and affect two joints. As such, you need to do knee flexion AND hip extension exercises to fully develop your hammies. Cable stiff-legged deadlifts are a very effective hip extension exercise working not just your hamstrings but your entire posterior chain.
Muscles worked:
Gluteus maximus, hamstrings, core.
Steps:
Attach a bar or rope handle to a low pulley.
Take hold of the handle, stand up, and take 1-2 steps back to tension the cable.
Stand with your feet hip-width apart, knees slightly bent. Brace your core and pull your shoulders down and back.
Push your butt back and lean forward from your hips, reaching out with your arms. Do not round your lower back.
Push your hips forward and stand back up, squeezing your butt as you do so.
Continue for the required number of repetitions.
Tips:
The further back you stand from the weight stack, the more effective this exercise becomes.
Experiment with your stance width to see which works best and feels most comfortable.
You can also do this exercise with just one leg – single-leg cable stiff-legged deadlifts.
3. Cable single-leg extension
While there is nothing inherently wrong with seated leg extensions, they put one of your quads (rectus femoris) in a relaxed position which means they can’t contribute much to the movement. This standing variation hits the rectus femoris much harder, making it a more complete quad-builder.
Muscles worked:
Quadriceps, hip flexors, core.
Steps:
Put on an ankle strap and attach it to a low cable machine. Turn your back to the weight stack. Take 1-2 steps forward to tension the cable.
Bend your knee and move your hip backward.
Next, drive your leg forward and extend your knee against the load.
Return to the starting position and repeat.
Change legs and do the same number of reps on the opposite side.
Tips:
Brace your core to stabilize your lumbar spine and hips.
Hold onto the back of an upright exercise bench for balance.
For home workouts, you can do this exercise with a resistance band.
4. Cable single-leg curl
While most gyms have seated and prone leg extension machines, standing leg curls are not as common. That’s a shame because the standing leg curl is a superb hamstring exercise. Don’t worry, though; you can replicate this classic old-school hamstring exercise with a cable machine and your trusty ankle strap.
Muscles worked:
Hamstrings, gluteus maximus, core.
Steps:
Put a cuff around your ankle and attach it to a low pulley machine. Stand facing the weight stack and use your arms for balance. Shift your weight onto your supporting leg and brace your core.
Extend your leg backward and simultaneously bend your knee, curling your foot up toward your butt.
Lower your foot back down and repeat.
Tips:
You can also do this exercise with a resistance band.
Make sure you do the same number of reps on both legs.
Try to keep your calf relaxed to ensure your hamstrings do most of the work during this exercise. The calves also help flex the knee.
5. Cable lunge
Bodyweight and freeweight lunges are great exercises, but you can add an extra dimension to your leg workouts by doing them with a cable machine. Cable lunges force you to work harder to decelerate and accelerate the load, challenging your lower body muscles in a whole new way.
Muscles worked:
Quadriceps, hamstrings, gluteus maximus, core.
Steps:
Attach a D-shaped handle or rope handle to a low pulley.
Hold the handle with both hands and take 1-2 steps back to tension the cable. Stand tall, brace your abs, and pull your shoulders down and back.
Take a big step forward, bend your legs, and lower your back knee down to within an inch of the floor.
Push off your front leg and return to the starting position.
Repeat for the desired number of reps.
Tips:
Do all your reps on one leg and then switch or use an alternating leg action as preferred.
You can also do backward cable lunges.
Try holding the handle with just one hand to increase the stability demands of the exercise and work your core a little more.
6. Kneeling cable crunch
While we can’t guarantee that kneeling cable crunches will give you a six-pack, we can say that this is one of the best exercises for overloading your abs and making them thicker. Get your body fat levels down, and this exercise will give you a great-looking midsection.
Muscles worked:
Rectus abdominus, obliques, hip flexors.
Steps:
Attach a rope handle to a high cable machine.
Kneel down and pull the handles down to the front of your shoulders.
Flex your spine and curl your shoulders down toward your hips.
Kneel upright and repeat.
Tips:
Exhale as you bend forward to maximize abs engagement.
Kneel on a folded mat or foam pad for comfort.
Try not to flex your hips too much. Most of the movement should come from your spine.
7. Cable Paloff press
Invented by physical therapist John Paloff, the Paloff press is an anti-rotation exercise. As such, you’ll use your abs to stop your body from twisting. This is how your core works during many fitness and general activities, from running to pushing a heavy door open. The Paloff press is a very functional core exercise that will also give you a rock-hard waist.
Muscles worked:
Obliques, rectus abdominus, transverse abdominis.
Steps:
Set a cable machine to about chest height and attach a D-shaped handle to it. Hold the handle in both hands and stand sideways on. Brace your core and pull your hand into your chest.
Without twisting either your hips or shoulders, extend your arms out in front of you, keeping them parallel to the floor.
Pull your hands back into your chest and repeat.
Change sides and repeat.
Tips:
Adopt an athletic stance with your knees slightly bent and weight on the balls of your feet for better balance.
You can also do this exercise in a half or full-kneeling position to reduce the tendency to use your legs.
Do this exercise with a resistance band if preferred.
Cable Hypertrophy FAQs
Got a question about our cable hypertrophy workout program? No worries because we’ve got the answers!
1. Is this a cutting or bulking program?
You can use this workout plan for cutting or bulking. That’s because it’s your diet that determines whether you gain weight or lose fat. Create a significant calorie surplus to bulk or a calorie deficit to burn fat and cut weight.
Read more about cutting vs. bulking here.
2. Can I change some of the exercises?
You certainly can! However, ensure you are hitting the same muscle groups with your new exercise. For example, you can do lat pulldowns instead of single-arm rows, as both work your upper back. However, doing cable chest presses instead of cable crunches is not a suitable exchange.
3. What weights should I use?
Unfortunately, this is the one question we cannot answer because we don’t know how strong or experienced you are. So, pick weights that take you close to failure in the specified repetition range of 12-20. If you cannot do 12 reps, your chosen weight is too heavy. But if you can do more than 20, it’s too light.
Determining the correct weights will take a little trial and error, but you should have it figured out within a couple of workouts.
However, you also need to challenge your muscles with gradually harder workouts. To do this, you can either use the same weight but do more reps or keep your reps the same and lift more weight.
This is called progressive overload and is the key to building bigger, stronger muscles.
4. What should I do if one of the exercises causes pain?
Effective bodybuilding training is normally uncomfortable, but there is a big difference between exercise-induced discomfort and pain. Pain is your body’s way of telling you that something is wrong.
If an exercise causes pain, you should stop what you are doing, check your form, and reduce the load. This may be all you need to do to eliminate the hurt.
But, if that pain persists, you may have an injury, and you should stop training and seek medical advice.
In most cases, muscle injuries are treated using PRICE, the acronym for protection, rest, ice, compression, and elevation. Most mild soft tissue injuries heal in a week or so. However, joint injuries can take much longer.
Depending on the nature of your injury, you may be able to train around it. However, it’s usually a bad idea to train through pain, as that just makes matters worse and delays your recovery.
5. Can I use training systems to make this workout harder?
Training systems are recognized methods you can use to push your muscles beyond failure. Popular training systems for bodybuilding include drop sets, partial reps, supersets, and 21s.
If you are familiar with these methods, you are free to use them in conjunction with this workout. However, there is no need to use them all the time, as straight/standard sets, when performed correctly, are usually sufficient to trigger hypertrophy.
More Cable Exercises:
Closing Thoughts
A lot of exercisers reserve the cable machine for isolation and finishing exercises, preferring to use freeweights for the majority of their workouts. While such an approach can work, there is no need to view cable training as supplementary to your main workout.
In fact, you can do all your training on a cable machine if you wish.
Take our cable machine workout for a spin to experience the power of cable machine training for yourself.
References:
Signorile JF, Rendos NK, Heredia Vargas HH, Alipio TC, Regis RC, Eltoukhy MM, Nargund RS, Romero MA. Differences in Muscle Activation and Kinematics Between Cable-Based and Selectorized Weight Training. J Strength Cond Res. 2017 Feb;31(2):313-322. doi: 10.1519/JSC.0000000000001493. PMID: 28129277. https://pubmed.ncbi.nlm.nih.gov/28129277/
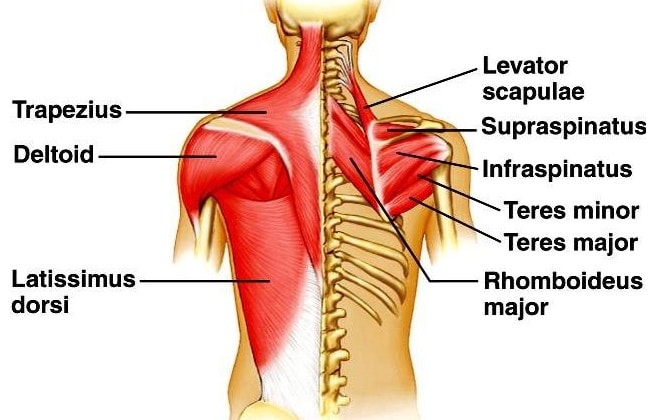
5 Back Workouts for Women: Bring the SexyBack!
Most women want an hourglass figure. However, some girls mistake an hourglass figure for a tennis racket figure. These ladies spend considerable time working on their booties but almost always overlook a vital aspect of achieving their dream figure — a shapely back. Ladies that want to rock a strapless dress or tank top must prioritize training their backs. Plus, a shapely back can add to your physique aesthetics by making your waist look smaller.
To build a curvy figure, you must incorporate back workouts into your training regimen. Your back workouts should have a balance of rowing exercises, such as barbell rows, dumbbell rows, seated cable rows, and horizontal pulling movements, such as lat pulldowns, pull-ups, etc.
After your legs, your back is the second-biggest muscle group, meaning your back workouts will be as brutal as your lower body training sessions. Plus, since it is a large muscle group, it will help burn more calories than the small muscle group workouts. If you feel fresh and energetic after a back workout, know that you didn’t go all-out in that training session.
Unlike smaller muscle groups like the biceps, which have only two muscle heads, your back consists of several muscles, such as the latissimus dorsi, rhomboids, teres major and minor, trapezius, posterior delts, and erector spinae. Furthermore, your back is divided into two portions — upper and lower. You must train your back from different angles, using different grips for overall posterior chain development.
In this article, we go over the back anatomy, the five best back workouts for women, the importance and benefits of building a strong back for women, and tips to make the most of your workouts.
Back Anatomy
Understanding your back anatomy can help you program an effective back workout and ensure there are no weak areas in your back. Here are the back muscles you should know about for building an eye-catching backline:
Back Anatomy Muscles
Latissimus Dorsi
Latissimus dorsi, or lats, are the biggest back muscle. A pair of developed lats can accentuate your V-taper. They are located on both sides of the middle and lower back and are responsible for moving your arms down and toward the body.
Teres Major and Minor
These are present at the back of the shoulder and are responsible for rotating the arm and stabilizing the shoulder joint.
Rhomboids
They are located on your upper back underneath the trapezius muscle and between the shoulder blades. They help maintain a good posture and stabilize your shoulder blades.
Erector Spinae
These are a group of muscles present on both sides of the spinal column. As their name suggests, they help maintain an erect spine and allow for bending and twisting movements. The erector spinae is also referred to as the lower back.
Posterior Deltoids
Although the posterior or rear delts are located on your back, they are mostly trained in a shoulder workout. They help move your arm backward.
Trapezius
The trapezius muscle is located over the back of the neck and shoulders and extends down to the middle of the back. It helps moves the head and shoulder blades. Many people train their traps in a shoulder workout.
Best Back Workouts For Women
Our goal with these workouts is to build a toned back that looks amazing and improves your overall health and fitness. We have included five workouts in this article for ladies at different experience levels. The resistance band back workout is perfect for when you don’t have access to a gym.
Beginner Back Workout For Women
Women that are just starting their fitness journey should perform foundational exercises that will help them build a solid base and improve their mind-muscle connection. Your focus with this workout will be to drill each movement until you know them, like the back of your hand.
Seek expert advice to learn the correct technique for performing these exercises. Hiring a personal trainer can expedite your learning process, lower your risk of injury, and fast-track your progress.
Advanced Back Workout For Women
Ladies with at least a few months of lifting experience should graduate to the advanced back workout. Use an assisted pull-up machine or a spotter if you cannot perform bodyweight pull-ups.
You’ll also be doing rear delt flyes for the rear delts and barbell shrugs for the trapezius muscle in this workout. Expect this workout to take between 45-60 minutes. However, keep your rest durations between sets limited to 30-60 seconds to maintain a high training intensity.
Machine-Only Back Workout For Women
Machines follow a fixed movement trajectory, which can help you focus on establishing a mind-muscle connection and achieve muscle-ripping pumps. Plus, machine workouts take less time than free-weight workouts, which is a boon for lifters on a tight schedule.
You can swap the GHD back extension with a conventional back extension if you lack the posterior chain strength to perform the exercise. Focus on contracting your muscles with each rep to get the most out of this workout.
Resistance Band Back Workout For Women
The resistance band back workout is an excellent place to start for beginners and when you are traveling. Contrary to what most people think, you don’t always need free weights or machines to build a chiseled physique. Resistance bands help maintain constant tension on your muscles throughout the motion, helping induce hypertrophy.
We recommend using loop bands for this workout; grab the heaviest bands you can find. Furthermore, you’ll be performing a higher number of reps in this workout than in the other workouts to ensure you’re not leaving anything in the tank.
HIIT Back Workout For Women
HIIT, or high-intensity interval training, workouts consist of short periods of high-intensity exercises followed by periods of rest or lower-intensity exercises. A HIIT workout aims to push your body to its maximum capacity in a short period. It is a great training protocol for breaking through strength and muscle plateaus. Furthermore, it is perfect for folks that can only dedicate 30 minutes to a training regimen.
You’ll perform five rounds of this HIIT workout. Do each exercise for 30 seconds and rest for 10 seconds after completing a movement. You are allowed a 60-second rest after completing each round.
Read more: HIIT Workouts for Women: 6 Best Workout Plans, Benefits, and Pro Tips
Back Workout Tips For Women
Follow these tips for carving a head-turning back:
Focus on Form
Beginners must prioritize lifting with the correct form instead of chasing heavy weights. Using a picture-perfect form maximizes an exercise’s muscle and strength-building potential and reduces the risk of injury.
Plus, focus on contracting your target muscles with each rep. Going through the motions for the sake of it won’t cut it. Slow down your rep tempo if you have trouble establishing a mind-muscle connection.
Progressive Overload
Progressive overload is the name of the game when it comes to building muscle mass. You could make your workouts harder and increase your training volume and intensity by lifting heavier, doing more sets and reps, shortening your rest duration between sets, or incorporating advanced training techniques like super sets, drop sets, intraset stretching, rest-pause sets, etc.
You must gradually increase the demands placed on your muscles. It will challenge your muscles to adapt and improve, leading to gains in strength, muscle size, and overall fitness.
You Don’t Have To Reinvent The Wheel
Many exercisers tend to do too much too soon. These people think that doing out-of-the-box exercises will speed up their progress. However, this is not the case. You don’t have to join a cult or follow a charlatan to build a chiseled back. The exercises mentioned in this article are all you need to develop a shapely back.
Nutrition and Sleep
You cannot out-train a bad diet and recovery program. You must back your workouts with a balanced diet to optimize muscle growth. Further, a seven to eight-hour sleep is a must as it allows your body enough time to rest and recuperate between workouts.
Since the back is a large muscle group, perform one of the workouts mentioned in this article weekly. As you gain more experience, you could perform two weekly back workouts to expedite your back growth. However, avoid doing more than two back workouts a week as it increases your risk of overtraining.
Change Grips
Performing the same exercise with a different hand grip can target your muscles differently. For example, you could do a barbell bent-over row with an underhand or overhand grip. You could also perform the seated cable row with a supinated, pronated, or neutral grip to train your back from different angles.
Why Building a Strong Back is Important For Women?
Incorporating back workouts into your training regimen entails the following advantages:
Improves Aesthetics
Building a bigger back can add to your physique aesthetics. It can create an illusion of a smaller waist and broader shoulders, which are essential features of an hourglass figure. A diced back will also make you look stunning in backless dresses and tank tops.
Promotes a Better Posture
Most of us spend the majority of our days hunched over a computer or phone screen. Training our backs can help improve our posture by strengthening the muscles responsible for maintaining a proper upright position. Plus, back exercises can increase back flexibility and mobility, which can help pull the shoulders back, open up the chest, and align the spine in its natural S-shape curvature.
Helps Burns Calories
Your back is the second-biggest muscle group. Performing an intense back workout that involves compound (multi-joint) exercises can spike your heart rate, helping you burn a decent amount of calories. Plus, back workouts help increase overall muscle mass and boost metabolism, both of which lead to a higher calorie expenditure even when you are physically inactive. However, if your goal is to burn more calories, you should follow the HIIT back workout listed in this article.
Boosts Functionality
Most back exercises are functional movements that improve overall strength, mobility, and stability. Your back plays a crucial role in many everyday activities, such as lifting, carrying, and bending, as well as in sports and other physical activities. Balanced back workouts improve your performance in all these activities while reducing your risk of injury.
Help Alleviate Lower Back Pain
Training your spine-supporting muscles (erector spinae) in your back workout can help alleviate and reduce the risk of lower back pain, especially in women with large breasts or those that remain seated for most of the day.
FAQs
How can women build a toned back?
Building a chiseled back requires following a balanced back workout focusing on building muscle mass and strength. Perform one of the workouts given in this article weekly for 12 weeks to see noticeable back development. You could also switch between the workouts to add variety to your training regimen.
Should men and women follow different back workouts?
No exercise is gender specific. The workouts in this article can be used by men and women alike. With that said, girls don’t need to worry about building a cobra back like their male counterparts. The ladies don’t produce enough testosterone to build the same amount of muscle mass as men.
How to program a back workout for hypertrophy and strength gains?
The number of sets, reps, and exercises you perform and your workout intensity will depend on your training goals. Perform 3 sets of 8-12 reps of an exercise and rest 60-90 minutes between sets if you want to build muscle mass. On the other hand, do 3-5 sets of 1-5 reps of an exercise with 2-5 minutes of rest between sets if you want to maximize strength. [1]
Wrapping Up
To carry the heavy burden of the world, you must have a strong back. The five back workouts for women listed in this article will help improve your posture, boost your functional fitness and calorie expenditure, and enhance your physique aesthetics.
These workouts are apt for women of any experience level. Furthermore, the HIIT back training session is great for ladies on a tight schedule. Pair these workouts with a balanced recovery program for optimal results. Best of luck!
References
Krzysztofik M, Wilk M, Wojdała G, Gołaś A. Maximizing Muscle Hypertrophy: A Systematic Review of Advanced Resistance Training Techniques and Methods. Int J Environ Res Public Health. 2019 Dec 4;16(24):4897. doi: 10.3390/ijerph16244897. PMID: 31817252; PMCID: PMC6950543.
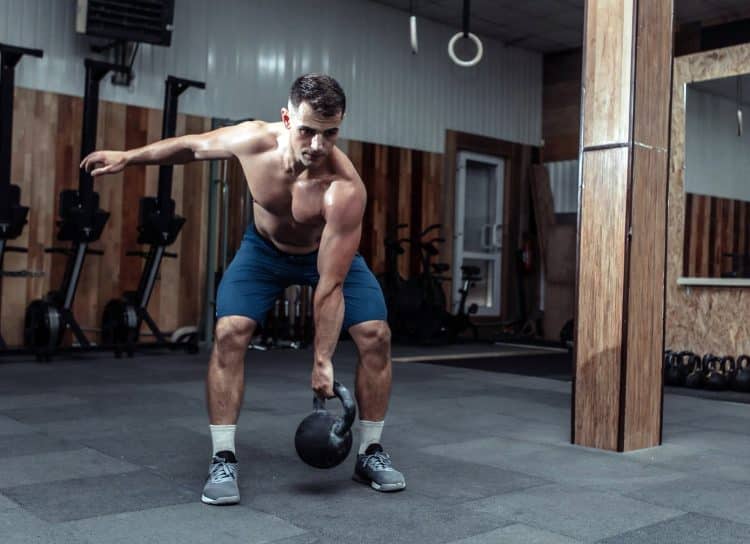
Kettlebell Workouts for Functional Fitness
When it comes to working out, there are many variables. Should you use a high or low rep range? Is a fast or slow training tempo best? Should you focus on compound or isolation exercises? Your training goals will largely determine the answers to these questions.
If your goal is to develop a beach-ready muscular physique, then training individual muscle groups is the way to go. But if you want to build a leaner, fitter, more athletic body that you can use in the real world, you should incorporate functional fitness into your workouts.
When it comes to functional fitness exercises, kettlebells are an excellent choice. Kettlebells challenge your body in ways that replicate real-world movements to improve your functional strength, stability, and coordination. In this article, we lay out eight fantastic kettlebell functional fitness exercises and then program them into three super-effective workouts you can alternate between to build a functionally fit physique.
What is Functional Muscle Training?
Workouts consisting of exercises that stimulate multiple muscles rather than isolating particular muscles are called functional training workouts. These types of exercises force your muscles to work together and move through multiple joints. This improves neuromuscular control and coordination.
Functional muscle training enhances our capacity to carry out everyday tasks like getting out of a chair or carrying a sack of potatoes.
Any exercise that will help you operate better by strengthening your heart, lungs, or muscles can be categorized as a functional exercise. However, there is a range of functionality for how effective an activity will be.
Exercises that isolate muscles, like the seated leg extension, are at the lowest end of that spectrum. Movements like the squat that imitate our everyday actions are at the other end of the spectrum. We all squat down frequently throughout the day, whether it’s to use the restroom or sit in a chair. Exercises like this that mimic practical movement patterns will improve a person’s flexibility, balance, and coordination.
Enhanced Movement Patterns
Rather than being based on isolated muscle movement, functional training is based on movement patterns. That’s the way that our bodies were made to work. We operate best when we are in an upright position with our feet set on the ground.
In this position, we can execute the following movement patterns:
Squat
Hinge
Lunge
Overhead Press
Chest Press
Core Rotation
Functional movements that mimic these movement patterns should form the basis of any functional fitness workouts. Doing such exercises will improve your strength and performance through the movement pattern you are performing.
Why Use Kettlebells for Functional Fitness?
Kettlebells have come out of the corners of the gym in recent years and entered center stage. That’s because people have become educated on how these strangely shaped weights can improve their workouts. They are especially good for functional training. Here are three reasons why kettlebells deserve a key role in your functional fitness program:
Offset Center of Gravity
The offset center of gravity of the weight is one of the key characteristics distinguishing kettlebells from dumbbells. That’s because when you grab a kettlebell’s handle, its center of gravity is about 6 to 8 inches away from your hand. That makes the weight harder to handle.
This is why every exercise you perform, from standard strength exercises to more difficult kettlebell moves like swings, calls for precise technique and greater muscle stimulation than you can get with dumbbells.
Greater Core Involvement
The instability of a kettlebell means that your core muscles have to be constantly working to maintain your posture and balance. You need to keep your core tight and engaged far more than if you were using a barbell or dumbbells. This core engagement will strengthen your abs, erector spinae, obliques, and intercostals.
Improved Athleticism
Developing your grip strength is one of the key benefits of including kettlebells in your workout program. That’s because the handle thickness and weight displacement require your fingers, hands, and forearms to provide perfect control.
Kettlebell training will also improve your cardio endurance. Most kettlebell exercises are compound, multi-joint moves that require a lot of energy to complete. They’ll tax your heart and lungs as they demand more oxygen. As a result, your muscular and cardiovascular endurance will both increase.
Dynamic kettlebell exercises like swings, snatches, and cleans develop explosive strength. This is an essential requirement for athletes, whether they’re smashing into an opponent on the football field or scrapping for a rebound on a basketball court.
8 Key Kettlebell Moves
Here are the fundamental kettlebell exercises that should feature in functional fitness workouts:
1. Kettlebell Swing
The kettlebell swing burns a ton of calories as it helps develop explosive power. Power largely emanates from the ability to execute a strong hip thrust, which is the key motion involved in this exercise.
Muscles Worked:
Glutes
Hamstrings
Quadriceps
Core
Back
Shoulders
Step-by-Step Guide:
Stand with your feet shoulder-width apart, with your weight on your heels.
Rest the kettlebell on the floor between your feet.
Look down at the ground six feet in front of you.
Sit back into your hips and reach down to grab the handle with both hands in an overhand grip.
Swing the bell behind you, then aggressively snap your hips forward as you stand up. As you do this, extend your spine and squeeze your butt.
Bring your arms up to chest level.
Immediately return to the bottom hike position and move into the next rep.
2. Goblet Squat
The kettlebell goblet squat helps you to maintain an upright stance by placing the weight in front of your body. To keep the weight centered over your feet, you have to keep your core tight, your lower back pulled in, and your chest up.
Muscles Worked:
Quadriceps
Glutes
Hamstrings
Core
Step-by-Step Guide:
Stand with your feet shoulder-width apart with your toes slightly pointed outward.
Hold a kettlebell with both hands hard up against your chest.
Hinge at the hips to go down into a full squat position, maintaining a neutral spine and keeping your chest up.
Push the heels into the floor to come back to an upright position.
3. Roll Up, Roll Down
The roll up, roll down is a dynamic, explosive exercise that combines hip and torso extension with multiplanar movement and ballistic strength. Start with a lighter kettlebell until you get comfortable with the actions involved.
Muscles Worked:
Abdominals
Lower back
Hip flexors
Shoulders
Forearms
Step-by-Step Guide:
Stand with your feet shoulder-width apart in front of an exercise mat. Hold a kettlebell at arm’s length in front of you with both hands.
Hinge at the hips to descend into a deep squat.
Continue going down until your butt is sitting on the mat.
Roll back as you bring the weight up and over your head.
Now reverse the direction to roll back forward as you bring the weight back overhead and down.
Use the forward momentum to drive yourself back up to a standing position.
4. Two-Handed Overhead Squat
The overhead kettlebell squat fully engages the back extensor and scapular muscles while also working the lower body. That is going to improve your performance of propulsions movements like sprinting, kicking, jumping, or running.
The overhead squat is a challenging exercise that requires quite a lot of balance and coordination. I recommend working up to it by starting with bodyweight squats with your hands extended overhead. Then advance to doing the exercise with a single kettlebell held with both hands overhead. Only when you’re comfortable with that exercise should you advance to the two-handed overhead squat.
Muscles Worked:
Quadriceps
Glutes
Hamstrings
Core
Shoulders
Triceps
Forearms
Step-By-Step Guide:
Stand with your feet shoulder-width apart and slightly turned out and a pair of kettlebells extended overhead in a lockout position. Keep your arms close to your head and your palms facing forward.
Maintaining an upright body and neutral spine, hinge at the hips to lower to a full squat position. Keep your arms locked out throughout the entire motion.
Push through your heels to return to the start position.
5. Overhead Walking Lunge
This exercise represents the ideal functional lower-body exercise. That’s because it combines flexion, extension, and propulsion all in one dynamic movement. Then there’s the overhead part of the movement, which improves posture and increases core stability. Moving forward with an asymmetrical load also strongly engages the obliques.
Muscles Worked:
Quadriceps
Glutes
Hamstrings
Core
Shoulders
Triceps
Forearms
Step-by-Step Guide:
Stand with your feet shoulder-width apart and a kettlebell held in each arm at your sides. Maintain an upright posture with your chest up and core tight.
Bring your right arm up above your head, locking out the elbow. The left arm should remain at your side.
Take a large step forward with your left leg and lunge down to bring the rear knee toward the floor.
Now follow through with the right leg to take another forward step.
Continue this forward motion for five steps, then turn around and return to the start position.
On the next set, raise your left arm overhead.
6. Squat & Press
The squat and press is a great functional exercise that forces your lower body, core, and upper body to work together to execute the movement. If you’re a rugby player, a martial artist, a basketballer, or a track athlete, this exercise is an absolute must to boost your functional fitness.
Muscles Worked:
Quadriceps
Glutes
Hamstrings
Core
Shoulders
Triceps
Forearms
Step-by-Step Guide:
Stand with your feet shoulder-width apart and a kettlebell in your right hand at your side. Another kettlebell should be on the floor on the inside of your left foot.
Now raise your right arm overhead and lock out your elbow.
Turn both feet to the left and look up at the kettlebell above your head.
Keeping your torso facing forward, press your right hip back as you lean down to grab the other kettlebell with your left hand.
Come back to an upright position. Now your right arm will still be above your head with your left arm at your side.
Perform all your reps on one side, then repeat with the left arm extended overhead.
7. Kettlebell Deadlift
While the kettlebell deadlift won’t allow you to lift as much weight as a standard barbell version of the exercise, it does allow you to achieve a fuller range of movement. The kettlebell can travel well beyond the tibiae, towards the heels, whereas the barbell presses against and stops at the tibiae. This allows you to extend the hip extensor chain more effectively.
Muscles Worked:
Glutes
Hamstrings
Quadriceps
Core
Back
Forearms
Step-by-Step Guide:
With your legs bent, sit back into a half-squat as though you were going to jump up. The chest should be up with the shoulder blades squeezed together. Your back should be naturally arched. The kettlebell should be held with your arms extended and level with your heels.
Extend the pelvis up and forward while keeping the scapulae together until you are upright.
Slowly return to the half-squat position so that the kettlebells end up at floor level. Maintain an upright posture with natural back curvature.
8. Renegade Row
The renegade row is a combination of a plank and a row. As such, it does a great job of working both the lats and the core muscles. Every time you bring an arm off the floor, you will engage the entire core area as it balances, stabilizes, and supports your body. This is an all-encompassing exercise that serves as the foundation for athletic training in all activities that place significant stress on the core, including combat sports, martial arts, wrestling, judo, rugby, American football, tennis, and baseball.
Muscle worked:
Latissimus dorsi
Rhomboids
Trapezius
Biceps
Triceps
Shoulders
Core
Step-by-Step Guide:
Get down in the high push-up position with kettlebells in your hands. Your feet should be shoulder-width apart, arms fully extended, and shoulders directly above the kettlebells.
Row the right hand kettlebell up toward your ribcage.
Lower back to the start position under control.
Repeat with the left hand kettlebell.
Continue alternating sides to complete your rep count.
Functional Fitness Kettlebell Workouts
Now that we know how to do the eight key fundamental kettlebell exercises for functional fitness, let’s put them together in the form of three workouts that you can alternate over the course of your workout week.
Workout A: Kettlebell HIIT Functional Fitness Circuit
Method: Perform each exercise for 40 seconds. Then rest for exactly 20 seconds before beginning the next exercise. Complete all eight exercises in eight minutes, then rest for exactly two minutes. Work up to doing four rounds of this HIIT circuit.
Warm-Up: Three minutes of medium intensity on a rowing machine.
Kettlebell Swing
Goblet Squat
Roll Up, Roll Down
Two-Handed Overhead Squat
Overhead Walking Lunge
Squat & Press
Kettlebell Deadlift
Renegade Row
Cool-Down: Three minutes of medium intensity on a rowing machine.
Workout B: EMOM Kettlebell Functional Fitness Workout
EMOM stands for every minute on the minute. It involves starting an exercise at the start of every new minute and then resting for any remaining time within the minute once your reps are complete. So, you begin by doing 15 reps of kettlebell swings, which takes 48 seconds. That leaves you with 12 seconds to recover before going into the next exercise when 60 seconds is up. You continue this pattern to complete all five exercises.
At the end of the round, rest for two minutes. Work up to completing eight rounds.
Warm-Up: Three minutes of medium intensity on a rowing machine.
Kettlebell Swing: 15 reps
Goblet Squat: 10 reps
Two-Handed Overhead Squat: 8 reps
Renegade Row: 6 reps (per arm)
Squat & Press: 5 reps
Cool-Down: Three minutes of medium intensity on a rowing machine.
Workout C: Straight Sets Kettlebell Functional Fitness Workout
You should rest 45-60 seconds between each set for this straight-set workout.
Warm-Up: Three minutes of medium intensity on a rowing machine.
Kettlebell Deadlift: 3 sets of 15 reps
Kettlebell Swings: 3 sets of 20 reps
Renegade Row: 3 sets of 12 reps (each arm)
Squat & Press: 3 sets of 12 reps
Roll Up, Roll Down: 3 sets of 8 reps
Overhead Walking Lunge: 3 sets of 10 forward steps
Cool-Down: Three minutes of medium intensity on a rowing machine.
Wrap Up
Kettlebells are perfect for functional fitness. You now have a list of eight of the best functional fitness kettlebell exercises, along with three challenging workouts to effectively work your entire body. Take the time to learn how to do the exercises well, and then add these functional fitness workouts to your schedule. Begin with one per week, gradually increasing to three sessions, spaced at least a day apart. You’ll soon be rewarded with a healthier, functional, and athletic body.
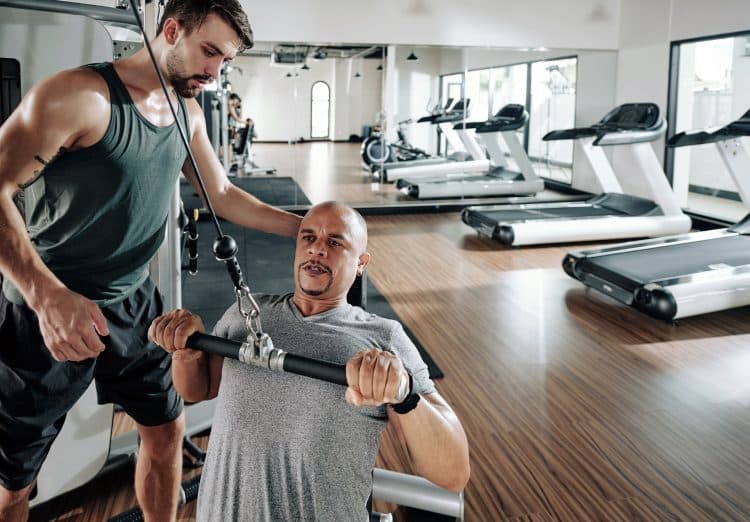
Cable Superset Workout: More Muscle in Less Time
Building muscle, getting stronger, losing body fat, improving your fitness – while these are all excellent training goals, they can also be time-consuming. That’s why most pros invariably achieve better results than amateurs; they get paid to train, so time is no object.
The average pro doesn’t have to balance their workouts with holding down a full-time job and all the demands that come with conventional employment. They don’t have to try and squeeze in a workout before going to the office, during a lunch break, or after work when they’d rather be chilling at home.
Pros can train when they want for as long as they want. Needless to say, this is a huge advantage. That’s why average folk should avoid following programs designed for pros; they were not the intended audience.
Because time is at such a premium, the average exerciser needs to learn how to train smarter and not longer. We must find ways to get more done in less time, maximizing our training results.
One way to do this is with supersets, and using a cable machine can also help.
So, for all of the people who have to balance their workouts with their careers, here is a cable superset workout designed to get you great results in less time.
Cables and Supersets – A Match Made in Heaven
Your muscles have a hard time differentiating between different types of training equipment. In truth, they don’t really know or care if you’re doing barbell or cable curls for your biceps. So long as you work hard and often enough, they’ll respond by getting stronger and bigger.
That said, using cables does have a few advantages over other types of training:
Quick exercise setup and weight adjustments
It’ll take you no more than a few seconds to attach the appropriate handle to a cable machine and slam in the selector pin to adjust the weight. Less time setting up means shorter workouts or that you can cram more exercises and sets into your training session.
Either way, cable machines make for a very time-efficient workout.
More constant muscle tension
Cable machines tend to keep your muscles under more constant tension compared to the same exercise done with freeweights. This makes each and every rep you perform more effective, so you won’t need to do as many sets per muscle group.
For example, compare cable crossovers with dumbbell flys. With dumbbell flys, the tension on your muscles peaks when your arms are far apart but almost vanishes when your arms come together. In contrast, cable crossovers keep your pecs under tension for the entire range of motion.
Perfect for drop sets
When time is of the essence, you may want to use intensity-boosting training systems so you can fatigue your muscles faster. One way to do this is with drop sets.
To do a drop set, rep out to failure, reduce (or drop) the weight by 10-20%, and then rep out again. The selectorized weight stack on most cable machines means you can reduce the weight in seconds, making your workout even more time-efficient.
This simple system lets you train well beyond your usual failure point. A couple of drop sets will soon fatigue your muscles, so you don’t have to do a long, time-consuming workout.
A safer, more joint-friendly workout
Training to failure with cables is a safe proposition. There are no bars to get pinned under, and dropping a weight will cause nothing more serious than a loud crash. The same cannot be said of most barbell and dumbbell exercises.
In addition, most cable exercises are easier on your joints than the same exercise performed with freeweights. There is less end-to-end joint compression, leading to less wear and tear. In addition, cable exercises can easily be modified to work around any aches, pains, or limitations you might have.
Finally, you can train to failure without a spotter, so you won’t have to wait for someone to help you when you just want to get on and train.
Perfect for supersets
Supersets and cable machines go together like peanut butter and jelly – they complement one another perfectly. Transitioning from one exercise to the next takes no more than a couple of seconds, and you can train your entire body on a single or double cable machine.
And speaking of supersets, their benefits include…
Less time spent resting
Most strength training workouts involve rest than actual training time. Lifters typically rest 60-90 seconds between every set they perform. Supersets involve doing two exercises back-to-back, eliminating half of your rests. With less resting, you’ll be in and out of the gym in half the time.
A structurally balanced workout
Using supersets makes it much easier to train opposing muscle groups equally. For example, by pairing biceps curls with triceps pushdowns, you ensure that both main upper arm muscles get the same volume of training.
Balancing your pushes and pulls will help develop an aesthetically and structurally balanced physique.
Cable Superset Workout – Program Overview
Short on time? Got access to a cable machine? Like supersets? Then this is the workout for you!
This program involves three workouts per week, performed on non-consecutive days, e.g., Monday, Wednesday, and Friday. This provides a good balance between training and recovery and works well for most average trainees.
All exercises are to be performed as paired supersets. For example, do exercise 1a and immediately follow it with exercise 1b. Rest for the designated time and then repeat the pairing. Do the specified number of sets and then move on to the next pairing (2a and 2b). Simple, but effective!
Workout 1 – Horizontal Push/Pull & Arms
By working in the horizontal plane, this workout hits your chest and upper back, specifically your mid-traps and rhomboids, with a bit of lats thrown in for good measure. We close things out with some direct upper arms training because everyone wants a ticket to the gun show!
Exercise
Sets
Reps
Recovery
1a
Cable supine chest press
4
12-20
60-90 seconds
1b
Cable seated row
2a
Cable crossover
4
12-20
60-90 seconds
2b
Cable reverse fly
3a
Cable incline fly
3
12-20
60-90 seconds
3b
Cable face pull
4a
Cable biceps curl
3
12-20
60-90 seconds
4b
Cable triceps pushdown
Workout 2 – Legs and core
Friends don’t let friends skip leg day! Your legs make up at least 40% of your total muscle mass, and it would be a crime against bodybuilding not to give you a cable superset leg workout to try.
This workout focuses on your quads, hamstrings, and glutes, but there are some direct abs exercises at the end for you to enjoy.
Exercise
Sets
Reps
Recovery
1a
Cable goblet squat
4
12-20
60-90 seconds
1b
Cable Romanian deadlift
2a
Cable standing leg extension
4
12-20
60-90 seconds
2b
Cable standing leg curl
3a
Cable hip abduction
3
12-20
60-90 seconds
3b
Cable hip adduction
4a
Cable woodchop
3
12-20
60-90 seconds
4b
Cable stability ball crunch
Workout 3 – Vertical Push/Pull & Arms
The workout emphasizes your shoulders and lats to build upper body width and hone your V-taper. And because no upper body workout is complete without some arm training, you’ll also work your biceps and triceps again.
Exercise
Sets
Reps
Recovery
1a
Cable shoulder press
4
12-20
60-90 seconds
1b
Cable single-arm pulldown
2a
Cable lateral raise
4
12-20
60-90 seconds
2b
Cable straight arm pulldown
3a
Cable upright row
3
12-20
60-90 seconds
3b
Cable Y pulldown
4a
Cable preacher curl
3
12-20
60-90 seconds
4b
Cable skull crusher
Cable Superset Workout – Exercise Descriptions
Get the most from your cable workouts by performing each exercise with perfect form. Proper exercise technique keeps the tension on your workout muscles and away from your joints. In contrast, the wrong technique makes your workout less effective and more likely to cause injury.
Workout 1 – Horizontal Push/Pull & Arms
1a. Cable supine chest press
This unique exercise looks like a bench press but feels more like a chest fly. The result is a challenging movement that will really pump up your pecs.
Target Muscles:
Pectoralis major, triceps, anterior deltoids.
Steps:
Place a bench in the center of a cable crossover machine. Attach D-shaped handles to the low pulleys.
Sit on the bench and take a handle in each hand. Lie on your back and pull the handles into your armpits. Turn your wrists so your palms face down your body.
Press your hands up and together so they meet above your chest.
Return your hands to your shoulders and repeat.
Tips:
Drive your feet into the floor for increased stability.
Keep your wrists straight.
Focus on pushing your hands inward as much as pushing them up to maximally engage your chest.
1b. Cable seated row
Cable seated rows are an excellent exercise for building a thicker, broader back. Unlike freeweight bent-over rows, this horizontal rowing movement is very lower back-friendly.
Target Muscles:
Latissimus dorsi, trapezius, rhomboids, posterior deltoids, biceps.
Steps:
Attach a neutral grip handle to a low pulley machine.
Sit with your legs outstretched and knees slightly bent. Grab the handle and sit up tall. Brace your core and pull your shoulders down and back.
Bend your arms and pull the handle into your abdomen. Keep your upper arms close to your sides.
Extend your arms and repeat.
Tips:
Drive your elbows back to maximize lat engagement.
Hinge forward slightly from your hips to stretch your lats but take care not to round your lower back.
Wear wrist straps or use gym chalk to enhance your grip if required.
2a. Cable crossover
Cable crossovers isolate your chest and hit all three heads of the pectoralis major. This exercise is great for creating shape and separation in your pecs.
Target Muscles:
Pectoralis major, anterior deltoids.
Steps:
Attach D-shaped handles to the high pulleys on a cable crossover machine.
Holding a handle in each hand, adopt a staggered stance and stand with your arms stretched out to the side.
Keeping your elbows slightly bent but rigid, sweep your arms forward and down so your hands meet in front of your hips.
Raise your arms, get a mild stretch in your chest, and repeat.
Tips:
Keep your torso upright to emphasize your chest and prevent turning this into a pressing exercise.
Keep your core braced throughout.
You can also do this exercise with your arms horizonal or moving from low to high.
2b. Cable reverse fly
This exercise works the muscles on the rear of your shoulders that oppose your chest. The trapezius, rhomboids, and posterior deltoids are critical for better posture and holding you upright against the pull of gravity.
Target Muscles:
Trapezius, rhomboids, posterior deltoids.
Steps:
Using a high cable machine, cross your hands and grip the balls/carabiners at the ends of the cables.
Move back 1-2 steps so your arms are extended in front of you, hands at about head height.
Keeping your elbows slightly bent but rigid, open your arms and pull the cables down and back to about hip height.
Raise your arms and repeat.
Tips:
You can also do this exercise with D-shaped handles if you don’t want to hold onto the cables directly.
Lead with your elbows and pull your shoulders back and down to make this exercise as effective as possible.
You can also do this exercise with your arms horizontal.
3a. Cable incline fly
Cable incline flys are so much more effective than the dumbbell variation that, once you try them, you’ll never go back to using freeweights to isolate your pecs. This exercise is VERY effective!
Target Muscles:
Pectoralis major, anterior deltoids.
Steps:
Place a bench in the center of a cable crossover machine. Raise the backrest to around 30 degrees. Attach D-shaped handles to the low pulleys.
Sit on the bench and take a handle in each hand. Lie on your back and extend your arms out so they’re roughly parallel to the floor.
Keeping your arms slightly bent but rigid, squeeze your hands up and together so they meet above your chest.
Lower your arms to get a stretch in your chest, and repeat.
Tips:
Experiment with different bench angles to see what feels most effective and comfortable.
The steeper the angle, the more you’ll hit your upper chest.
Imagine you are hugging a tree to perform this movement correctly.
3b. Cable face pull
Face pulls target your upper back, i.e., the mid-traps, rhomboids, and posterior deltoids. They’re an excellent exercise for improving your posture and will add some thickness to your upper back muscles. Face pulls are also good for your shoulder health and could prevent future shoulder joint pain.
Target Muscles:
Trapezius, rhomboids, posterior deltoids, biceps.
Steps:
Attach a rope handle to a head-high cable machine.
Take one end of the handle in each hand and, with straight arms, step back into a staggered stance.
Bend your elbows and pull the handles into either side of your head. Keep your elbows up to fully engage your upper back.
Extend your arms and repeat.
Tips:
Lead with your elbows and drive them back to emphasize your upper back muscles.
Don’t go too heavy, as doing so will make you lower your elbows and use your lats more than your upper back.
Raise your hands by externally rotating your shoulders to also work your rotator cuff (supraspinatus, infraspinatus, teres minor, and subscapularis).
4a. Cable biceps curl
The cable biceps curl is a proven arm builder that keeps your arm flexors under near-constant tension to deliver a skin-splitting pump. Paired with triceps pushdowns, this final superset will leave you looking and feeling swole AF!
Target Muscles:
Biceps, brachialis, brachioradialis.
Steps:
Attach a straight bar to a low cable machine. Hold the bar with an underhand, shoulder-width grip, upper arms by your sides.
Brace your core and pull your shoulders down and back.
Bend your elbows and curl the handle up to your shoulders.
Extend your arms and repeat.
Tips:
Use a rope handle and do cable hammer curls to target your brachioradialis and brachialis muscles more.
Use an EZ bar to take pressure off your wrists and elbows.
Try a palms-down grip to challenge your forearms and improve your grip.
4b. Cable triceps pushdown
Cable pushdowns are one of the most popular triceps exercises. They’re simple, effective, and ideal for beginners and more experienced lifters. Supersetting them with cable biceps curls provides a great way to pump up your arms without having to switch machines.
Muscles Worked:
Triceps.
Steps:
Attach a straight bar to a high cable pulley. Grip the bar with a shoulder-width overhand grip.
Pull your upper arms into your sides, brace your core, and set your shoulders down and back.
Extend your arms and press the bar down to your thighs. Pause for 1-2 seconds.
Bend your arms as far as possible without letting your upper arms move away from your sides.
Continue for the specified number of reps.
Tips:
You can also perform this exercise with a V-bar or a rope handle.
For variation, try using an underhand grip.
Keep your torso uptight so you don’t turn this into a pressing exercise.
Workout 2 – Legs and Core
1a. Cable goblet squat
Muscles worked:
Most people are more than familiar with kettlebell and dumbbell goblet squats. After all, they’re an excellent lower body exercise. However, the cable variation is just as effective and could be a better option for some people as it’s even more lower back-friendly than the original version.
Steps:
Attach a straight bar to a low pulley. Hold it in front of your chest, just below your chin. Pull your shoulders back and down and brace your core.
Take a small step back and stand with your feet about shoulder-distance apart, toes turned slightly outward.
Bend your legs and descend until your thighs are roughly parallel to the floor. Do not round your lower back.
Stand upright and repeat.
Tips:
Work your glutes harder by wearing a booty band around your knees.
Increase quads engagement by resting your heels on weight plates.
Experiment with your stance (wider, closer) to see which feels the most comfortable.
1b. Cable Romanian deadlift
Romanian deadlifts are one of the best posterior chain exercises around. Not only are they a great muscle developer, but they’re also an effective move for mobilizing and stretching your hips and hamstrings. Cable Romanian deadlifts are easier on your lower back than the barbell or dumbbell variations.
Muscles Worked:
Gluteus maximus, hamstrings, core.
Steps:
Attach a bar or rope handle to a low pulley. Hold the handle and stand up, taking 1-2 steps back to tension the cable.
Stand with your feet hip-distance apart, knees slightly bent. Brace your core and set your shoulders.
Bend over from your hips and reach forward with your arms. Do not round your lower back, as doing so could lead to injury.
Drive your hips forward and stand back up.
Continue for the specified number of reps.
Tips:
Move further back from the weight stack to make this exercise more hip-centric.
Vary your stance width to see what works best and feels more comfortable.
Make this exercise harder by standing on one leg – single-leg cable stiff-legged deadlifts.
2a. Cable standing leg extension
While regular leg extensions are an effective quadriceps exercise, one of the four quad muscles doesn’t get such a great workout – the rectus femoris. That’s because this muscle crosses your hips and knees, and sitting with your hip flexed puts the rectus femoris into a relaxed position, so it cannot contract very well. This standing variation fixes that problem.
Muscles worked:
Quadriceps, hip flexors, core.
Wearing an ankle strap, stand with your back to the weight stack. Take 1-2 steps forward. Bend your knee and move your hip backward.
Drive your knee forward and extend your leg.
Return to the starting position and repeat.
Switch legs and do the same number of reps on the other side.
Tips:
Keep your supporting knee slightly bent for balance.
Brace your core to prevent unwanted hip and lumbar spine movement.
You can also do this exercise with a resistance band.
2b. Cable standing leg curl
The hamstrings are a biaxial muscle, meaning they cross two joints – your hips and knees. As such, they are responsible for two movements; knee flexion and hip extension. Cable standing leg curls are one of the few exercises to address both of these functions simultaneously.
Muscles Worked:
Hamstrings, gluteus maximus, core.
Steps:
Wearing an ankle cuff, attach it to a low pulley machine and stand facing the weight stack. Shift your weight onto the other leg and brace your core. Use your arms for balance.
Extend your leg to the rear and bend your knee, curling your foot up toward your butt.
Lower your foot and repeat.
Tips:
Extend your hip more or less to change the feel of this exercise.
Keep your calf relaxed so your hamstrings do most of the work during this exercise.
Home exercisers can do this move with a resistance band.
3a. Cable hip abduction
Cable hip abductions work the muscles on the outside of your hips. Strengthening these muscles will improve lateral hip stability and help you sculpt a better-looking butt.
Muscles Worked:
Gluteus minimus, gluteus medius, tensor fascia latae.
Steps:
Put on an ankle cuff and attach it to a low pulley machine. Stand sideways-on to the weight stack with the cable running in front of your feet. Brace your core and hold on to the machine for balance.
Raise your leg out to the side as high as possible without twisting your hips.
Lower your leg and repeat.
Switch legs and do the same number of reps on the other side.
Tips:
Rotate your hip inward slightly to emphasize the hip abductor muscles.
Keep your supporting leg slightly bent for better stability and balance.
You can also do this exercise with a resistance band.
3b. Cable hip adduction
The adductor muscles are located on the inside of your thighs and hips. Like the abductors, these muscles help stabilize your hips. Stronger hip adductors will lower your risk of groin strain during activities that involve running, sprinting, lunging, and kicking.
Muscles Worked:
Adductor longus, adductor brevis, adductor magnus.
Steps:
Put on an ankle cuff and attach it to a low pulley machine. Stand sideways-on to the weight stack with the cuff on your innermost leg.
Cross your leg in front of the other without twisting your hips.
Lower your leg and repeat.
Switch legs and do the same number of reps on the other side.
Tips:
Brace your core to stabilize your lumbar spine and prevent unwanted movement.
Bend your supporting knee slightly for better balance.
Home exercisers can replicate this move with a resistance band.
4a. Cable woodchop
The cable woodchop is so called because it looks and feels a little like you are swinging an axe and cutting down a tress. This core rotation exercise will develop your obliques and strengthen your abs.
Muscles Worked:
Obliques, rectus abdominis, erector spinae.
Steps:
Attach a D-shaped handle to a high cable pulley. Hold the handle in both hands and then stand sideways onto the weight stack. Extend your arms and brace your core.
Rotate your upper body through 180 degrees, drawing a diagonal line with your hands.
Return to the starting position and repeat.
Turn around and do the same number of reps on the opposite side.
Tips:
Keep your arms slightly bent but rigid throughout.
You can also do this exercise in a half-kneeling position to stop you from using your legs.
For variety, use a low cable and raise your arms upward.
4b. Cable stability ball crunch
Bodyweight crunches are a great exercise, but once you’ve been training for a while, they often become too easy. Doing crunches on a stability ball with a cable makes them much more challenging and effective. High-rep crunches? Just say no!
Muscles Worked:
Rectus abdominis.
Steps:
Attach a rope handle to a low pulley machine. Place your stability ball on the floor next to your cable machine.
Sit on the ball and hold the handle over your shoulders so the cable is behind you.
Walk your feet forward and lean back so the ball sits in the natural curve of your lower back.
Contract your abs, flex your spine, and curl your shoulders toward your hips.
Lie back down, get a mild stretch on your abs, and repeat.
Tips:
Anchor your feet to prevent being pulled backward over the ball.
Exhale as you lift your shoulders to increase abs engagement.
Move your feet further apart to increase stability and make this exercise easier. Bring your feet closer together to decrease stability and make it more challenging.
Workout 3 – Vertical Push/Pull & Arms
1a. Cable shoulder press
Cable shoulder presses look like any other overhead pressing exercise but feel very different. The angle of the load changes how your deltoids are recruited, hitting your shoulders in an entirely new way. This is a unique exercise, and you’re going to love it!
Muscles Worked:
Deltoids, triceps.
Steps:
Attach a straight bar to a low pulley machine.
Pick up the handle and hold it in front of your shoulders so your elbows are below your wrists. Set your shoulders and brace your core. Take 1-2 small steps backward.
Press the handle upward and slightly back until your arms are extended.
Return to the starting position and repeat.
Tips:
Step back just enough that the cable doesn’t touch your face when your arms are overhead.
You can also do this exercise with a neutral grip.
Experiment with the width of your grip to see what feels most comfortable.
1b. Cable single-arm pulldown
Lat pulldowns are a popular lat-building exercise. However, training both sides of your back at the same time could lead to muscle imbalances. This unilateral version hits one side of your back at a time and will also enhance your mind-muscle connection.
Muscles Worked:
Latissimus dorsi, biceps, trapezius.
Steps:
Attach a D-shaped handle to a high pulley.
Hold the handle with one hand and sit or knee beneath it with your arm extended above you.
Leading with your elbow, bend your arm and pull the handle down to the front of your shoulder.
Extend your arm and repeat.
Do the same number of repetitions with the opposite arm.
Tips:
Use an overhand, underhand, or neutral grip as preferred.
Brace your core to keep your torso upright and balanced throughout.
Drive your elbow down and back to maximize lat engagement.
2a. Cable lateral raise
Lateral raises target the medial head of your deltoids, which is the part of your shoulders that give them their width. Doing this exercise with give you bigger, broader, more rounded shoulders.
Muscles Worked:
Deltoids.
Steps:
Attach a D-shaped handle to a low cable machine. Stand sideways onto the weight stack and hold the handle in your outside hand so the cable runs in front of your body.
Keeping your arm slightly bent but rigid, raise it up and out until it’s roughly parallel to the floor.
Lower the handle to the front of your hips and repeat.
Tips:
Hold onto the cable machine with your non-working arm for balance if required.
Lead with your elbows (and not your hands) to get more from this exercise.
You can also do this exercise with both arms at the same time if you wish:
2b. Cable straight arm pulldown
When it comes to training the lats, most people tend to focus on pulldowns and rows. While these are effective exercises, the lats can also be worked with straight arm extensions. This move hits your upper lats, and you should really feel it in your armpits. It also works the long head of your triceps.
Muscles worked:
Latissimus dorsi, triceps, posterior deltoid.
Steps:
Attach a straight bar to a high cable machine.
Hold the handle with an overhand, shoulder-width grip. Brace your abs and set your shoulders
With your arms slightly bent but rigid, push the bar down to your thighs.
Raise your arms, get a stretch in your lats, and repeat.
Tips:
You can do this exercise on a cable crossover or a lat pulldown machine.
Pause at the bottom of each rep to maximize muscle engagement.
Lead with your elbows, and avoid pressing the bar down with your triceps.
3a. Cable upright row
Upright rows are a slightly controversial exercise, and some coaches believe they’re bad for your shoulders. While that may be true for the straight barbell version, cable upright rows are more shoulder-friendly and usually better tolerated. Using a rope handle also allows for more comfortable movement.
Muscles Worked:
Deltoids, trapezius, biceps.
Steps:
Attach a rope handle to a low cable machine. Hold one end in each hand and stand up straight. Take a small step back, brace your abs, and set your shoulders.
Bend your arms and pull your elbows up until they’re above your hands.
Extend your arms and repeat.
Tips:
Keep your knees slightly bent for better balance and stability.
Squeeze your shoulders back to maximize mid-trap engagement.
Only pull your arms up as high as your shoulders comfortably allow.
3b. Cable Y pulldown
This unique exercise hits your lats from a very unusual angle. You should feel it in the middle of your back as well as the sides. Avoid going too heavy with this exercise. Instead, focus on contracting your lats as hard as possible.
Muscles Worked:
Latissimus dorsi, biceps, trapezius.
Steps:
Attach D-shaped handles to the high pulleys of a cable crossover machine. Hold a handle in each hand and kneel between the pulleys, arms raised to form a Y-shape.
Bend your arms and pull your elbows down and into your sides. Squeeze your shoulders down and back.
Extend your arms up and out and repeat.
Tips:
Try using an underhand, overhand, or neutral grip to see which you prefer.
Kneel on a folded exercise mat or foam pad for comfort.
Think about leading with your elbows rather than pulling with your hands to maximize lat engagement.
4a. Cable preacher curl
Preacher curls are usually done using a barbell or dumbbells. However, that means there is very little tension on your muscles at the top of each rep. Using a cable ensures there is tension on your biceps throughout the movement.
Muscles Worked:
Biceps, brachialis, brachioradialis.
Steps:
Move a preacher curl bench over to a low cable machine. Attach a straight bar to the low pulley.
Hold the bar with an underhand grip and rest your upper arms against the bench.
Bend your arms and curl the handle up until your forearms are roughly vertical.
Extend your arms and repeat.
Tips:
Use an EZ bar to make this exercise more comfortable.
You can also do this exercise using one arm at a time with a single D-shaped handle.
No preacher curl bench? No problem! Just use the inclined backrest of an adjustable exercise bench:
4b. Cable skull crusher
Cable skull crushers might sound like an MMA knockout move, but they’re actually a very effective triceps exercise. Utilizing a large range of motion, they take your triceps into a deep stretch, ensuring your arms get a great workout and an intense pump.
Muscles Worked:
Triceps.
Steps:
Place a flat bench next to your cable machine and attach a straight bar to the lowest pulley.
Lie on the bench with your head nearest the weight stack and hold the handle above your chest.
Keeping your upper arms stationary, bend your elbows and lower the bar to your forehead.
Extend your arms and repeat.
Tips:
You can also do this exercise while lying on the floor instead of a bench.
Use a rope handle to hit your triceps from a different angle.
Extend your shoulders backward to get an even deeper stretch in your triceps.
Cable Superset Workout – FAQs
Do you have a question about this workout, training with cables, or superset in general? No worries because we’ve got the answers!
1. Is this a cutting or a bulking program?
Contrary to popular belief, it’s not your workout that determines if you are cutting or bulking, but your diet. Bulking invariably involves consuming a surplus of calories, leading to rapid weight and muscle gain.
In contrast, cutting involves eating fewer calories, and this deficit leads to fat burning and weight loss.
Consequently, you can use this workout plan for bulking or cutting; you just need to adjust your diet according to your goals.
Read more about cutting vs. bulking here.
2. Can I change some of the exercises?
You are very welcome to make changes to any of these programs. However, make sure that whatever new exercises you choose are similar and work the same muscles. For example, while cable reverse lunges are an acceptable replacement for cable goblet squats, cable biceps curls are not.
Stick to the spirit of the program, and you’ll be fine. However, avoid making changes just for the sake of it or swapping out an exercise just because it’s hard. When it comes to building muscle, harder exercises are usually the most effective.
3. How should I warm up before these workouts?
Warming up prepares your muscles, joints, and mind for the workout you are about to do. It helps lower your risk of injury and also gets your muscles firing properly so you can work harder.
Warming up is usually a three-stage process:
Pulse raiser – 5-10 minutes of light cardio.
Dynamic flexibility and mobility – loosen up those muscles and joints.
Practice sets – a couple of light sets of your first 1-2 movements to prepare your body for the exercises you’re about to do.
It’s beyond the scope of this short Q&A to tell you how to warm up, but this in-depth guide should provide you with all the answers you seek.
4. What weights should I use for these workouts?
Because we don’t know how strong or experienced you are, we cannot tell you how much weight you should lift. Instead, you need to self-select your weights based on your performance.
If you can do more than 20 reps or any exercise, the load is too light. In contrast, if you are unable to do 12 reps, it’s too heavy. Pick weights that keep you in the sweet spot of 12-20 reps for all the exercises.
Remember, though, that you also need to make the workouts progressively more challenging by either increasing the weights or doing more reps whenever you feel you are able. It’s this progressive overload that keeps you moving forward.
5. Are there any supplements I can take that will enhance my progress?
While you don’t have to take supplements to get good results from your workouts, there are a few products that may help. However, even the most exotic or expensive substance won’t do anything for you if you aren’t training hard, eating right, and getting enough sleep.
Supplements that may be helpful include:
Closing Thoughts
While there is no need to use just cables or supersets in your workouts, doing so could be just the change you need to reignite your gains and bust out of your current training rut. Cable exercises are very joint-friendly and stress your muscles in a unique way. Supersets make great use of your training time and will save you from having to do two-hour workouts.
Cable machines and supersets? We think they’re a match made in heaven!